AMAZON multi-meters discounts AMAZON oscilloscope discounts
In the previous article, the application for the drive below is enabled and controlled by external switches or contacts. The National Electric Code (NEC) and local codes will specify the exact number of external controls required for each drive. The block diagram for the AC drive (variable-frequency drive) below shows typical control switches. You can note that at the upper left side of the drive that a NO (normally open) start push-button is connected to terminals TB2-7 and TB2-6, and an NC (normally closed) stop button is connected between terminals TB2-7 and TB2-8. The voltage for these circuits is provided internally from TB2-7. Power must be received continually through the stop push-button, and when the start push-button is depressed a pulse signal will be received and the drive's start sequence will begin. The start sequence will provide a ramp that's used to start the motor by slowly increasing the frequency and voltage. Anytime the stop button is opened, the drive will be stopped and if a ramp-down sequence is programmed, the drive will come to a gradual stop. If a ramp-down sequence is not programmed, the motor can be stopped with braking, or it can be allowed to coast to a stop.
The second set of switches provides a set of terminals where an external set of contacts from a control relay can be connected to provide a drive-enable function. When the contacts are connected to terminals TB2-11 and TB2-12, power will flow from terminal TB2-12 through the closed contacts to terminal TB2-11 to enable the drive. When the drive is in the enable condition, power is allowed to flow through the drive motor. Anytime these contacts are opened, the drive will become disabled, and the drive will not send voltage to the motor.
The drive can be switched from forward to reverse with a remote switch. The external switch is connected between terminals TB2-12 and TB2-13 to provide the reverse signal to the drive. Anytime the switch is closed and this circuit is made, the drive will reverse the phase sequence to the motor, which provides the same effect as physically swapping the leads U and W. Please not that whenever two leads of a three-phase power supply are switched, the phase relationship between these two leads is changed and the motor will run the opposite direction. This is an important feature of variable-frequency AC drives in that they can reverse the direction of the motor without using expensive reversing motor starters.
The jog push button can be connected across terminals TB2-14 and TB2-12 to provide the jog function. When this switch is close, the drive will check the jog parameter and produce the programmed frequency for this parameter. For example, if one requires the motor to turn at 20% rpm at jog speed, one needs to enter 20% into the program as the jog parameter and the drive will produce a frequency that causes the motor to rotate 20% anytime the jog button is depressed.
The external switches labeled as SW1, SW2 and SW3 are connected between terminals TB2-15 and terminals TB2-16, TB2-17, and TB2-18. If switch 1 is closed, the drive will provide the frequency to operate the drive at the frequency that's entered for program 1. This allows an operator to change fixed speeds for a drive if it's used as a stand-alone control. For example, one may have an application where one has a frequency drive controlling the speed of a conveyor. An operator can close switch 1, 2, or 3 to manually set the conveyor speed. If switch SW1 is closed, the drive will operate at 60% rpm, which is the value that's entered into for speed 1. If SW2 is closed, the drive will operate 89%, which is the value that's entered into the program for speed 2. If SW3 is closed, the drive will operate at 100% rpm, which is the speed entered into the program parameter for speed 3.
If you wanted to provide the operator with the ability to set the speed at any value from 0 - 100% rpm, you could connect a remote potentiometer 10 kΩ the potentiometer will provide the reference signal for the drive. Terminals TB2-2 and TB203 are used for an external voltage signal (0 - 10 volts DC), which could come from some other type of microprocessor such as a PLC. If the external control signal is going to be milliamp signal, terminals TB2-3 and TB2-4 would be used.
Two ports are provided on the right side of the drive to accept serial
inputs. A hand-held programmer is connected to port 1 and it can be used
for entering programming parameters or check parameters for troubleshooting.
The second serial port can be used to establish serial communications
from a portable computer, which allows the parameters to be loaded to
or from a disk or thumb drive. This provides a means of reloading the
parameters in case a programming problem or a drive is changed.
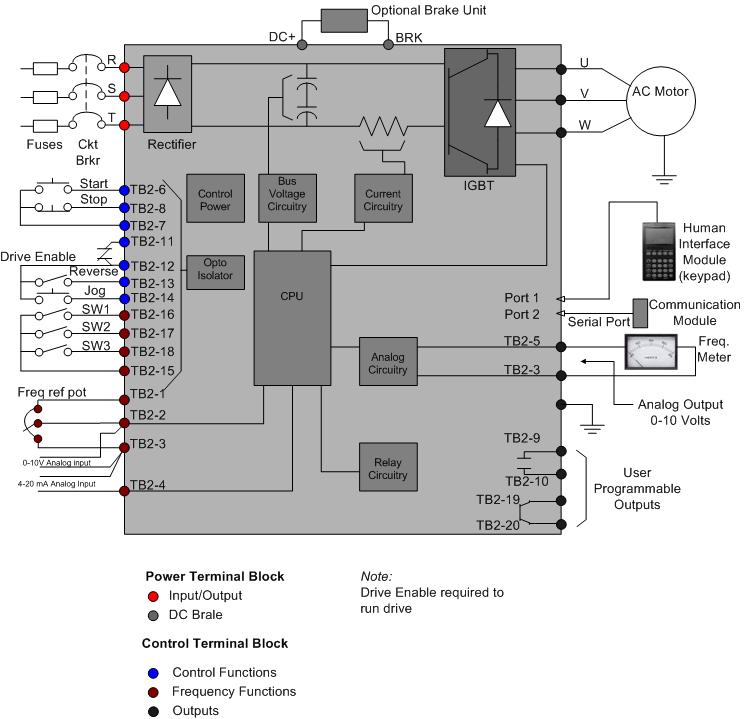
above: A block diagram of a
variable-frequency drive that also shows the components that are connected
to the drive to provide additional control. Adapted from an Allen-Bradley/Rockell
Automation AC drive schematic.