In some applications, such as motion control, machine tooling, and material handling, one must be able to turn the motor on for a few seconds to move the load slightly in the forward or reverse direction. This type of motor control is called jogging. The jogging circuit utilizes a reverse motor starter to allow the motor to be moved slightly when the forward or reverse push button is depressed.
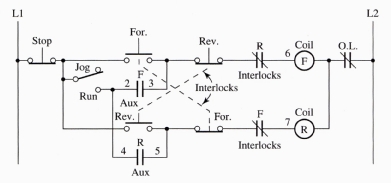
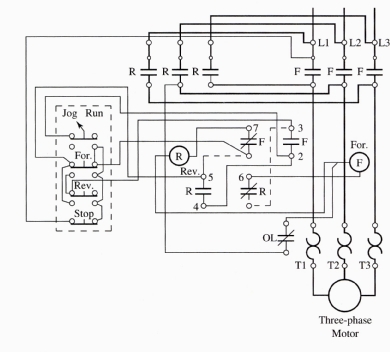
Another requirement of the jogging circuit is that the motor starters don't seal in when the push buttons are depressed to energize the motor when it's in the jog mode, yet operate as a normal motor starter when the motor controls are switched to the run mode. A ladder diagram of a jogging circuit is provided in Figure 1. This diagram of the load circuit and control circuit is shown as an electrical wiring diagram with the location of each component. The control circuit is shown again as a ladder diagram so notice the sequence of operation for the forward and reverse motor starters with the jog function.

Above: Fig. 1: A ladder diagram of a forward and reverse jogging
circuit. Notice the interlock between the forward push buttons and the
reverse push buttons so that you can't energize the for ward and reverse
motor starters at the same time.
The wiring diagram in Figure 2 gives one a good idea of the way the jog/run switch operates. This switch is shown to the left of the motor starter in the diagram. Notice that it's part of the start/stop station. The jog/run button is a selector switch that is mounted above the forward/reverse/stop buttons.

Above: Fig. 2: A wiring diagram of a for ward and reverse jogging
circuit. Notice that this diagram shows the location of the jog push
button and the forward motor starter and reverse motor starter.
When the switch is in the jog mode, the selector switch is in the open position. From the ladder diagram, note that the jog switch is in series with both of the seal-in circuits, which prevents them from sealing in the forward or reverse push buttons when they are depressed. That is, the motor will operate in the forward direction for as long as the forward push button is depressed. As soon as the push button is released, the motor starter will become de-energized. This jog switch also allows the motor to be jogged from one direction directly to the other direction without having to use the stop button.
The motor is protected by the overloads that are connected in series with the forward and reverse motor starter coils. If the overload trips, the overload contacts in the control circuit will open and neither coil can be energized until it's reset.
These two diagrams will hopefully lets one comprehend the operation of the jog circuit. One can make a forward and reverse motor starter circuit into a jogging circuit by adding the jog switch, but one must be sure that the motor and the motor starters are rated for jogging duty. Remember: Some motor starters and motors can't take the heat that will build up when the motor is started and stopped continually during the jogging operation. The motor and the motor starters will be rated for jogging or plugging if they can withstand the extra current and heat.

