AMAZON multi-meters discounts AMAZON oscilloscope discounts
TABLE 9.1 Nominal Voltages and Currents for Running-Overload Test
Nameplate current |
Current increment |
Nameplate voltage |
Nominal voltage |
0.1–10 A 10–15 A 15–20 A |
0.2 A 0.3 A 0.4 A |
110, 115, or 120 200 or 208 208-220 or 208-230 220, 230, or 240 265 or 277 440, 460, or 480 550, 575, or 600 |
120 208 240 240 277 480 600 |
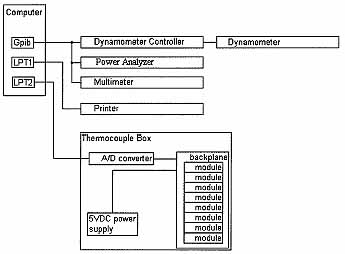
Thermal tests for ac motors determine the thermal protector trip and reset temperatures under locked and running condition, as well as the leveling temperatures for running conditions. See ill. 9.7 for test setup. These tests usually run at nameplate-rated voltage, frequency, and current, but UL may require tests at different voltages, as listed in Table 9.1.
Running conditions include full load, running overload, full-voltage idle, and reduced-voltage idle heat runs. The running test definitions follow.
Full-load heat run: A dynamometer or other load device maintains the motor at the rated torque or current, as determined by customer and agency requirements.
The test continues until the winding temperatures reach equilibrium for 60 min.

Ill. 9.7 Typical motor test bench diagram.

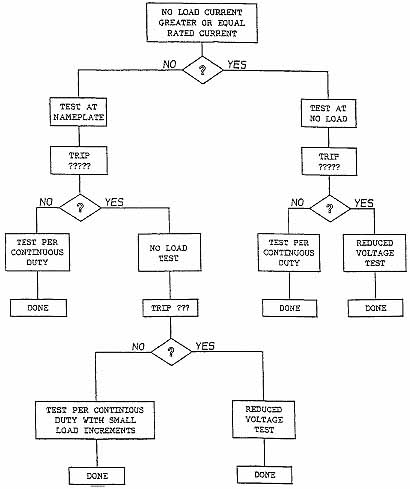
Ill. 9.8 Logic diagram for idle thermal test.
Running overload: A dynamometer holds the motor current per the nameplate rating until the motor windings attain thermal equilibrium for 60 min or until the protector trips. The dynamometer controller then increases the torque to provide a current increment per Table 9.1, and maintains this current until the winding temperature reaches equilibrium. This sequence repeats until the thermal protector opens or the motor stalls. (Note: For running-overload tests, UL requires performing the first test at nameplate current. If the no-load current of the motor at rated voltage equals or exceeds the nameplate current, the first running-overload test occurs at idle. If the thermal protector opens at the nameplate current-above the no-load current-then the motor test must also occur under no-load condition at the nominal test voltage. If the protector opens at idle, then the idle test repeats for voltages reduced by 10-V increments until the winding temperature stabilizes with-out opening the protector. See ill. 9.8 and Table 9.1 for these test requirements.)
Idle heat run: The motor operates without load at nameplate voltage until the windings reach thermal equilibrium for 60 min.
Reduced-voltage idle heat run: The motor operates without load at voltages reduced by 10-V increments below rated voltage until the windings reach thermal equilibrium for 60 min without tripping the thermal protector.
9.2.1 Test Conditions
UL 2111 allows the following maximum temperatures for Class B insulation with the various thermal tests:
Locked rotor: 225 C in first hour; 200 C in the second hour
Full-load heat run: 160 C
Running overload: 160 C if protector opens; 175 C if protector does not open IEC 34-1 requires a maximum temperature rise of 85 C above room temperature as measured by thermocouple or 90 C as measured by resistance. For Class F insulation, the maximum temperatures increase to 110 and 115 C, respectively.
For full-load, running-overload, and idle heat runs, UL requires a temperature rise variation at temperature equilibrium of no more than +/- 1.0 C for 2 h.
9.2.2 Equipment Required
- Dynamometer sufficient to handle the long-term dissipation
- Dynamometer controller
- Power analyzer
- Speed-torque indicator
- Correct size and type of coupling between motor and dynamometer
- Motor test stand and means of securing stand to stationary mount
- Type J thermocouples and accompanying chart equipment
- Printer
- Computer hardware and software Locking bar for locked-rotor test (optional)
- Powerstat
- Fan for quick cooling of the test motor
9.2.3 Test Setup
Motor Setup Requirements
1. Mount the motor in a test stand with the protector at the six o'clock down position with the motor connected to the dynamometer.
2. Couple the motor to a dynamometer with a thermally insulating coupling. For locked-rotor tests, either apply enough torque with a dynamometer to overcome the motor starting torque or use a thermally insulated lock bar to stall the motor.
3. Align and secure test stand to dynamometer.
4. Connect thermocouples from the motor to chart equipment with electrical isolation.
5. Connect motor to capacitor or relay (if specified) and to power source per out-line.
6. Confirm that the dynamometer cooling and dissipation rating meets the test needs before operating the dynamometer.
For locked-rotor tests or tests on intermittent-duty motors, let the test run with the motor off for a short time to clearly document a room temperature start. Other tests may start without delay. All locked-rotor tests, regardless of thermal rating, must start with winding temperatures within 10 C of room temperature. For other thermal tests, only intermittent-duty motors must begin test with windings within 5 C of room temperature.
Computer-controlled tests can produce many times as much information as the old manual tests, while providing greater accuracy, drastically reduced test times, and at least an order-of-magnitude productivity increase.