AMAZON multi-meters discounts AMAZON oscilloscope discounts
Various systems are installed on aircraft to protect them from a variety of hazards including: stalling, ice, rain, unsafe configuration during takeoff and skidding.
Stall protection systems provide the crew with a clear and distinctive warning before the stall is reached. The primary sensor required for this protection system is the aircraft's angle of attack. Flying in ice and/or rain conditions poses a number of threats to the safe operation of the aircraft. Ice formation can affect the aerodynamics and/or trim of the aircraft. The anti-skid system (also called an anti-lock braking system: ABS) is designed to prevent the main landing gear wheels from locking up during landing, particularly on wet or icy runway surfaces. The configuration warning system (also known as a take-off warning system) provides a warning if the pilot attempts to take-off with specific controls not selected in the correct position, i.e. an unsafe configuration. This section describes a variety of protection systems found on a range of aircraft.
1. Stall warning and protection
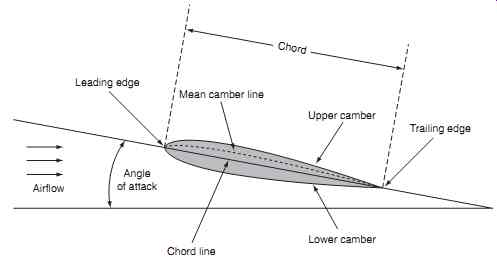
Aircraft wings are in the form of an aerofoil designed to produce lift; the key features of an aerofoil together with specific terminology are shown in FIG. 1.
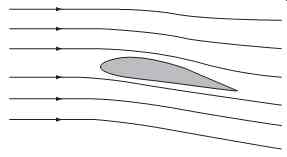
When the airflow passes over the wing without turbulence it is said to have a streamline airflow, see FIG. 2. The angle of attack (AoA) is the angle between the chord line of the wing and the vector representing the relative motion of the aircraft and the atmosphere. (The term angle of incidence is some times used instead of angle of attack.)
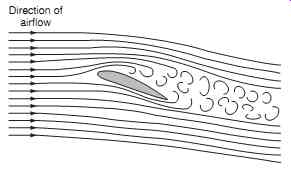
Basic aerodynamic principles state that increasing the angle of attack increases the lift produced by the wing; when the AoA reaches a certain angle, the air-flow over the wing becomes turbulent and the lift is dramatically decreased. When this occurs, the aero foil is in a stall condition as illustrated in FIG. 3. It can be seen that the streamlined airflow is breaking up and becoming turbulent.
=======
Leading edge; Airflow; Angle of attack; Chord line; Lower camber; Mean camber line; Upper camber; Trailing edge; Chord
=======
========
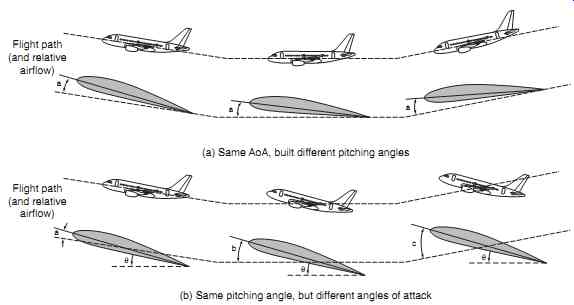
FIG. 4 Angle of attack and attitude (a) Same AoA, built different pitching
angles Flight path (and relative airflow) Flight path (and relative airflow)
(b) Same pitching angle but different angles of attack
========
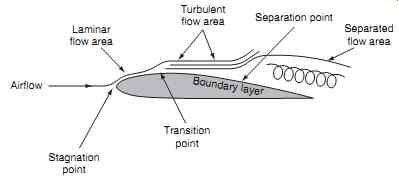
FIG. 5 Boundary layer separation
Laminar flow area; Turbulent flow area; Separation point; Separated flow area; Transition point; Stagnation point; Airflow; Boundary layer
=========
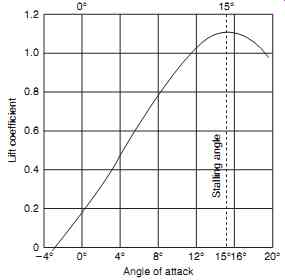
FIG. 6 Angle of attack and lift
It is important to note that an aerofoil stalls at a certain angle; the speed at which the aircraft is flying makes little difference to the stall angle. The relationship between speed and stalling can be related directly to the formula for lift:
Lift L _ ½?VSC 2
…where ? is the air density, V is the aircraft speed, S is the wing area, and CL is the aerofoil's coefficient of lift.
Referring to FIG. 4, an aircraft can have a different angle of attack for a given pitch attitude. Aircraft pitch angle should not be confused with angle of attack.
Relative airflow over the wing will change direction in flight in relation to the pitch angle of the aircraft.
The critical features of aerofoil performance are centered on the boundary layer as illustrated in FIG. 5. When the airflow divides between the upper and lower surfaces, the point of division is at the stagnation point. Airflow over the upper surface remains stable until, at higher AoA, it starts to detach; this occurs at the transition point, before giving rise to turbulence at the separation point. The turbulence behind the separation point increases with AoA.
The relationship between lift and stall is depicted in FIG. 6. The two axes on this chart are the lift coefficient (CL) and angle of attack. It can be seen that lift increases in proportion to the AoA over the ordinary angles of flight. At higher angles of attack, the stall condition is reached. Different aerofoil sections have different lift coefficients, and therefore different stall angles, but the principles remain the same.
Deploying lift augmentation devices, e.g. leading and/or trailing edge flaps, can change the wing area and also the wing camber, thereby changing the coefficient of lift. By reducing aircraft speed, the lift will decrease; for a given flap setting, the only other way of increasing lift is to increase the angle of attack.
(Aerodynamic theory is covered in more detail in another book from the aircraft engineering series: Aircraft Engineering Principles.)
Key point: An aerofoil stalls at a certain angle; the speed at which the aircraft is flying makes little difference to the stall angle.
Warning systems are installed to provide the crew with clear and distinctive warning before the stall is reached. This can be a warning horn and/or warning light on smaller aircraft. On passenger aircraft, the stall warning is provided by a stick shaker. Warning systems require a basic sensor to detect this stall condition; typical sensors are:
-- reed sensor
-- vane sensor
-- pressure sensor
-- angle of attack sensor
Key point: Stall warning systems provide the crew with a clear and distinctive warning before the stall is reached.
========
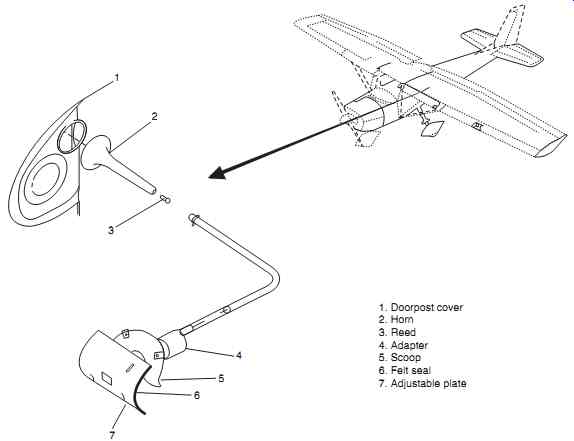
FIG. 7 Stall warning: reed sensor
1. Doorpost cover
2. Horn
3. Reed
4. Adapter
5. Scoop
6. Felt seal
7. Adjustable plate
========
1.1 Reed sensor
Many GA aircraft are installed with a reed sensor ( FIG. 7); this does not require any electrical power.
Airflow is directed from a scoop (FIG. 7, item 5) in the wing leading edge and into a reed (3) and horn assembly (2). In the pre-stall condition, the air pressure on the leading edge reduces (relative to cabin pressure) because the stagnation point has moved. This draws air through the reed, causing it to vibrate at an audible frequency (much like a musical instrument); this is amplified in an acoustic horn and the crew receive a tone. An adjustable plate (7) is used to alter the airflow intake such that the intake is aligned with stagnation point.
Key point: When the AoA reaches a certain angle, the airflow over the wing becomes turbulent and the lift is dramatically decreased.
1.2 Vane sensor
An alternative device used on GA aircraft is the vane sensor located in the wing leading edge as shown in FIG. 8. As with the reed sensor, the vane is sensitive to the movement of the stagnation point. The vane is held in a forward position by an internal spring and connected to a micro-switch.
At normal angles of attack, the vane is held back by the airflow (against spring pressure) and the micro switch is held in the open position, see FIG. 9. At higher angles of attack, airflow pressure on the switch is reduced and the vane eventually moves forward (by the spring force) thereby closing the micro-switch.
This completes the warning circuit that activates a light and horn.
Key point: At normal angles of attack, the vane sensor is held back by the airflow against spring pressure.
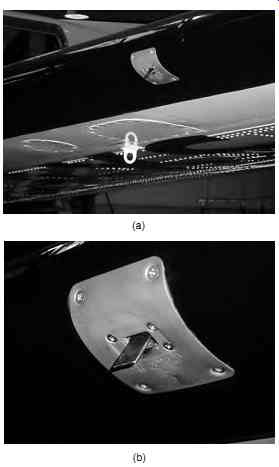
FIG. 8 Stall warning: vane sensor installation.
======
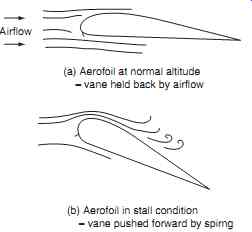
FIG. 9 Stall warning: vane sensor principles; Airflow (a) Aerofoil at normal
altitude - vane held back by airflow (b) Aerofoil in stall condition - vane
pushed forward by spirng
======
1.3 Pressure sensing sensor
Another angle of attack sensor technology is based on measuring the pressure at two points on the sensor housing, see FIG. 10. The conical housing rotates on its axis; slots A and B are connected to a pressure chamber that contains a pivoted vane. The sensor housing aligns with the angle of attack because slots A and B maintain equal pressures on the vane, and hence the conical housing.
If the angle of attack increases, slot B has increased pressure compared with slot B. The vane moves to re-align the housing with the airflow to equalize the pressures in both slots. Rotation of the housing is detected by a potentiometer; the center contact picks off a signal voltage tapped from the resistance windings and this is used to measure the angle of attack.
Key point: When airflow passes over the wing without breaking up, it is said to have streamline airflow.
1.4 Sensor vane
The final type of stall warning sensor to be described is illustrated in FIG. 11. An angle of attack (AoA) sensor vane aligns itself with the prevailing airstream; this rotates a shaft inside the housing.
The vane's shaft is connected to a synchro that pro vides an electrical output proportional to the angle of attack.
A viscous damper connected to the AoA vane stabilizes vane movements and reduces the effects of turbulence. The AoA sensor contains a heater that pro vides continuous de-icing/anti-icing, prevents condensation and reduces changes in damper fluid viscosity.
1.5 Stick shaker
On larger aircraft the stall warning system comprises an angle of attack vane and stick shaker. A motor is attached to one or both control columns; an out-of balance weight is attached to the motor shaft so that it vibrates when the motor is running. The motor design is matched to the control column to provide a distinctive frequency of approximately 10-30 Hz together with physical movement of the controls.
=======
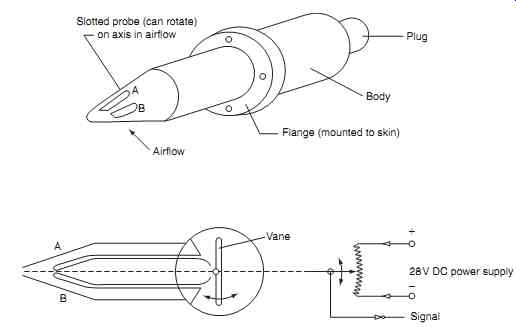
FIG. 10 Stall warning; pressure sensor
Slotted probe (can rotate) on axis in airflow; Airflow; Flange (mounted to skin); Body Plug Vane; 28V DC power supply Signal
=======
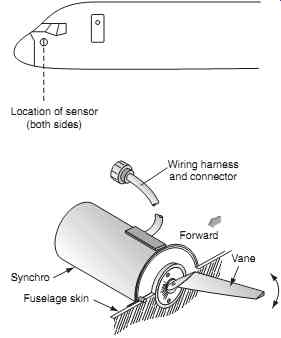
FIG. 11 Stall warning: AoA sensor
Location of sensor (both sides); Wiring harness and connector; Forward; Vane; Fuselage skin; Synchro
=======
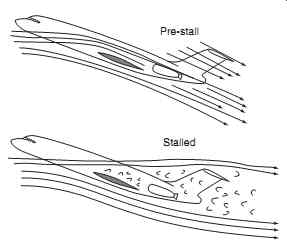
FIG. 12 Deep stall; Stalled; Pre-stall
========
Key point: An angle of attack (AoA) sensor vane aligns itself with the prevailing airstream.
1.6 Stall identification system
Certain aircraft types, typically tee-tailed aircraft, are installed with stall identification systems; this is normally integrated with the stall warning system. The tee-tailed aircraft can be vulnerable to a deep-stall as illustrated in FIG. 12. In addition to the wings (or main-planes) stalling, the deep stall condition also makes the elevators less effective; this compounds the problem, since the elevators are the means of pitching the aircraft nose down to recover from the stall.
Furthermore, if the aircraft has rear-mounted engines, the airflow into the engine is turbulent, possibly causing a loss of performance.
The stall identification system contains an actuator that pushes the control column forward with a sharp and positive action. The stick push is released once the aircraft is returned to an acceptable angle of attack. This system has to be highly reliable, both in terms of operating when need and having low probability of false operation.
Key point: The stall identification system contains an actuator that pushes the control column forward.
2. Airframe ice and rain protection
Flying in ice and/or rain conditions poses a number of threats to the safe operation of the aircraft. Ice formation can affect the aerodynamics and/or trim of the aircraft. Icing occurs when super-cooled water makes contact with the airframe and/or ice particles.
Super-cooled water exists at temperatures below freezing point; this is because water needs nuclei to form ice crystals. The water freezes on the surface of the nuclei, and then grows in size by forming layers.
Water freezes when energy is given up to its surroundings. Ice accumulation on an aircraft can causes secondary damage by breaking off and being ingested into the engine. Ice and rain also reduces visibility through the windscreen. External sensors and equipment can also be affected by the build-up of ice, e.g. pitot tubes that sense airspeed and angle of attack sensors, and these must not be allowed to freeze.
2.1 Ice detection
Various technologies are available to provide a warning to the crew of icing conditions. The simple method is to monitor the outside air temperature and atmospheric conditions. When flying at night, an ice inspection light (see Section 12) can be used to illuminate critical areas, e.g. wing leading edges.
Automatic ice detectors are normally located at the front of the aircraft. Various technologies are employed; the function of the sensor is to detect ice accretion and provide a warning to the crew and/or turn on the ice protection systems.
One type of automatic ice detector consists of a motor-driven sensor that is located against a knife edge cutter, see FIG. 13, at the front of the fuselage. As ice builds on the rotor, the gap closes with the knife-edge and torque is applied to the rotor. The body of the motor is held in position by springs, and as the torque increases, the motor starts to rotate in its mounting until a pre-determined point is reached and a micro-switch is closed, thereby operating a warning light.
An alternative technology uses an ultrasonic ice detector; see FIG. 14. The sensing probe is exposed to the airflow and is vibrated by an electromagnetic coil at a natural frequency of 40 kHz. The probe vibrates at a lower frequency when it accumulates ice due to its increased mass.
A logic unit within the detector housing ( FIG. 15) determines when the probe vibration is less than 39,867 Hz; this occurs when a known mass of ice has been accumulated, and the cylinder is heated to melt the ice.
A timing schedule ( FIG. 16) is programmed into the control unit and monitors the time taken for the frequency to change. The heater remains on until the probe vibration returns to its nominal 40 kHz value.
Nominal heating time is six seconds; if the heater is on for more than 25 seconds, power is removed, and a fault condition is notified to the crew. The detector provides control functions for selection of both engine and wing ice protection.
==========
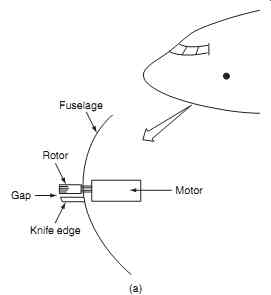
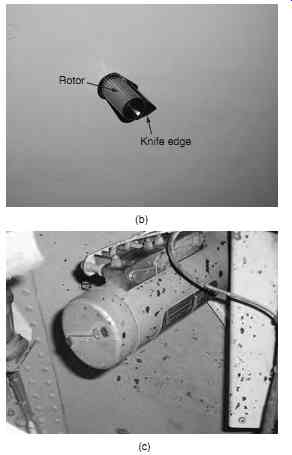
FIG. 13 Ice detector: knife edge cutter. (a) Schematic, (b) sensor, (c) motor
Fuselage; Rotor; Motor; Knife edge; Gap (a) (b) Rotor Knife edge (c)
==========
Key point: When the ultrasonic ice detector probe accumulates ice, it vibrates at a lower frequency.
Fault conditions are reported to the on-board maintenance system. Weight on wheels logic prevents the detector from being heated on the ground. Press to test (PTT) is used to check the detector's logic functions and heater continuity.
2.2 Ice protection
Two strategies are used for ice protection: de-icing and anti-icing. De-icing allows ice to form and then be removed on a periodic basis. The build-up of ice will have been investigated during type testing of the aircraft and the build-up removed before it poses a hazard. Anti-icing is when ice is not permitted to form at all. Three primary methods are used for both de-icing and anti-icing:
-- fluid
-- pneumatic
-- thermal
All three are controlled and operated by electrical systems; an aircraft can be fitted with any one method, or a combination of all three. Specific areas to be protected from ice formation are as follows:
Airframe
-- leading edges
-- control surfaces
-- lift augmentation devices
-- windscreen (or windshield)
Propulsion
-- air intakes
-- propellers
External components
-- pitot tubes
-- temperature sensors
-- angle of attack sensors
-- water drains
==========
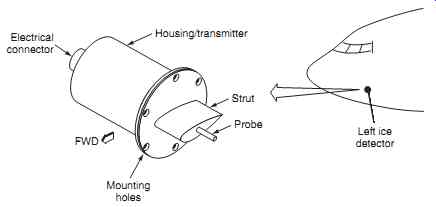
FIG. 14 Ice detector: ultrasonic sensor
Mounting holes; Housing/transmitter; Electrical connector; Strut; Probe; Left ice detector; FWD
===========
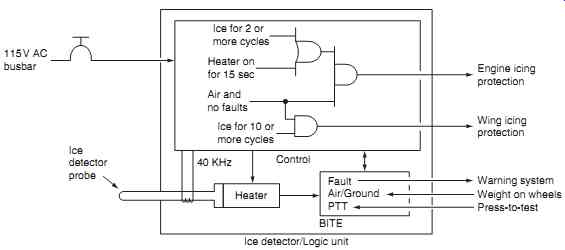
FIG. 15 Ice detector: ultrasonic system
115V AC busbar; Ice detector probe; Ice for 2 or more cycles; Heater on for 15 sec; Air and no faults; Ice for 10 or more cycles 40 KHz; Control; Heater Fault Air/Ground PTT Ice detector/Logic unit; Engine icing protection; Wing icing protection; Warning system; Weight on wheels; Press-to-test BITE
============
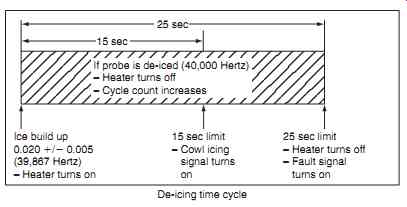
FIG. 16 Ice detector: ultrasonic system timer
Ice build up;
- Heater turns on 15 sec limit
- Cowl icing signal turns on 25 sec limit
- Heater turns off
- Fault signal turns on
De-icing time cycle 25 sec 15 sec
If probe is de-iced (40,000 Hertz)
- Heater turns off
- Cycle count increases
===========
2.2.1 De-icing fluids
Fluids are typically used on wings, vertical stabilizer, horizontal stabilizer, propellers and windscreens. On board fluid protection is applied through pipes and/or small holes in the airframe. The fluid is transferred from a storage tank by electrical pumps and directed to the required zones by electrically operated valves.
The fluid can also be applied on the ground by specially equipped vehicles with booms to allow easy access to the entire aircraft. De-icing fluids are typically composed of ethylene glycol or propylene glycol, together with thickening agents, corrosion inhibitors, and colored dye. The aircraft is sprayed with a fluid that melts any existing ice on the aircraft and also prevents ice formation prior to takeoff. The timing of when the aircraft is sprayed has to take into account the weather conditions (in particular ambient temperature, wind speed, precipitation, humidity) aircraft skin temperature, and the scheduled departure time.
Fluid performance is characterized by its holdover time: this is the period of time that an aircraft remains protected against ice prior to takeoff, and can be up to 80 minutes depending on conditions and fluid additives. The colored dye is used so that treated areas can be readily identified.
Key point: De-icing allows ice to form and then be removed on a periodic basis.
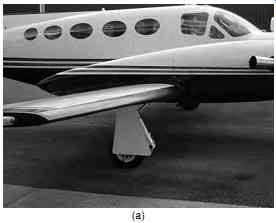
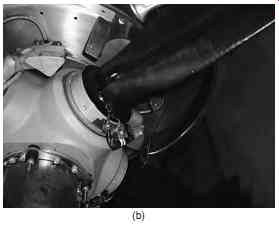
FIG. 17 Pneumatic ice protection: (a) wing leading edge, (b) electrical connections
2.2.2 Pneumatic ice protection
Pneumatic ice protection is used on the leading edge of wings and the vertical/horizontal stabilizers.
Fabric reinforced rubber tubes (known as boots) are attached to the surfaces of leading edges of wings, tail planes and fins, see FIG. These tubes are inflated and deflated with air on a cyclic basis to cause a slight deformation of the boot; this causes the ice to break off.
The air supply is from an electrically driven pump, or bled from the engine compressor via a regulator.
Electrical solenoid valves direct the air into the boots either in sequence or simultaneously. The tubes are deflated and kept flush with the airframe when not in use; this is achieved by connecting the boots to a vacuum source. The system can be operated automatically or manually.
Key point: When not in use, pneumatic de-icing boots are deflated and kept flush with the airframe.
2.2.3 Thermal ice protection
Thermal ice protection can be achieved by one of two methods: hot air bled from the engine compressor, or electrical heaters. Hot air is directed to the required zone(s) by electrically operated valves con trolled from the flight compartment or by a control unit. Temperature sensors are used as part of a control and feedback system to provide overheat protection.
Applications for bleed air ice protection include the leading edge of wings, vertical/horizontal stabilizers and engine air intakes.
Key point: Anti-icing is used where ice is not permitted to form at any time.
Electrical heating systems are used for both anti ice and de-icing; heater mats are bonded to the:
-- airframe
-- engine intakes
-- propellers
-- rotor blades
-- windscreens
The heater mats are formed from fine-wire elements inside layers of insulation and protective materials. Typical heating elements are nickel, nickel chrome or copper-nickel. Larger aircraft use 115 V AC variable frequency power supply. Smaller aircraft use a 28 V DC power supply.
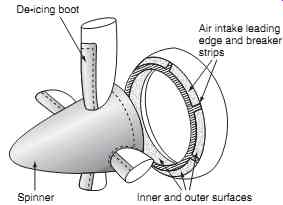
Propeller de-icing is achieved by electrical heating elements that are bonded to the leading edge of the blades, see FIG. Some aircraft have heating mats on the inboard and outboard sections of the propeller blade. The elements are connected to the 28 V DC power supply via slip rings and brushes inside the hub. Typical current requirements for propeller heating are 15-20 A. Power is applied from a timer control circuit that alternates the heating of outer and inner mats on each of the propeller blades over a 30 second cycle.
Engine intake leading edges are continuously heated when the system is turned on (anti-icing). This applies to gas turbine engines and turbo-props). The inner and outer surfaces are heated via a cyclic timer to provide de-icing. Engine intakes are installed with mats that are shaped to provide breaker strips; this ensures that the ice breaks off in pre-determined sections in a controlled sequence.
Test your understanding
What is the difference between anti-icing and de-icing?
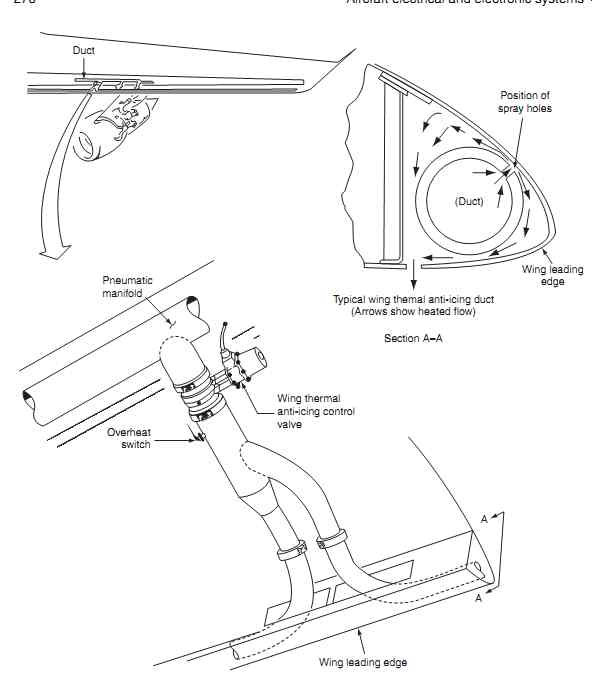
Larger aircraft use engine bleed air for thermal anti icing. FIG. 19 illustrates how ducts are located along the leading edge of the wing. Spray holes direct the air inside the leading edge before it is ejected overboard. Similar installations are used for tail plane and engine nacelles.
========
Air intake leading edge and breaker strips Inner and outer surfaces Spinner De-icing boot
========
Duct; Pneumatic manifold; Wing thermal anti-icing control valve; Section A-A; Typical wing themal anti-icing duct; (Arrows show heated flow); Wing leading edge (Duct); Position of spray holes; Overheat switch; Wing leading edge A A
========
3. Windscreen ice and rain protection
Various methods of windscreen ice and rain protection are used on a range of aircraft types. One method uses a metallic film deposited onto the surface of the screen; this is connected to an electrical supply on either side of the panel. An alternative technology uses fine wire elements ( FIG. 20) sandwiched within the laminated glass panel. Individual wind screen heaters use 4 kW of power, to keep window temperature at approximately 30°C.
Automatic cycling of power regulates the amount of heat being absorbed by the windscreen. Power is isolated from the heaters in the event of fault conditions; temperature sensors detect overheat and current transformers detect electrical overload conditions.
Temperature sensors are monitored by a control unit; these can be simple thermostats or thermistors.
Key point: Windscreens are kept clear of rain by wipers, rain repellent (sprayed on the windows), or by treating the glass with a hydrophobic coating.
=======
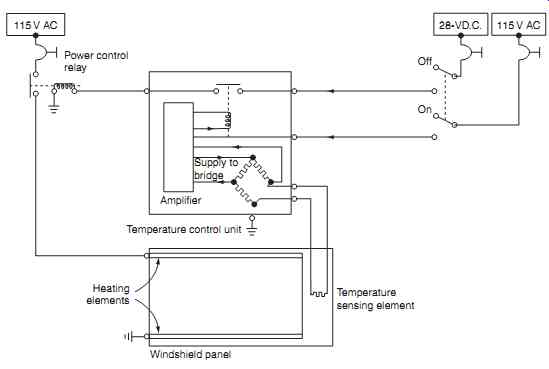
FIG. 20 Windscreen de-icing circuit
Temperature sensing element; Windshield panel; Heating elements; Amplifier Temperature control unit
=======
3.1 Windscreen wiper
The windscreen wiper system is based on 28 VDC variable speed motors; the rotary motion of the motor is changed by a gear mechanism in the converter to produce the sweeping motion of the wiper arm over the windscreen. A typical windscreen wiper circuit is shown in FIG. 21. The normal arrangement is to have one wiper assembly per screen to ensure that at least on pilot can keep a clear screen in the event of failure. The motors are set by the control switch; typical wiper speeds are:
-- low, 160 cycles per minute
-- high, 250 cycles per minute
A parking switch in the motor/converter sets the wiper blade to the park position when the wiper is selected off. In the off position, the park switch in each motor/ converter closes; this causes the blades to position themselves at the bottom of each windscreen.
3.2 Rain repellent
This system is used to maintain a clear area on the windscreen during take-off and landing; a typical sys tem is shown in FIG. 22. The rain repellent bottle is located inside the fuselage roof; this contains a pressure gauge, visual contents reservoir and a shut-off valve.
The control panel (normally combined with the wiper system) contains two switches to control the rain repellent system. FIG. 23 illustrates a typical rain repellent system schematic. The repellent fluid is stored in a container; this is pressurized from an external air supply. Two electrically operated solenoid valves control the flow of repellent to the windscreens.
Nozzles on the fuselage (forward of the windscreen) direct the repellent spray onto the windscreens.
The rain repellent switches are momentary make type; pushing a switch once activates the respective sole noid valve. A time delay circuit in the valve controls the amount of repellent being released by closing the valve after a short time period, typically ½ second. A pressure gauge indicates when the container needs replacing.
==========
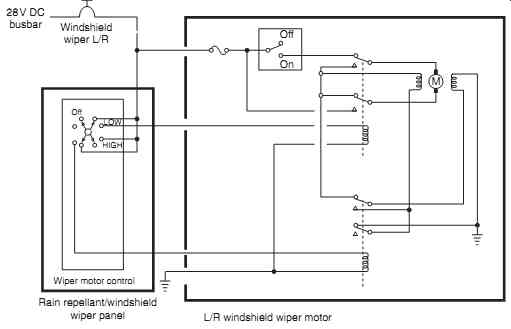
FIG. 21 Windscreen wiper circuit Rain repellant/windshield wiper panel L/R
windshield wiper motor
==========
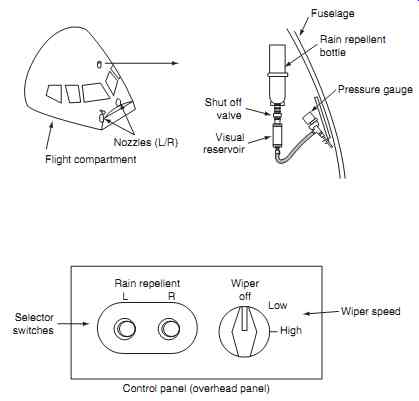
FIG. 22 Rain repellent system overview
Rain repellent; LR; Wiper off; Low; High; Control panel; (overhead panel); Selector switches; Wiper speed Nozzles (L/R) Flight compartment; Fuselage; Rain repellent bottle; Pressure gauge; Shut off valve; Visual reservoir
============
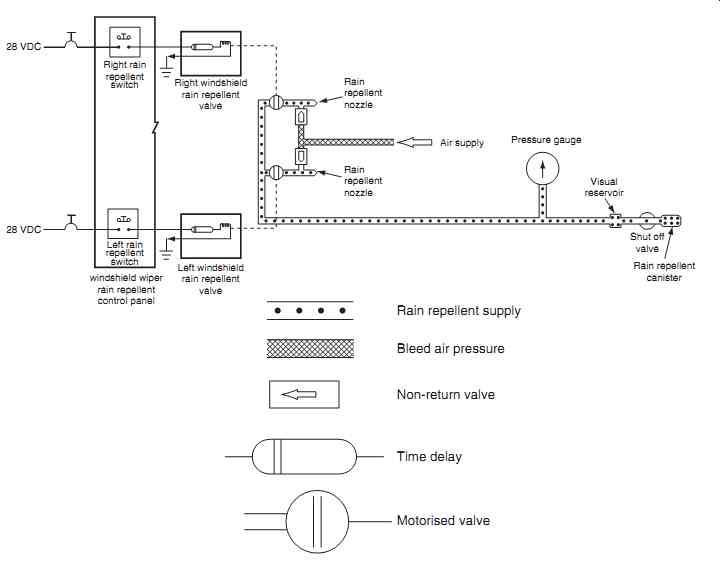
FIG. 23 Rain repellent system schematic
Rain repellent supply; Bleed air pressure; Non-return valve; Time delay; Motorized valve
==========
4. Anti-skid
The anti-skid system (also called an anti-lock braking system: ABS) is designed to prevent the main landing gear wheels from locking up during landing, particularly on wet or icy runway surfaces. Traditional method used to operate brakes is from hydraulic pres sure controlled from the brake pedals. This pressure can be varied by the pilot by increasing or decreasing the amount of force being applied to the pedals. If too much pressure is applied by the pilot, the wheels will lock-up and the aircraft will skid on the runway.
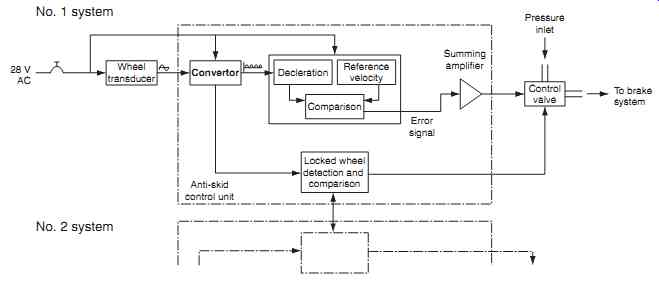
The anti-skid system ensures optimum braking under all conditions by modifying the pres sure being exerted by the pilot on the brake pedals. The applied pressure is reduced before the wheels lock up, and then reapplied to continue the braking action; this occurs as a repeated on/off cycle. Modifying the applied pressure is achieved by modulation; this can vary the applied pressure in both time and pressure.
The system comprises speed transducers (or sensors) on each wheel, a control unit and electro-hydraulic control valves, see FIG. 24. During a skid condition, the wheel(s) experience a rapid deceleration. Typical speed sensors are based on the tachometer; this is a small AC generator with the stator formed with a permanent mag net. The rotor coil is built into the axle and turns inside the stator field. Referring to fundamental principles, when the coil is rotated inside the field, currents are induced and a voltage is generated; the tachometer's out put is proportional to wheel speed. The tachometer AC output is rectified in the control unit; the DC output is monitored for rate of change to determine if the wheel is accelerating or decelerating. A comparator circuit generates an error signal which is amplified and used to operate a control valve to modulate the applied brake pressure. Control laws are used to determine when the wheel is approaching a skid condition, this occurs when the wheel speed is decreasing at a given rate. Hydraulic pressure is decreased in the braking system and the wheel accelerates. Once the skid has been averted, hydraulic pressure can be reapplied.
===========
==========
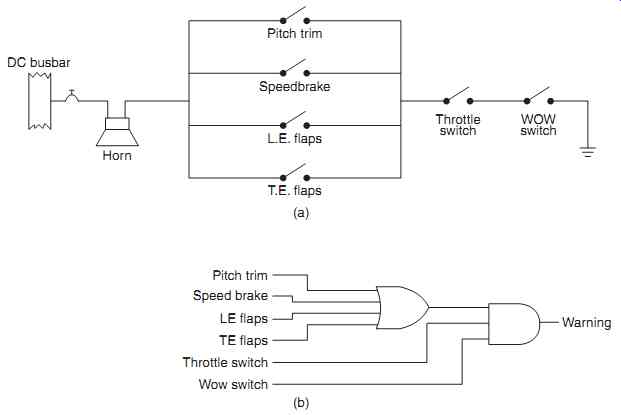
FIG. 25 Take-off warning system: (a) functional diagram, (b) logic diagram
===========
Test your understanding
Explain how wheel speed is monitored to determine when an aircraft is approaching a skid condition.
5. Configuration warning
The system (also known as a take-off warning system) provides a warning if the pilot attempts to take-off with specific controls not selected in the correct position, i.e. an unsafe configuration. A simple take-off warning system is illustrated in FIG. 25(a). The type of sys tem fitted depends on the aircraft type and size; typical parameters being monitored include (but are not limited to):
-- pitch trim
-- speed brake
-- leading edge (LE) flaps
-- leading edge (LE) slats
-- trailing edge (TE) flaps
The position of each of these controls is monitored together with the squat switch (weight on wheels) and throttle position. If an unsafe take-off configuration is detected, a warning horn is sounded. This system can be viewed in combination logic terms as illustrated in FIG. 25(b). On larger aircraft, more parameters are monitored, and more logic functions are required for configuration warning ( FIG. 26).
6. Aural warnings
Flight compartment aural warnings typically include the:
-- fire bell
-- take-off configuration warning
-- cabin altitude warning
-- landing gear configuration warning
-- mach/airspeed overspeed
-- stall warning
-- TAWS
-- TCAS
Typical external aural warnings are also provided for a fire bell in the wheel well and ground call horn in the nose wheel-well for an equipment bay overheat.
Certain warnings can be silenced whilst the condition exists. (TCAS is an automatic surveillance system that helps aircrews and ATC maintain safe separation of aircraft. It is covered in a related book in this series: Aircraft Communications and Navigation Systems.)
An aural warning system that combines many functions on has a priority logic based on alert levels to ensures that certain warnings, e.g. TAWS, are announced in a predetermined threat level. Examples of three priority levels are given in Table 1. Note that there could be 25 or more levels of aural warning system inputs.
========
Table 1 Aural warning system priority logic
Priority | Description
1 Windshear
2 Pull-up (sink rate)
3 Pull-up (terrain closure)
=======
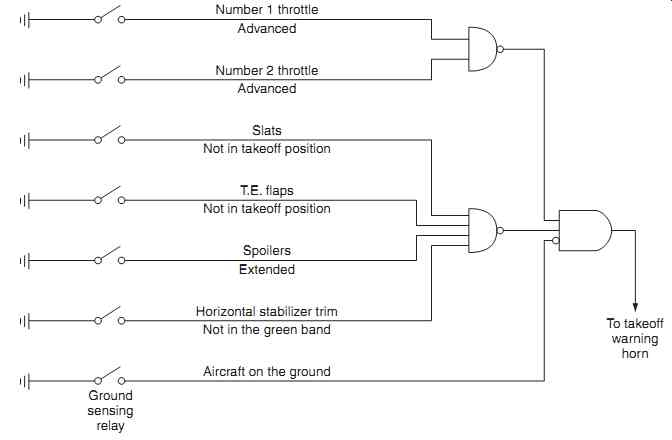
FIG. 26 Configuration warning system
Number 1 throttle; Advanced Number 2 throttle; Advanced Slats; Not in takeoff position; T.E. flaps; Not in takeoff position Spoilers; Extended; Horizontal stabilizer trim; Not in the green band; Aircraft on the ground; Ground sensing relay; To takeoff warning horn
=========
7. QUIZ--Multiple choice questions
1. Stall warning systems provide the crew with a clear and distinctive warning:
(a) before the stall is reached
(b) after the stall is reached
(c) at all angles of attack.
2. When an ultrasonic ice detector probe accumulates ice, it vibrates at a:
(a) higher frequency
(b) lower frequency
(c) constant frequency.
3. The stall identification system contains an actuator that:
(a) maintains the angle of attack
(b) pulls the control column rearward
(c) pushes the control column forward.
4. When not in use, pneumatic de-icing boots are:
(a) inflated and kept flush with the airframe
(b) deflated and kept flush with the airframe
(c) cycled on a periodic basis.
5. When the AoA reaches a certain angle, the airflow over the wing:
(a) becomes turbulent and the lift is dramatically decreased
(b) becomes streamlined and the lift is dramatically decreased
(c) becomes turbulent and the lift is dramatically increased.
6. When a wheel is approaching a skid condition, this is detected when the speed is:
(a) decreasing at a given rate
(b) increasing at a given rate
(c) constant
7. At normal angles of attack, the vane sensor is held:
(a) back by spring pressure against the airflow
(b) forward by the airflow against spring pressure
(c) back by the airflow against spring pressure.
8. De-icing:
(a) allows ice to form, and then be removed on a periodic basis
(b) prevents ice from forming at any time
(c) directs the repellent spray onto the windscreens.
9. An angle of attack (AoA) sensor vane aligns itself with the:
(a) boundary layer
(b) prevailing airstream
(c) stagnation point
10. When airflow passes over the wing without breaking up, it is said to have a:
(a) boundary layer
(b) streamline airflow
(c) stalled airflow
