An indicator lamp can be added to a three-wire circuit to show when the coil in the circuit is energized or de-energized. The indicator lamp can be green to show when the system is energized and red to show when the circuit is de-energized. The lamp is usually mounted where personnel can easily see it at a distance. Sometimes the indicators are used where one operator must watch four or five large machines. After a machine has been set up, the operator will move on to the next machine. Since the installation is very large and spread out over a distance, the operator can watch for the indicator lamps to see if the machine is still in operation.
The indicator lamps can also be used by maintenance personnel when a machine has more than one motor starter. In this type of application each motor starter has an indicator lamp to indicate its coil is energized. This will help the maintenance personnel to begin testing for faults in the correct part of the circuit when the system has stopped or is not operating correctly. This is especially useful if the motor starter is mounted in a NEMA (National Electrical Manufacturers Association) enclosure where the technician can't see through the enclosure door to verify if the starter is energized or de-energized.
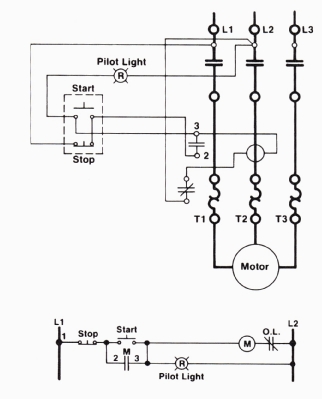
Figure 1 shows a wiring diagram and a ladder diagram of a circuit with an indicator lamp connected in the control circuit. The lamp is called a pilot light and it's connected in parallel with the seal-in contacts on the motor starter. When the motor starter closes, the lamp will be energized to indicate that the motor starter contacts are closed. Anytime the lamp is de-energized, the operator and maintenance personnel know that the motor starter is not energized. A press-to-test lamp could also be used in this circuit. The press-to-test lamp allows the operator and maintenance personnel to put their fingers on the lamp and depress the lens at any time to test it to see if it's operational. When the lamp lens is pressed, it will cause a special set of contacts in the base of the lamp holder to provide voltage instantly to the lamp and illuminate it. If the bulb is burned out, the lamp won't illuminate and the maintenance personnel or the operator can change the bulb. If the indicator is energized most of the time, such as in a continuous operation, the press-to-test lamp may not be necessary since the indicator will be energized most of the time.
Indicator lamps are available for 120 volt, 240 volt, 480 volt, and 600 volt AC, which provides them for any control circuit voltage. A wide variety of colored lenses is also available to indicate other conditions with the machine.

Above: Fig. 1: A wiring diagram and a ladder diagram
of a three-wire control circuit with an indicator lamp added to show
when the motor starter coil is energized.
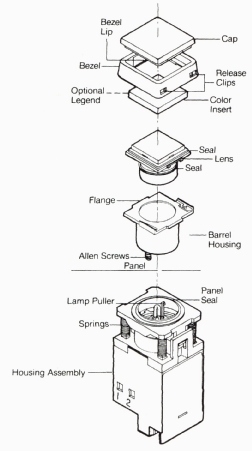
These indicators can be connected across different individual motor starters in the machine to provide other information, such as hydraulic pump running, heaters energized, conveyor in operation, and other conditions that are vital to the machine. Figure 2 shows an exploded view of a typical indicator lamp. In this diagram notice that the lens is replaceable, and the part of the lamp that has wires connected to it can easily be removed from the socket part of the lamp in case the socket needs to be replaced.

Above: Fig. 2 An exploded view of a typical indicator
lamp. Notice the lens is replaceable so different color lenses can be
used. The field wiring is connected to a terminal section that allows
the lamp to be changed when it's damaged without removing and replacing
the wiring.

