One of the most versatile storage aids is a cabinet mounted on casters, which can be rolled from one work area to another.
With a lockable door, it can be used to safeguard tools or materials. Its adjustable shelves extend its storage capability and it can double as an extra work surface.
Sizing the Cabinet: Make the length, width, and depth of the cabinet to suit the bulk and number of items you plan to store in it. For the height, determine how you want to use the cabinet when it is stationary; as an assembly table it should be shorter than an auxiliary workbench—shorter still if you want to store the cabinet under a table when it is not in use.
Materials: For a good com promise between durability and economy, use interior-grade plywood for all but the back of the cabinet, which can be made of plywood or hard-board. Mount the cabinet on locking casters—they’ll keep the cabinet immobilized when necessary. For loads up to 35 pounds, install 3-inch casters; for heavier loads, choose 4-inch casters.
TOOLS:
- Tape measure
- Circular saw
- Electric drill
- C-clamps
- Bar clamps
- Router and bits (straight, rabbeting)
- Hammer
- Mallet
- Carpenter’s square
- Wood chisel
- Awl
- Screwdriver
- Magnetic catch Casters (swivel- type, locking)
MATERIALS:
- Plywood (1/4”, ¾”)
- Shelf supports
- Wood glue
- Offset hinges (¾”)
- Wood screws ¾” No. 8
- Finishing nails (1’’, 2¼”’)
SAFETY TIPS: Wear goggles when nailing or when operating power tools.
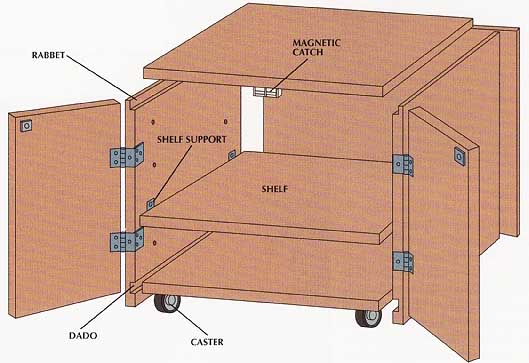
The sides, top, bottom, shelf, and doors of this cabinet are all made of 3/4-inch interior-grade plywood; the back is cut from 1/4” plywood. The width of the top is inch shorter than the overall width of the cabinet so it can fit into rabbets cut in the tops of the sides. The bottom, cut to the same dimensions as the top, fits into dadoes 2 inches from the bottom of the cabinet. The back fits squarely against the top, sides, and bottom.
Shelf supports fit into holes drilled in the sides. The doors are fastened to the cabinet sides with offset hinges; tool racks can be added to the inside of the doors, as shown earlier. Magnetic catches keep the doors closed. The cabinet rides on swiveling casters.
Putting the Pieces Together

1. Preparing the cabinet parts.
• Cut 3/4-inch plywood to size for the top, bottom, and sides.
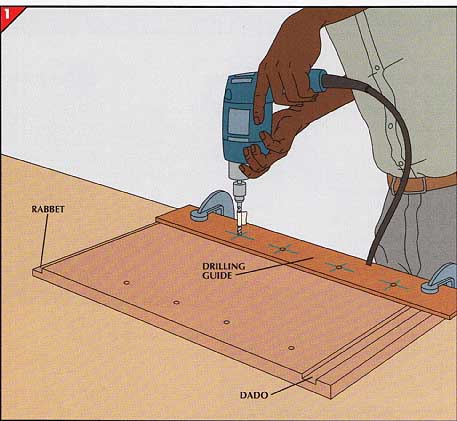
• In each of the cabinet sides, rout a 3/4-inch-wide, 3/8-inch-deep rabbet along the top edge, and a dado the same size 1 inch from the bottom edge using the techniques shown earlier.
• Make a guide to drill the shelf support holes: In a board, drill holes that will accommodate the shelf sup ports at the desired intervals. Start the holes 5 inches from one end of the board and offset them from the edge by 1½-inches.
• Align the guide with the cabinet side and bottom and clamp it in place.
• For a depth stop, wrap masking tape around the bit inch from the tip. Drill the holes, stopping when the masking tape reaches the wood, then drill the holes on the other side.
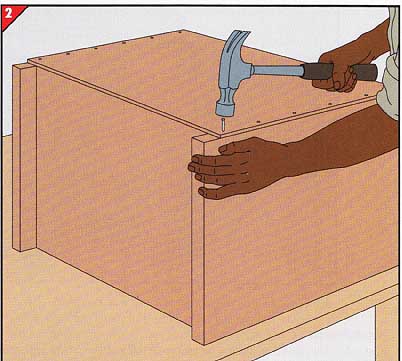
• Apply wood glue to the dadoes and rabbets in the cabinet sides and fit the top and bottom in place; checking that the cabinet is square with a carpenter’s square, secure the panels together with bar or pipe clamps and 2¼-inch finishing nails driven every 6 inches along the joints.
• Cut the back of the cabinet from 1/4-inch plywood or hardboard.
• Attach the back to the assembly with 1 -inch finishing nails.
• To size the doors, measure the width of the cabinet, then the height from the lower edge of the bottom piece to the top; cut a piece of 3/4-inch plywood to these dimensions. Cut the piece in half to create two doors—the kerf left by the saw blade will pro vide clearance between the doors.

3. Chiseling the hinge mortises.
• Position two 3/4-inch offset hinges on one of the doors, placing them about 3 inches from the top and bottom.
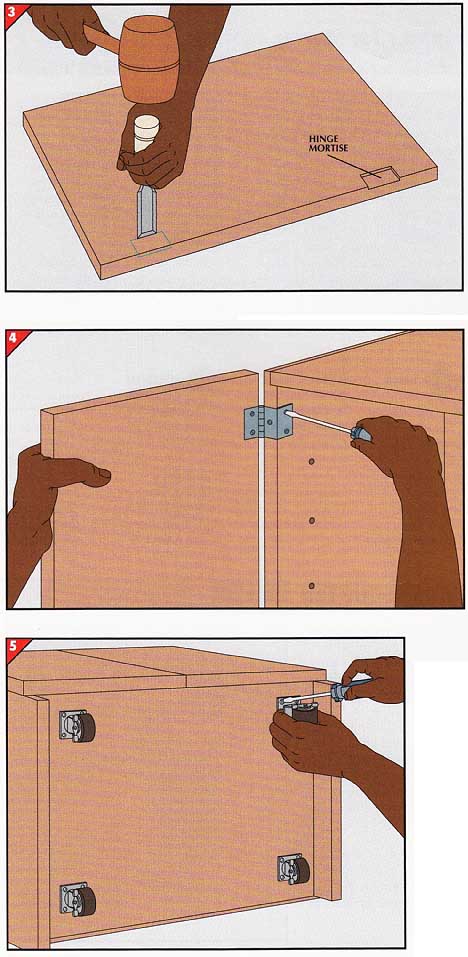
• For the hinge mortises, outline the edges and thickness of the hinge leaves on the door. Then cut around the outline with a chisel and mallet.
• With the chisel beveled side up, make a series of shallow cuts to shave the recess to the thickness of the hinge. Repeat to cut the second mortise.
• To fasten each hinge to the door, position the leaf in its mortise, mark the screw holes with an awl, and drive 3/4-inch No. 8 wood screws.
4. Hanging the doors.
• With a helper holding one door in position against the cabinet, mark the edges and thickness of the portion of the hinge leaf on the front edge of the cabinet side. Cut a mortise at each out- line—the leaves on the inside of the side panel sit flush on the surface. Fasten the hinge leaves to the cabinet.
• Install the other door the same way.
• Attach a magnetic catch assembly to the underside of the cabinet top and the inside top corners of the doors.
5. Adding casters and shelves.
• With the cabinet on its side, position a swivel-type locking caster on the bottom far enough from one corner so it will not bump against a cabinet side when it rotates. Fasten the caster in place with the screws provided, then install the remaining ones.
• Make shelves from 3/4-inch plywood, cutting them 1/8-inch shorter than the inside dimensions of the cabinet to allow for an easy fit. Insert shelf sup ports in the holes in the side panels and slide the shelves in position.
Next: Tailored Spaces
for Storing Materials
Prev: Intro and Storage in
the Workshop

