Hardware, lumber, and other work shop materials need to be stored in an organized fashion. The resulting lack of clutter will not only make your shop more efficient—the space will be safer.
Shelving: Mounted on L-shaped brackets, shelving can sit over a work bench or cover a wall (below). On interior partition walls without insulation, you can remove a section of wallboard and install narrow shelves between the studs. These shelves can be either stationary or, when held by metal standards and shelf supports, adjustable. Joist-supported shelves—ideal for masonry walls—are another option.
Storing Hardware: Small shop materials can be conveniently stored in containers of various sizes. These are easy to track and less apt to break or spill when anchored to shelves or collected in drawers.
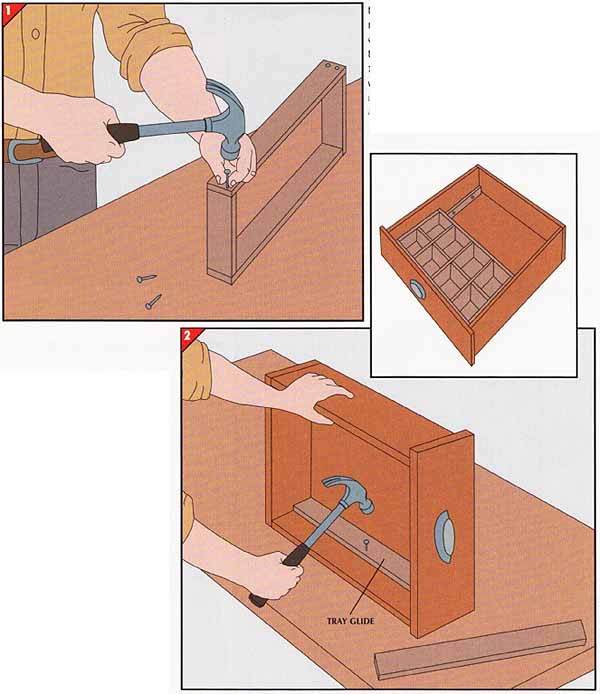
Drawers can be subdivided into small compartments or fitted with inserts to organize jars. You can maximize the space in a deep drawer by installing a tray in the upper part.
Stacking Lumber: Store lumber on racks that keep it off the floor — out of the way but still accessible.
TOOLS:
- Electronic stud finder
- Carpenter’s level
- Awl
- Electric drill
- Screwdriver
- Tape measure
- Circular saw
- Combination square
- Wallboard saw
- Pry bar
- Hammer
- Plumb bob
- Coping saw
- Compass
- C-clamp
- Saber saw
- Wrench
- Woodworking vise
MATERIALS:
- Shelf brackets
- 1 x 2s, 1 x 4s, 1 x 6s, 2 x 4s, 2 x 6s
- Shims
- Plywood (1/2”, ¾”)
- Hardboard (1/8”, 1/4”)
- Common nails (3/4”, 1”, 1½”, 2”, 3”, 3½”)
- Finishing nails (1½”)
- Masonry nails (3/4”)
- Wood screws (4”, 14”, 2” No. 8)
- Round-head wood screws (4” No. 6)
- Lag screws (4” x 3”, 4”, 44”), washers
- Screw anchors
- Construction adhesive
- Shelf standards and clips
- Wood glue
SAFETY TIPS: Wear goggles when nailing or when operating power tools.
Wall-Mounted Shelves
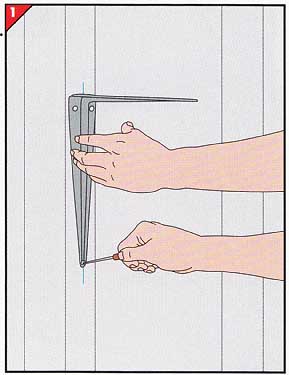
1. Positioning and cutting the shelf.
• For a stud wall, locate and mark the proposed shelf height on every second stud. With a level, mark a vertical line on the center of the studs.
• Center a shelf bracket just be low the height mark at one end of the desired shelf span. Center the bracket’s vertical arm on the vertical line, then mark the screw holes with an awl.
• Drill a pilot hole for 1½-inch No. 8 wood screws at each awl mark, then fasten the bracket to the stud.
• Cut a shelf from 3/4-inch ply wood or 1-inch lumber, limiting its width so it will extend beyond the front arm of the bracket by no more than one-third the arm’s length. Make the shelf long enough to stretch 4 to 6 inches past each end bracket.
• Position the shelf on the wall with one end on the installed bracket, and transfer the stud marks to the underside of the shelf; take the shelf down, and use a combination square to ex tend the lines across the shelf.
For a masonry wall, mark the pro posed location of the shelf using a level. Cut the shelf to the de sired length, but limit its width as described above.
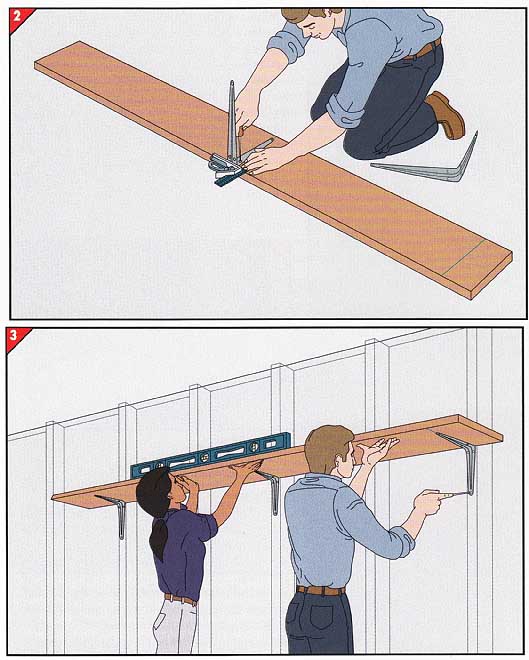
2. Fastening brackets to the shelf.
• Center a shelf bracket on one of the marked lines on the shelf, butting it against a combination square to position it flush with the edge of the shelf.
• Mark the screw-hole locations on the shelf, drill a pilot hole for 3/4-inch screws at each mark, and fasten the bracket to the shelf.
• Attach the remaining bracket in the same way.
For the masonry-wall shelf, space the brackets equally along the length of the shelf, then fasten them in place.
3. Fastening the shelf.
• Reposition the shelf on the installed bracket. With a helper, level the shelf, then mark the screw-hole locations for each bracket.
• Remove the shelf, drill a pilot hole for 1½-inch screws at each mark, then fasten the brackets to the studs.
• Screw the first bracket to the underside of the shelf.
On the masonry wall, position the shelf on the wall and mark the bracket holes. Drill a pilot hole at each mark, drive in masonry anchors, and secure the brackets.
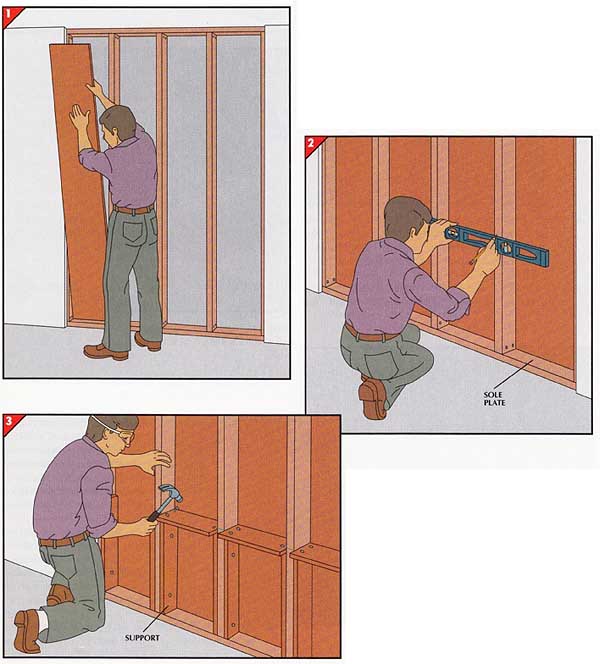
Storage between Wall Studs
• Turn off the power to electrical circuits in the work area in case you cut into wires.
• With a wallboard saw, cut out a section of wall board to expose the studs behind the wall. Remove any fire stops—boards fastened horizon tally between studs—from the exposed area.1/4-inch hardboard panel to fit each gap between the exposed studs, spread construction adhesive on one side of the panel, and gently press it into place (top).
2. Marking shelf locations.
At each position for the first tier of shelves, hold a level across two adjoining studs and mark level lines on their front edges (middle).
3. Mounting the shelves.
• Cut two 1 -by-4 supports for each shelf, making them 3/4-inch shorter than the distance from the sole plate to the shelf-location mark.
• Cut 1 -by-6 or 1 -by-4 shelves to fit between the studs.
• Set the shelf supports on the sole plate, flat against the insides of the studs, and nail them in place with 2-inch common nails.
• Lay each shelf on its supports and toenail two nails through each end into the stud.
• Mount more tiers of shelves the same way, resting the supports on the first tier.
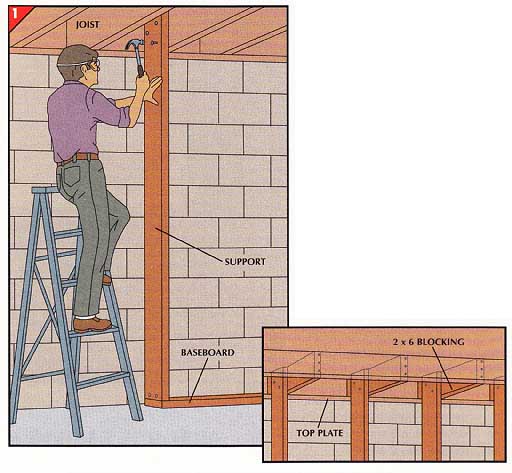
Anchoring Shelves to Joists
• For joists perpendicular to the shelves, hang a plumb bob from the outside faces of the joists at each end of the proposed shelf and have a helper mark the floor where the bob touches it. Mea sure the distance between the marks and cut a pressure-treated 2-by-6 3 inches longer than this length. Position the board with each end extending 1½-inches beyond each mark. Holding the baseboard against the wall, shim it level, if necessary, and fasten it to the floor with 3-inch masonry nails.
• For the end joists and every second joist in between, cut a 2-by-6 support to span from the baseboard to 6 inches above the bottom edge of the joists. Fasten the top of the supports to the joists with three 3-inch common nails.
• Check each support for plumb with a level, then toenail the bottom to the baseboard with 3½-inch nails.
For joists running parallel to the shelving, first cut 2-by-6 blocking to fit between the joist resting on the top plate and the next joist at 32-inch intervals. Fasten the blocking to the joists and toenail it to the joist on the top plate with 3½-inch nails. Then prepare the baseboard and supports, anchoring the supports to the blocking rather than the joists (inset).
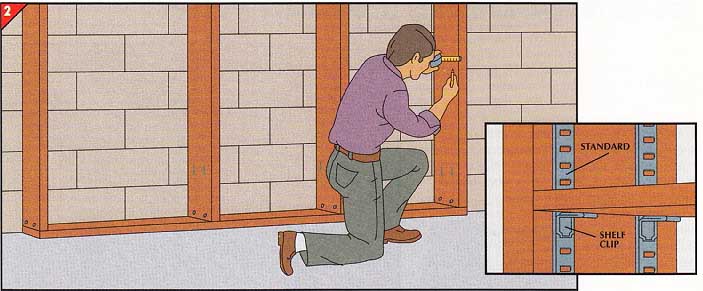
2. Installing shelf standards and shelving.
• Mark locations for metal shelf standards on the in side faces of the shelf supports 1½-inches from the front and back edges at the top, middle, and bottom . At each location, set a standard on the baseboard, align it with the trio of marks, and drill pilot holes for the screws provided. Then fasten the standard to the support. To prevent the screws on the other side of the same support from hitting each other, align the second standard on the opposite side of the location marks.
• Snap shelf clips into the standards (inset), then cut the shelves from 1 -by-6 lumber to fit between adjoining supports.
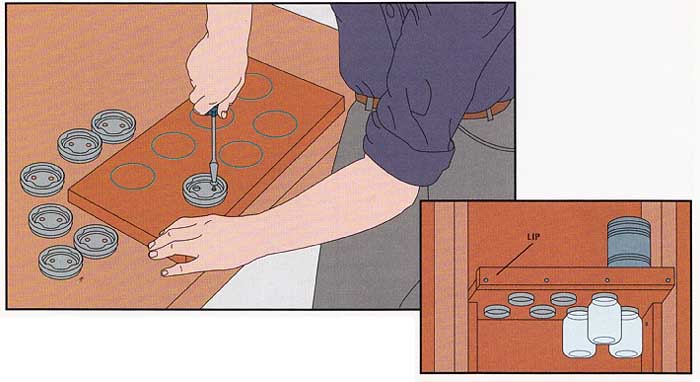
Hanging Containers
• For every container to be hung, out line its lid on the underside of the shelf. Leave about 2 inches of clearance between outlines and stagger them so all the jars will be visible.
• With a nail, punch two holes through each lid for 5/8-inch No. 6 round-head wood screws, then fasten the lids to the shelf.
• To keep objects stored on the shelf top from slipping off, fasten a 1 -by-2 lip to the front edge of the shelf with 1½-inch finishing nails (inset), then install the shelf and screw the jars into their lids.
Egg-Crate Compartments to Organize a Drawer
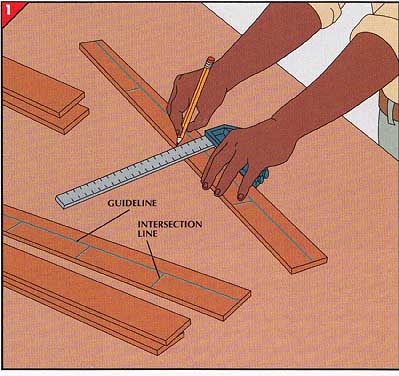
1. Cutting and marking divider strips.
• Determine the size and number of compartments you want in the drawer.
• Cut two sets of divider strips from 1/8-inch hardboard—one set to fit lengthwise and one to fit widthwise in the drawer. Make them ½-inch narrower than the height of the drawer.
• Draw a guideline ¼-inch off center down the length of one strip from each set, then use a combination square to mark compartment-intersection lines perpendicular to the guideline across the wider portion of the strip.
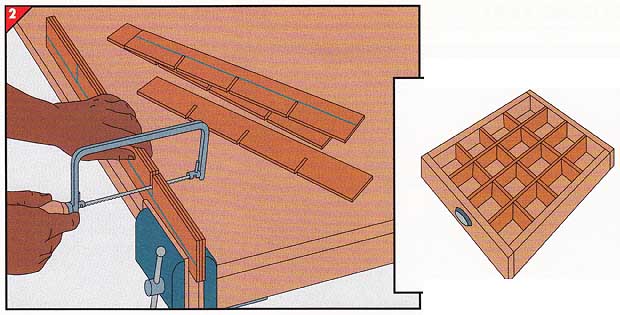
2. Cutting slots in the divider strips.
• Stack each set of divider strips with the marked strip on the outside, align the ends of the strips, then clamp one set on edge in a vise so the intersection lines face up. Cut along both sides of each line with a coping saw to make a slot 1/8-inch wide, pushing out the waste wood at each slot.
• Cut the other set in the same way.
• Assemble the strips by interlocking the lengthwise strips with the width- wise ones, aligning the slots. Place the assembly in the drawer (inset).
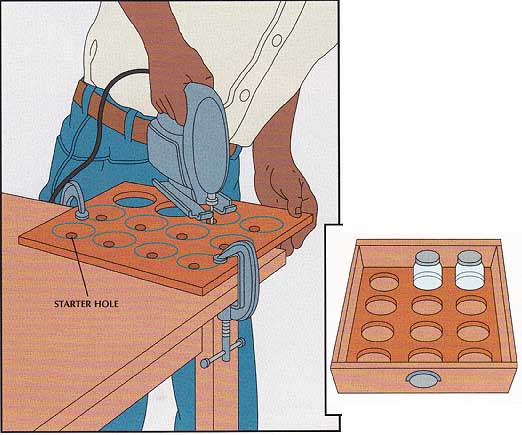
A Divider for Jars
• Cut a piece of ½-inch plywood to fit flat into the bottom of the drawer.
• On the plywood, outline the bottoms of the jars to be stored in the drawer, then use a com pass to enlarge the radius of each circle by ¼-inch. Place a wood scrap under the divider and drill a 1/2-inch starter hole for a saber-saw blade in each circle.
• Clamp the plywood over the edge of a work table. Cut out the circles with a saber saw.
• Slip the insert into the drawer and stand jars in the holes (inset).
A Sliding Tray
1. Assembling the tray. (see image below)
• From a piece of 1/2-inch plywood one- half as wide as the inside height of the drawer sides, cut two lengths 4 inch shorter than the inside width of the drawer, and two more pieces one-half as long as the inside length of the sides.
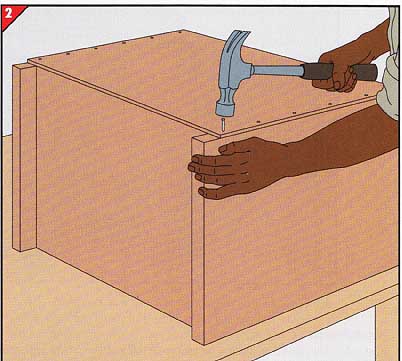
• With wood glue and 1½-inch common nails, assemble the pieces into a boxlike tray.
• Cut a bottom from a piece of 1/8-inch hardboard and fasten it to the tray with wood glue and 1-inch nails.
• Make egg-crate dividers for the tray if desired.
• For each glide, cut a piece of 4-inch plywood one-half as wide as the inside height of the drawer sides and equal to their inside length.
• Set a glide in the drawer flat against the inside of one drawer side. Fasten it with glue and i-inch common nails . Install the other glide to the opposite side.
Slide the tray back and forth on the glides, as needed, to access the items in the drawer (inset).
Keeping Wood High and Dry
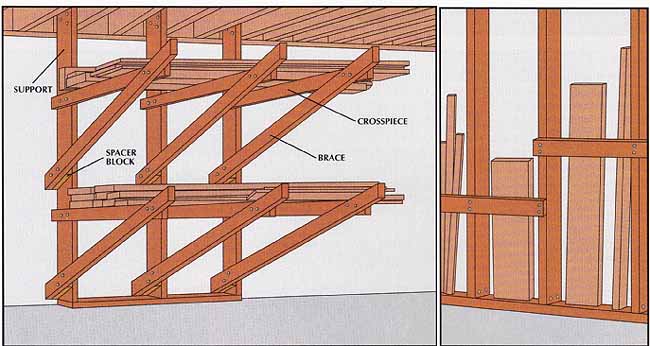
A lumber rack for a masonry wall.
The framework of the rack illustrated above can be built with by 3/8-inch lag screws and washers used to fasten the supports to the joists. The crosspieces on which the lumber will sit are 2-by-4s cut to 3-foot lengths; to 4-inch lengths for the spacer blocks; and to 5½-foot lengths for the braces. One end of each brace is mitered at a 45-degree angle. The crosspieces and supports and the braces and crosspieces are joined by two lag screws at each connection. For the brace-support connections, two 4½-inch lag screws are used with a spacer block in between. For a wall with exposed studs, you can forgo the supports and fasten the braces and crosspieces directly to the studs.
Making use of exposed studs.
Dowels, moldings, and other small lumber pieces can be stored by nailing wood strips across the front of the studs.
For a shop with exposed ceiling joists, four 30-inch-long 2-by-4s are cut for uprights and two 4-foot lengths are cut for the crosspieces. The uprights are attached to the joists and the crosspieces to the uprights with 3/8- by 3-inch lag screws and washers; the uprights on the same joist are spaced 4 feet apart and the second pair is positioned about 6 feet away from the first.
For a finished ceiling, four 49½-inch-long crosspieces are cut from 2-by-4 stock and eight 24-inch uprights are cut from 1 -by-4 stock. The two frames are built by joining the uprights to the crosspieces with wood glue and 2-inch No. 8 wood screws. The frames are fastened to the center of four of the joists about 6 feet apart with 4-inch lag screws.
Next: Controlling
Workshop Dust
Prev: A Wheeled Tool Cabinet
