A neat and uncluttered workshop, where tools, hardware, and materials are sorted and stored in an organized fashion, will make your work easier, safer, and more enjoyable. This chapter shows you how to build and set up a range of storage aids, as well as how to keep dust and debris under control.
Storage in the Workshop
- Perforated Panels for Quick Storage
- A Drawer Hung Underneath a Worktable
A Wheeled Tool Cabinet
- Putting the Pieces Together
Tailored Spaces for Storing Materials
- Wall-Mounted Shelves
- Storage between Wall Studs
- Anchoring Shelves to Joists
- Hanging Containers
- Egg-Crate Compartments to Organize a Drawer
- A Divider for Jars
- A Sliding Tray
- Keeping Wood High and Dry
Controlling Workshop Dust
Storage in the Workshop
Storing tools and materials so they remain in good condition and are easily accessible is essential for a smoothly running shop. Careful planning will allow you to make the most efficient use of the space you have.
Simple Hangers: An easy way to hang tools and supplies is to drive 2½” finishing nails into wall-mounted plywood. To protect fine tools from scratches, use wooden dowel pegs instead of nails.
Versatile Pegboard: Perforated tempered hardboard—known as pegboard —coupled with a variety of metal and plastic hangers can transform a wall, the inside of a door, or the side of a table into efficient storage surfaces. A 1/8-inch thick sheet will hold small hand tools such as screwdrivers, pliers, and wrenches; 1/4-inch is best for heavier items.
Drawers: Shallow drawers hung beneath the workbench are convenient for storing small tools. They can also be divided into compartments tailored to suit their contents.
TOOLS:
- Tape measure
- Circular saw
- Hammer
- Electric drill
- Counterbore bit
- Screwdriver
- Straightedge
- Router and bits (straight, rabbeting)
- Table saw
- C-clamps
- Bar clamps
- Mallet
- Backsaw
- Sanding block
- Table saw
MATERIALS:
- Pegboard and hangers
- 1 x 2s
- 1 x 4s
- Plywood (1/4”)
- Common nails (2”)
- Brads (1”)
- Wood screws (2” No.6; 1” No.8)
- Wood glue
- Dowel (1/4”)
- Sandpaper (medium grade)
- Paraffin
SAFETY TIPS: Wear goggles when nailing or operating power tools.
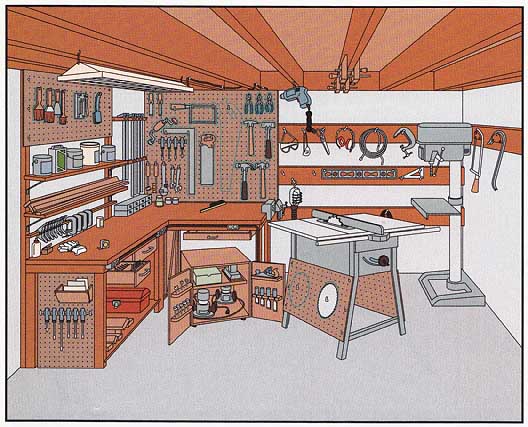
This workshop combines several practical tool-storage systems. Pegboard above the workbench and on the sides of the bench and table saw, and racks made of dowels in plywood strips fastened to wall studs, store hand tools within easy reach. Wall shelves display supplies, and drawers hung beneath the workbench keep small items confined. The notched rack against the wall holds bar clamps, and a wooden cleat just above the workbench stores spring clamps and C-clamps; even the joists are utilized. A lockable cabinet on casters safeguards power tools such as drills and routers, and provides an extra work surface.
Perforated Panels for Quick Storage
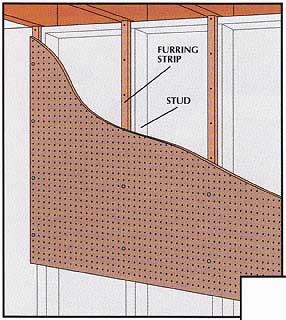
Mounting pegboard.
In a typical installation , 1 -by-2 furring strips hold the pegboard inch from the wall to allow space for the backs of the hangers. The furring strips are nailed to wall studs with 2-inch common nails, then 1 -inch No. 8 wood screws and washers at 6-inch intervals fasten the board to the furring strips.
On a concrete-block wall, use masonry nails and construction adhesive to fasten the furring strips to the blocks.
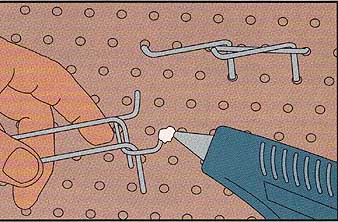
Hangers for pegboard.
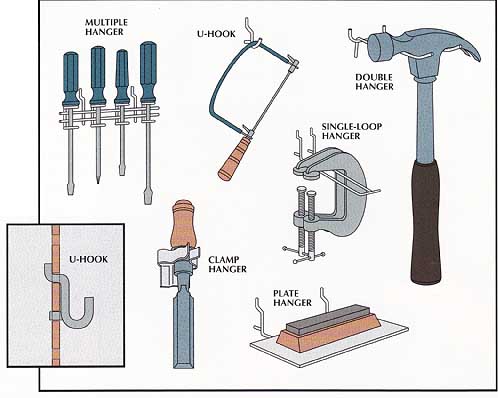
A wide variety of pegboard hangers is available; some common types are shown at right. Multiple hangers hold screwdrivers and pliers. Clamp hangers offer firm support for chisels and other round-handled tools. The versatile U-hook is suitable for tools with straps, holes, or loop-shaped handles; the type with an extra tip on the back (inset) keeps the hook from swiveling. Plate hangers support flat-bottomed tools such as sharpening stones. A single-loop hanger is convenient for clamps, a hand drill, or handsaw. A double hanger is ideal for a hammer.
TIPs from the PROs: Anchoring Hangers
To prevent pegboard hangers from falling off the board when you remove a toot, place a large drop of hot glue on each hanger hook just be fore slipping it in place. If you need to subsequently reposition a hanger, hold a heat gun against the peg board for a few seconds to soften the glue.
A Drawer Hung Underneath a Worktable
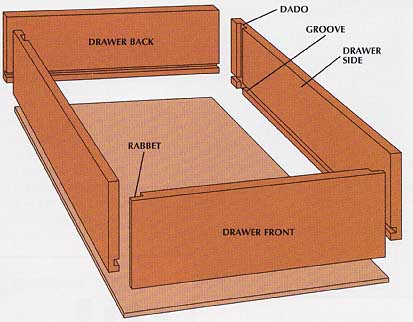
This drawer is a simple box with the front, back, and sides cut from a 1 -by-4, and the bottom made from 1/4-inch ply wood. Dimensions depend on your needs and on the size of worktable to which the drawer will be attached, but certain features are shared by all sizes.
The drawer front has rabbets cut into both ends to accommodate the sides. The drawer back, cut ¾-inch narrower than the front, fits into dadoes cut into each side piece ½-inch from the end. The plywood bottom, 5/8-inch longer and wider than the inside dimensions of the drawer, is held in a dado cut near the bottom edges of the 1 -by-4s.
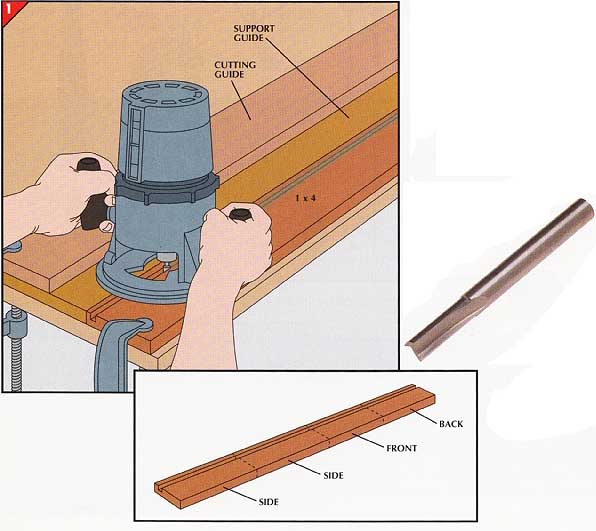
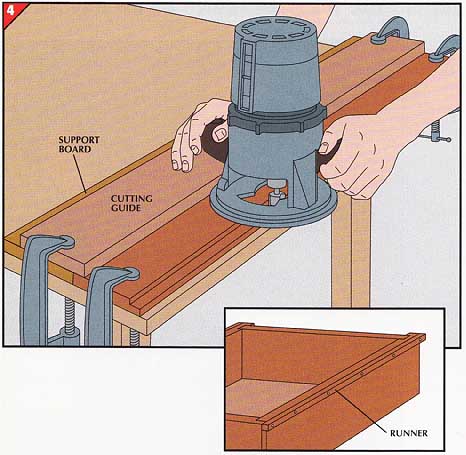
1. Cutting the dadoes and rabbets.
• On a 1 -by-4 board as long as the combined lengths of the drawer front, back, and sides, draw lines 3/8- and 5/8-inch from one edge.
• Butt a 3/4-inch-thick support board against the 1 -by-4, and set a straight-edged cutting guide on top of the support board.
• Install a 1/4-inch straight bit (photograph) in a router. With the router bit aligned between the groove lines, butt the cutting guide against the tool’s base, then clamp it in place.
• Rout a 1/4-inch groove along the length of the 1 -by-4 , moving the clamp out of the way if necessary.
• Mark the lengths of the front, back, and sides on the board (inset), then cut them.
• With a 3/4-inch straight bit, rout a 3/8-inch deep dado into each side piece, 1/2-inch from the end.
• Rout a 9/16-inch-deep rabbet into the ends of the drawer front.
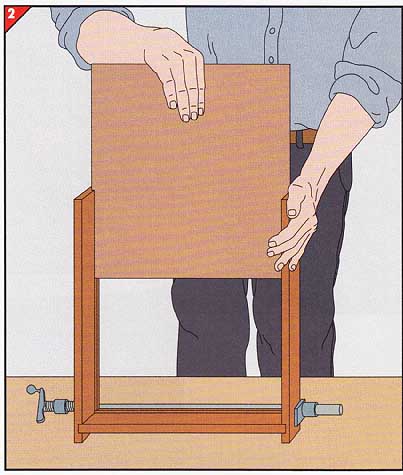
• Spread wood glue in the vertical dadoes in the side pieces and place the back of the drawer into them. Secure the assembly with a bar clamp.
• Cut the drawer bottom inch longer and wider than the inside measurements of the drawer.
• Set the drawer on its back and slide the bottom into its horizontal dadoes; do not glue the bottom in place.
• Spread glue in the rabbets in the drawer front, position the front against the sides and bottom, then clamp it in place.
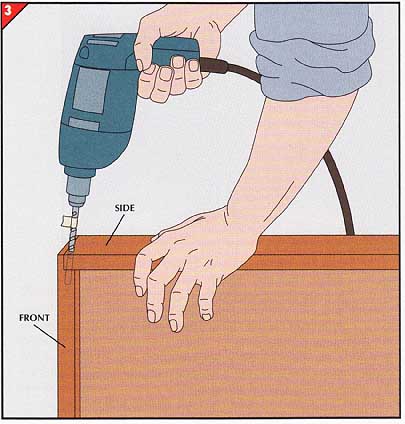
• Wrap a piece of masking tape as a depth gauge around a 1/4-inch drill bit 1¼-inches from the end.
• Holding the bit about ½-inch from the top edge of the drawer side and ½-inch from the front edge, bore a hole at a slight angle through the side into the front. To avoid drilling through the drawer front, stop when the masking-tape gauge contacts the wood. Make another hole at the bottom edge of the drawer side and two more through the opposite side.
• Cut four pieces of ¼-inch dowel about 1½-inches long. Squirt glue in the holes and tap the dowels in with a mallet. Cut off the ends of the dowels with a backsaw, then use medium-grade sandpaper to sand them flush with the drawer sides.
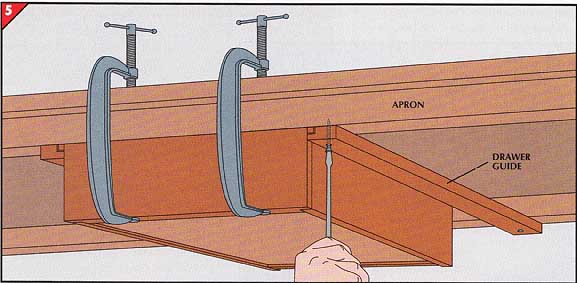
Runners fastened to the drawer sides along their top edges fit into guides attached to the underside of the work table, enabling the drawer to be slid in and out.
• For each guide, cut a 1 -by-4 to the width of the worktable.
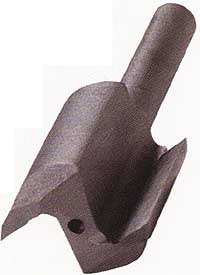
• Place a 1 -inch-thick support board beside the 1 -by-4. Fit a 3/4-inch straight bit (photograph below) into the router, position a cutting guide so the bit will cut a 3/8-inch-wide, 3/8-inch-deep rabbet in the 1 -by-4’s edge. Clamp the boards and cutting guide to the work surface, then rout the rabbet , moving the clamp out of the way if necessary.
• Cut the 1 -by-4 in half and rip it 1½-inches wide.
• To make runners, rip a length of 1 -by stock 3/8-inch thick and wide on a table saw. Fasten the runners to the drawer sides with glue and 1-inch brads (inset).
• Holding the wide edge of a drawer guide against the underside of the table’s aprons, drill counter sunk clearance holes for 2-inch No. 6 wood screws through it at the center of each apron. Repeat for the other guide.
• Clamp the drawer in its closed position under the table. Holding one drawer guide over a runner with a small gap between the guide and runner, drill pilot holes up into the aprons, through the holes in the guide. Then do the same with the other guide.
• Fasten the guides to the table.
• Screw a small block of wood to the back of each guide to stop the drawer from sliding too far under the bench.
• Sand the adjoining surfaces of the runners and tracks. Lubricate the guides with paraffin so the drawer will slide smoothly.
Next: A Wheeled Tool
Cabinet
Prev: A Space-Efficient Tool Turret
