Certain jobs such as fixing a leaky faucet or patching wallboard cannot be undertaken in the shop. In such cases, you have to take the workshop to the job.
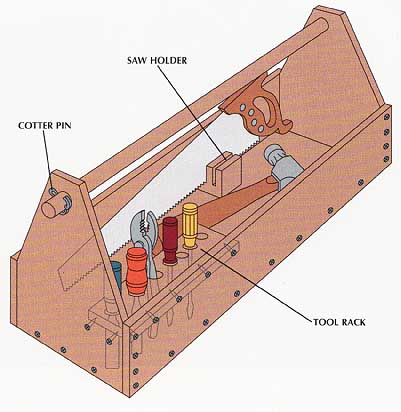
Tool and Material Carriers: A wooden toolbox (below) sized to accommodate the items you expect to carry is a worthwhile accessory. Rather than trying to transport all your tools in a single box, you may prefer to build two or more smaller carriers— one for all-purpose tools, another for electrical work, and a third to take to plumbing jobs.
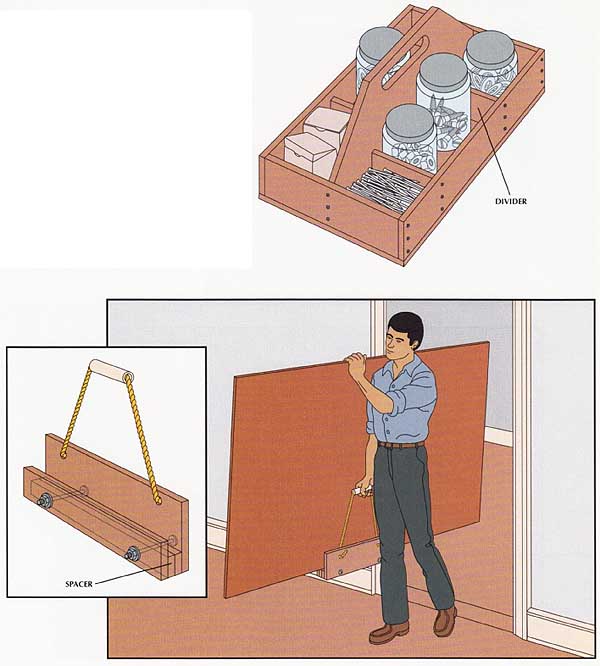
A hardware organizer is ideal for carrying small items such as nails, screws, bolts, nuts, and washers.
For toting cumbersome materials such as 4-by-8 sheets of plywood or wallboard, build a rope-handled carrier.
Workstands: For jobs away from the shop that require a temporary workbench, you can set up and support a work surface with two folding sawhorses. Compact and simple to transport, these stands pass easily through doorways and, when not in use, hang almost flat against the shop wall.
TOOLS:
- Tape measure
- Circular saw
- Electric drill
- Screwdriver
- Pliers
- Saber saw
- Protractor
- T-bevel
- Handsaw
- Wood chisel
- Mallet
- Hammer
MATERIALS:
- 1 x 3s
- 2 x 4s
- Plywood (1/2”)
- Wood dowel (7/8”)
- Wood glue
- Cotter pins
- Wood screws (1”, 1¼”, No. 6; 1¼”, 3” No. 8)
- Carriage bolts (3/8” x 2½”, 5”), washers, nuts, and wing nuts
- Butt hinges (3”)
- Rope
- Plastic pipe
SAFETY TIPS: Wear goggles when nailing or when operating a power tool.
HOMEMADE CARRIERS FOR TOOLS AND MATERIALS
• From 1/2-inch plywood, cut the sides, end panels, and bottom pieces of the box, sized to accommodate your tool collection. The sides can typically be about 8 inches high and the ends high enough to position the handle above the tools.
• Drill 7/8-inch holes for the handle near the top of the end panels, stacked so the holes will line up.
• Fasten the pieces together with glue and 1 1/4-inch No. 6 wood screws.
• Add tool-holding accessories such as a slotted saw holder, screwed to the bottom of the box, and a tool rack fastened in a corner.
• For the handle, drill a hole through a length of 7/8-inch wood dowel near each end and slide it through the holes in the end panels. To hold the handle in place, insert cotter pins in the holes and bend back their ends.
• Design a box large enough to hold the planned contents and partitions, then cut the pieces for the sides, bottom, and dividers from 1/2-inch plywood.
• With a saber saw, cut a handhold in the middle divider.
• With glue and 1-inch No. 6 wood screws, fasten the sides to the bottom, and individual dividers to the long middle divider. Then fasten the entire divider assembly to the box.
Carrying panels with ease.
• From 1/2-inch plywood, cut two 16-inch- long pieces for the sides of the carrier; make one 2 inches high and the other 4 inches high. For the spacer, cut two pieces of plywood 1 inch high and glue them together face to face.
• Sandwich the spacer between the sides; glue the pieces together, then drill two 3/8-inch holes through all three, and join them with 3/8- by 2 1/2-inch carriage bolts.
• Bore two holes along the upper edge of the high side for a rope handle. Thread a short length of plastic pipe or garden hose over the rope as a hand grip, and knot the rope against the carrier. The knot may be untied and adjusted to suit the height of the person carrying the panel.
FASHIONING A FOLDING SAWHORSE
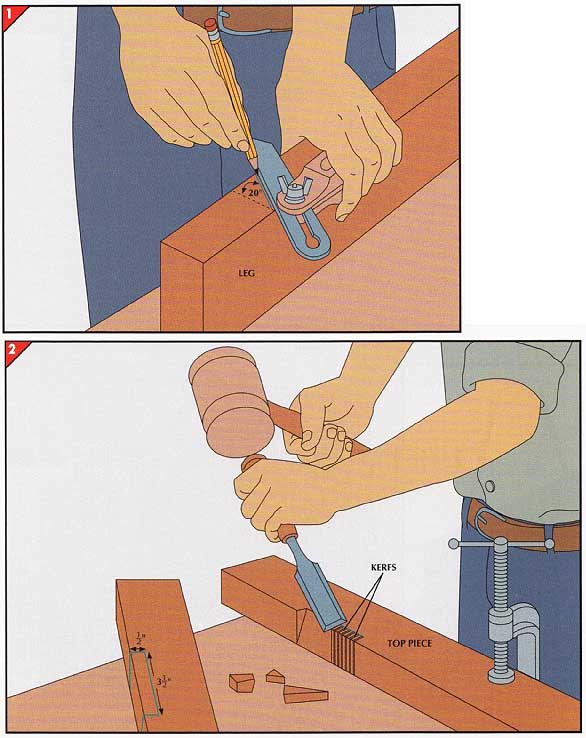
If you will be using a circular saw, mark two lines across the face of each 2-by-4 leg, 2 feet apart, tilt the saw’s base plate to 20 degrees, and cut the legs at the lines.
• If you’re using a handsaw, first set the blade of a T-bevel to 20 degrees with a protractor and hold the blade against a leg to mark one end.
• Mark the opposite end with a parallel line 24 inches away.
• To guide the blade as you cut the angled ends, extend both lines completely around the leg, marking straight lines across the faces of the 2-by-4 and angled lines on the edge.
• Cut the leg, then use it as a pattern for sawing the other three.
2. Notching the top pieces.
• Cut two 30-inch-long 2-by-4s for the top.
• Along one edge of each piece, mark a 3½” notch for the legs 4 inches from each end. Also mark a line on the face of the board, inset inch from the edge to define the angle of the notch.
• With a handsaw, cut kerfs at 1/2-inch intervals across the notch outline. Clear out the bulk of the waste with a chisel and mallet, keeping the bevel of the chisel toward the waste. To clean up the notch, move the chisel with hand pressure only.
• To attach each leg, hold it in its notch flush with the surface of a top piece, drill pilot holes for three 3-inch No. 8 wood screws, then secure the leg to the top.
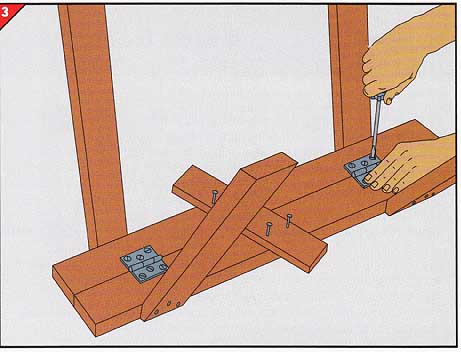
• Butt the top pieces against each other upside down and hold them together temporarily with nails and a piece of scrap wood.
• Place two 3-inch butt hinges across the joint between the top pieces about 6 inches from the ends; mark the holes, drill a pilot hole at each mark, and fasten the hinges with 1¼-inch screws.
![]()
4. Bolting braces to the legs.
• For each top brace, hold a 1 -by-3 across a pair of legs and butted against the underside of the top, and mark the outside edge of the legs on the 1 -by-3.
Mark bottom braces 10 inches lower down the legs. Saw the braces to length.
• Tack the upper braces to the legs and drill 3/8-inch clearance holes through the braces and legs. Remove the nails and attach the braces with 5-inch carriage bolts, washers, and wing nuts.
• Remove the scrap wood, and secure the lower braces the same way.
To fold the sawhorse for transport or storage (inset), remove one bolt from each brace and let the braces hang free; the hinges under the top will let the legs collapse. Store the bolts you removed in the legs.
Next: A Bench for
Metalworking
Prev: A Shop-Made Router
Table


