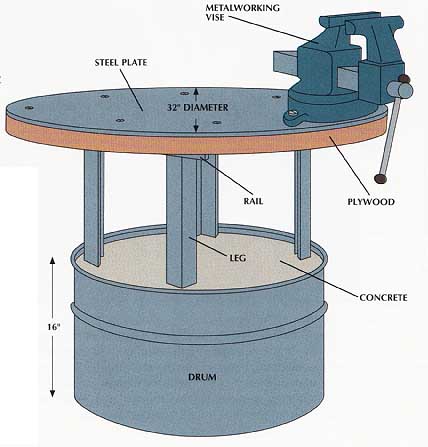
Anyone whose specialty is metalworking will appreciate the practical island-style bench pictured below. Weighted at the base, it is small enough to allow you to circle the work, approaching it from any angle. The durable steel-plate top is absolutely flat—an advantage if your work includes aligning metal seams. Although the base and top together weigh more than 400 pounds, the bench can be tipped onto a dolly and moved fairly easily.
Buying and Preparing the Metal: Purchase an empty 55-gallon drum and have a metalworking shop trim it down, or do the job yourself with a hacksaw. Both the steel plate for the top and the angle irons for the legs are available at metal-products shops. Choose ungalvanized steel for the top, to reduce glare.
Most metal shops will cut and drill holes in the metal parts to your specifications, and can shape a square steel plate into a round disk. You can cut costs by leaving the top square, but you may find that the sharp corners are a hazard.
SAFETY TIPS: Wear goggles when hammering or when using power tools. Put on gloves and goggles to mix and pour concrete.
TOOLS:
- Saber saw
- Wrench
- Carpenter’s square
- C-clamps
- Electric drill
- Screwdriver
- Metalworking vise
MATERIALS:
- Plywood (1”)
- Concrete
- 2 x 4s
- Angle irons (1/4” x 2” x 2”)
- Lag screws (3/8” x 1”), washers
- Machine bolts (3/8” x 1”), lock washers, and nuts
- Drum (55-gallon)
- Steel plate (1/4”)
- Wood screws (1” No. 8)
For the table top, a sheet of 1 -inch plywood cut 32 inches in diameter has a matching 1/4-inch steel plate attached to it with screws running through eight countersunk holes, evenly spaced, about 2 inches from the edge. Each side of the top is supported by a leg assembly that includes a 21-inch rail and two 24-inch legs made of 1/4- by 2- by 2-inch angle iron. The top flanges of the rails are bolted to the plywood with three lag screws running through holes 8 inches apart. The legs are fastened to the vertical flanges of the rails, 3½-inches from each end, with machine bolts running through a hole in the top of each leg. A 55-gallon drum, cut to a height of 16 inches, is filled with approximately 4 cubic feet of concrete, and the legs are sunk in the concrete so the table height falls at knuckle level when the owner is standing next to it with loosely hanging arms. A metalworking vise is fastened to the top with machine bolts and nuts.
• With a saber saw, cut a piece of 1-inch plywood into a circle 32 inches in diameter.
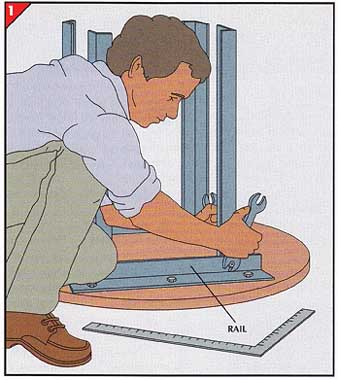
• Set the rails on the underside of the top, placing them parallel and 16 inches apart, with their vertical flanges inward. Mark the holes in the rails and drill pilot holes into the top, then anchor the rails to the top with 3/8- by 1 -inch lag screws.
• Bolt the legs to the rails with 3/8- by 1-inch machine bolts, placing a lock washer behind each nut. Check with a square that the legs are perpendicular to the top, then tighten the fasteners.
Choosing a Metalworking Vise: A solid vise s indispensable for metal working. One with jaws that open to about 5 inches works well for most home workshop needs. Look for a vise with a swivel base and replace able jaw plates. The model shown here has an integral anvil next to the right hand jaw for shaping metal.

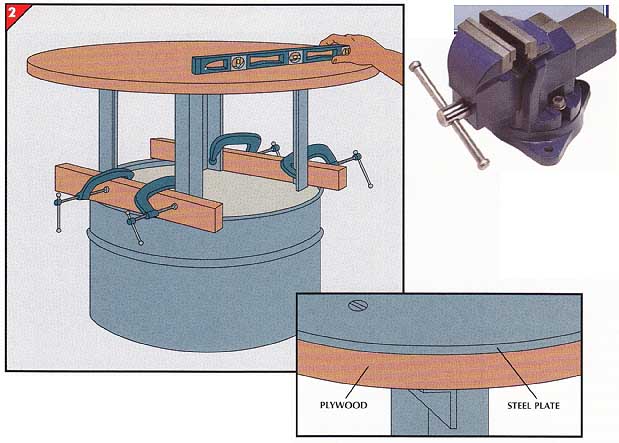
2. Embedding the legs in the base.
• Clamp a 24-inch-long 2-by-4 across each pair of legs about one-third from their bottom ends.
• Fill the base with concrete and sink the legs into it, letting the 2-by-4s rest on the rim.
• Loosen the clamps and adjust the position of the legs so the top is level and at the desired height.
• Allow the concrete to set for 48 hours, then remove the clamps and 2-by-4s.
• Set the steel plate on the top, drill pilot holes in the plywood through the holes in the plate, then attach the plate with 1-inch No. 8 wood screws, driving them so the heads lie flush with the plate.
Next: A Booth for
Spray Painting
Prev: Portable Shop Accessories

