Shop-made accessories can increase the efficiency and versatility of many workshop tools. Although commercial tables and jigs are available, you can save money and tailor the accessories to your needs by building them yourself.
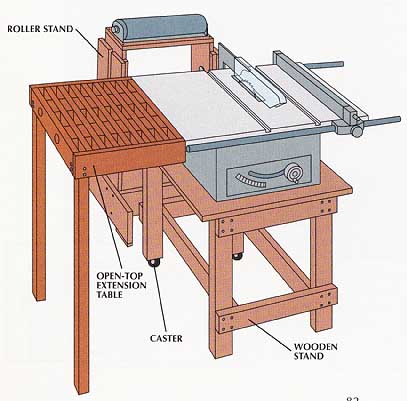
Work-Surface Extensions: To support panels and long boards at a stationary saw, use extension tables or roller stands. For general-purpose cutting with a table saw, place extensions on one side of the blade. For ripping 4- by 8-foot panels, however, you may prefer to extend the table by 2 feet on both sides of the blade; to crosscut very long boards, set up an even wider extension. For ripping on a table saw, band saw, or radial-arm saw, you’ll need a roller stand at the out-feed side of the saw.
Because a radial-arm saw is often placed against a wall, its extension table can be as long as the available space—doubling as a work counter. It can be screwed to the wall and supported by legs along the outside edge.
Jigs: Shop-built “third hands” for specific tasks can make your work safer and more accurate. For a table saw, you can fashion crosscut, miter, and tenoning jigs, as well as feather-boards and push sticks. A shop-built drill-press table simplifies angled work.
TOOLS:
- Tape measure
- Carpenter’s level
- Carpenter’s square
- Circular saw
- Saber saw
- C-clamps
- Electric drill
- Spade bit (1”)
- Counterbore bit
- Hacksaw
- Wrench
- Screwdriver
- Combination square
- Hand-screw clamp
MATERIALS:
- Lumber (1”, 2”, 4”)
- Plywood (3/4”)
- Common nails (1¼”)
- Wood screws (7/8” No. 6; No. 8)
- Threaded rods (1/4”), washers, lock washers and nuts
- Carriage bolts (1/4” x 2”) washers, wing nuts
- Hanger bolts (7/16” x 2”), washers, wing nuts
- Wood glue
- Roller assembly
- Clear polycarbonate sheet
- Casters
- Toggle clamp
- Butt hinges (3”)
SAFETY TIPS: Wear goggles when nailing or operating a power tool.
Shop-built accessories hold a table saw at a convenient height and extend its working surface; they can be adapted for use with other power tools as well. To support the saw, build a wooden stand 32 to 42 inches high, basing its design on the wheeled table, or on one of the workbenches. To enable a non-wheeled type to be moved easily, you can shorten two of its legs and add casters. An open-top extension table bolted to the saw table will steady a sheet of plywood or a long board during crosscutting. A freestanding roller stand—positioned on the out-feed side of the saw at a right angle to the direction in which you push the work—will support long boards during rip cutting.
An Open-Top Extension Table

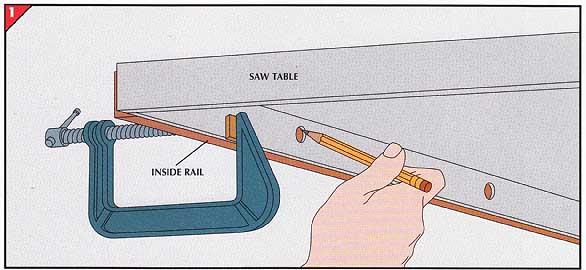
1. Establishing hole locations.
• To make an extension table for a table saw, start with the inside rail that will abut the edge of the saw table, and cut a 1 -by-2 rail 1½-inches shorter than the edge.
• Clamp the rail to the edge of the saw table with its top flush with the top of the table. On the rail, mark the holes along the table’s edge (above).
• Counterbore a 3/8-inch-deep hole at each mark with a 1 -inch spade bit, then drill through the center of the holes with a 5/16-inch twist bit.
• For every 1½-inches of extension table width you want to add, cut one rail to the same length as the inside rail and two 4-inch 1 -by-2 spacer blocks.
• Cut a 1 -by-4 outside rail the same length as the other rails.
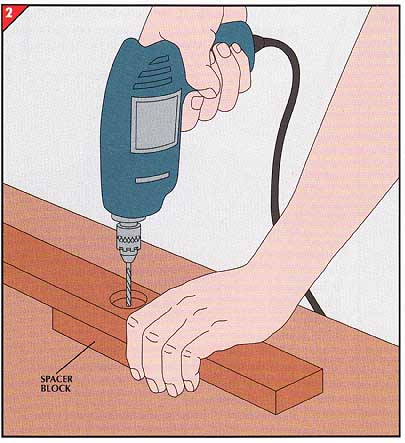
• Center a spacer block under one of the holes in the inside rail and line up the edges of the two pieces. Drill a matching hole through the spacer block.
• Use the spacer block as a guide to bore holes in the remaining blocks; use the inside rail as a guide for drilling 5/16-inch holes through the other rails. Mark the top of each piece after drilling it so the holes can be lined up quickly when you assemble the table.
• Counterbore the outside rail as you did the inside rail.
• With a hacksaw, cut two 1/4-inch threaded rods 1 inch longer than the extension-table width; put a washer and a nut on one end of each rod.
• Set the top edge of the outside rail on a flat surface and slide the rods through its holes.
• Thread the rest of the spacers and rails onto the rods, spreading a thin coat of wood glue on both sides of the spacer blocks as you go.
• Slip on the inside rail so its counterbored surface will butt against the saw table.
• Put a washer and a nut onto the outer ends of both rods, seating them in the counterbored cavities.
• With the assembly perfectly flat, tighten the nuts until the glue begins to squeeze out and about 1 inch of threaded rod extends from the holes in the inside rail.
• For the front and back of the extension table, cut two 1 -by-4s as long as its width.
• Holding one piece so its top edge is flush with the extension-table top, drill pilot holes through the board into the end of each rail.
• Spread glue on the rail ends and secure the piece with 1½” No. 8 wood screws.
• Attach the piece on the other side in the same manner.
• Slide the protruding ends of the threaded rods through the holes in the side of the saw table and prop up the other end of the extension table so it is level.
• Cut two 2-by-2 legs 1½” shorter than the height of the extension-tabletop.
• Holding a leg inside one corner of the extension table, drill four staggered pilot holes through the frame pieces and into the leg.
• Attach the leg with 2-inch screws. Fasten the other leg in the same way.
• Under the saw table, thread a lock washer and a nut onto each of the threaded rods and firmly tighten the nuts.
Extending a Radial-Arm Saw
Since the typical radial-arm saw lacks a convenient edge for bolting on an extension table, attach a permanent 2-by-2 connecting strip to the saw table.
• Build the extension table to the desired height and width as for a table saw.
• Cut a 2-by-2 to the same length as the extension table’s inside rail, drill pilot holes for 2½” No. 8 wood screws through the 2-by-2 and into the underside of the saw table, and fasten it in place.
• To attach the extension table, position it against the saw table and drill pilot holes for 2 1/4-inch screws through the 2-by-2 and into the inside rail, then screw the pieces together (inset).
Making a Roller Stand
• Cut two 30-inch-long uprights from 1 -by-6 stock.
Starting at one end, cut a 14-inch-long, ¼-inch wide slot down the middle of each upright with a saber saw.
• Cut two rails 19 ½-inches long and a crosspiece and two feet 18 inches long.
• Tack 3/4- by 3/4- by 3-inch pads to the underside of the feet to keep the stand from wobbling.
• Aligning the pieces with a carpenter’s square, hold a foot and an upright in a perfect “T.” Drill pilot holes through the joint, and fasten the pieces together with 1 1/4-inch No. 8 wood screws. Join the opposite foot and upright in the same way.
• Fasten the rails to the uprights, making sure that they are perpendicular to each other.
• Attach the crosspiece to the uprights just below the slots.
• As a guide for the roller frame, cut 3/4– by 3/4-inch cleats as tracks. With glue and 1 1/4-inch common nails, fix the cleats to the uprights about inch from the outside edges.
• From 1 -by-4 stock, cut four pieces to construct a 10- by 18-inch frame for the roller. Assemble the frame with glue and 1 1/4-inch screws.
• Screw the roller assembly to the frame or, instead of a roller assembly, fasten plate-mounted casters or commercial roller balls (inset) to the frame.
• Bore a 1/4-inch hole in the middle of each side of the frame and about 3 inches from the bottom, and push 1/4- by 2½” carriage bolts through the holes from the inside out.
• Lower the frame into the tracks so the carriage bolts slide down the slots. Set the roller at the desired height, then add a washer and a wing nut to each carriage bolt; tighten the nuts to hold the roller in position.
Building a Table-Saw Crosscut Jig
A jig like the one above will help you make accurate crosscuts with a table saw.
• From 3/4-inch plywood, cut the base 25 inches deep and as wide as the saw table, but no wider than 36 inches.
• Cut two 25-inch-long hardwood runners to fit the saw table’s miter slots.
• Drill countersunk pilot holes 3 inches from each end of the runners.
• Place the runners in the miter slots and slide them out to overhang the back end of the table. Position the base squarely over the runners and fasten it with 7/8-inch No. 6 wood screws (inset). Slide the base for ward and drive in the screws at the front end.
• Cut the support frame and guide from 2-by-4 stock to the width of the base.
• From a 2-by-2, cut the reinforcing blocks 8 inches long; with glue and 1¼-inch screws, fasten the blocks to the middle of the guide and support frame.
• Align the support frame along the back edge of the base, drill countersunk pilot holes through the base into the support, and fasten the pieces together with 1¾” No. 8 screws.
• With the runners in the miter slots, turn on the saw and cut a kerf through the support frame and three- quarters of the way across the base. Turn off the saw and lower the blade below the table.
• Using a carpenter’s square, align the guide along the front edge of the base square to the saw kerf, then clamp it in place. Screw the guide to the base from underneath.
• From a 4-by-4, cut the safety block 6 inches long, round off the top edge, and paint it red. Glue it to the guide, centered on the kerf.
• Raise the saw blade and finish the kerf across the base, cutting just far enough into the safety block so the top of the blade contacts the guide.
• Screw a clear polycarbonate blade guard to the reinforcing blocks.
• To hold the workpiece in position while making several crosscuts to the same length, screw a 1 -by-2 extension to the right side of the guide and clamp a stop block to the extension.
• With the workpiece against the guide and the cutting mark aligned with the blade, adjust the stop block to rest against the end of the board and clamp it in place.
• Make the cut by holding the work- piece firmly against the guide and the stop block and sliding the jig for ward, feeding the workpiece into the blade (left).
Guiding Miter Cuts
• Construct a crosscut jig, but make the base 24 by 24 inches, and cut the support frame and guide from 2-by-6 stock. Make the frame short enough so as not to interfere with long workpieces.
• Cut 17-inch-long miter arms from 1 -by-4s, beveling one end of each arm at 45 degrees. Butt the beveled ends together, centered over the kerf. Check with a combination square that each arm is at 45 degrees to the kerf, then screw them to the base from underneath.
• With the workpiece against the miter arm and the cutting mark lined up with the blade, butt a stop block against the piece and clamp it to the arm. Push the jig toward the blade. Make mating miter cuts on the other arm.
A Commercial Tapering Jig: Held against the rip fence of a table saw, an adjustable tapering jig allows you to repeat identical tapered cuts along the lengths of boards. The two legs of the jig are connected by a hinge, and a sliding adjustment bracket locks to set the legs at the desired taper. Reference lines on the taper scale allow you to measure the amount of taper in terms of inches per foot. A stop to hold the workpiece is fixed to one leg at the unhinged end. The workpiece is but ted against the stop, then the jig is pushed with the handle past the saw blade.
A Tenoning Jig

Building the jig.
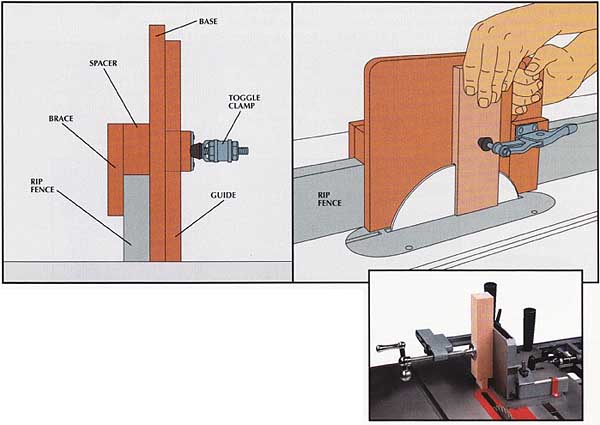
• From *-inch plywood, cut a 9- by 12-inch base and a 4- by 12-inch brace (above, left).
• With a saber saw, cut a hand hold in one corner of the base, as shown above, right.
• Cut an 8-inch-long 1 -by-2 guide board and screw it vertically to the base in front of the opening.
• Fasten a toggle clamp to a block slightly thicker than the guide, then screw the block to the base against the guide.
• Cut a spacer as thick as the rip fence, 2 inches wide and 12 inches long.
• Screw the spacer to the base so that the spacer rests on the fence when the base rests on the saw table. Then fasten the brace to the spacer.
To cut a mortise or a tenon, place the jig astride the rip fence and clamp the workpiece to the base against the guide. Adjust the rip fence to align the
Aids for Safer Rip Cuts
With its springy fingers, a featherboard presses a workpiece against the rip fence while letting it slide smoothly past the blade, reducing risk of kick back. The commercial model (photo) fits in the miter slot; turning the knob tightens it in place and lowers the hold-down bracket against the workpiece.
• From a 3/4-inch piece of straight-grained hardwood, cut a piece about 6 inches wide and 16 inches long.
• Miter one end at a 45- to 60-degree angle, then cut a series of 5-inch-long kerfs from the mitered end at 1/8-inch intervals, creating the fingers. Cut a 1/2- by 1 -inch notch along the middle of the long edge.
To use the featherboard, place the workpiece against the fence and clamp the featherboard against it on the infeed side of the blade. Clamp a support board in the notch. (Note: For this cut, the saw’s blade guard cannot be used.)
Aids for feeding stock across saw and jointer tables can be made easily from scraps of 3/4-inch plywood.
Cut out the forms with a saber saw or a band saw.
Two common shapes are shown (inset), but you can adapt the shape for the machine and job at hand.
A push stick with an angle of 45-degrees is ideal for most jobs on the table saw; on a radial-arm saw, a lower angle, with the handle closer to the table, allows the stick to slide under the arm. A rectangular shoe-shaped push stick allows you to apply greater downward pressure (above), to keep the workpiece, particularly narrow stock, from rising up. (Note: In this illustration, the blade guard has been removed for the sake of clarity.)
A Tilting Drill-Press Table
Equipped with a tilting table, a drill press can bore holes at any angle.
• Cut an 11- by 13-inch base and top from 3/4-inch plywood, then join them with two 3-inch butt hinges.
• From 1 -by-2s, cut two support brackets 10 inches long, then cut a 1/2-inch slot from each one. Round the ends of the brackets so they won’t protrude above the top.
• Fasten the support brackets to opposite sides of the top with 1½-inch No. 8 wood screws, and to the base with 7/16- by 2-inch hanger bolts (photo), washers, and wing nuts.
• Loosen the wing nuts, raise the tilting table top to the desired angle, and tighten the nuts. Center the table under the spindle and clamp the base to the table with small quick-action bar clamps.
• For each hole, align the workpiece under the bit and clamp it to the jig— a wooden handscrew clamp is handy for this—then drill the hole.
Next: A Shop-Made Router
Table
Prev: Building a Workbench

