Building your own workbenches, extension tables, and jigs gives you two major advantages over purchasing their commercial counterparts. One, it is much cheaper to construct these items yourself than to buy them ready-made; and two, you can tailor them to suit the kind of work you do, the tools you use, and the lay out of your shop.
Building a Workbench
- Assembling a Bench with a Backboard
- Constructing a Woodworking Bench
- Fashioning a Fold-Down Worktable
- Making a Portable Workbench
- A Tall Stand for Small Jobs
Adding Accessories to Power Tools
- An Open-Top Extension Table
- Extending a Radial-Arm Saw
- Making a Roller Stand
- Building a Table-Saw Crosscut Jig
- Guiding Miter Cuts
- A Tenoning Jig
- Aids for Safer Rip Cuts
- A Tilting Drill-Press Table
A Shop-Made Router Table
Portable Shop Accessories
- Homemade Carriers for Tools and Materials Fashioning a Folding Sawhorse
A Bench for Metalworking
A Booth for Spray Painting
- Building the Spray Booth
A Space-Efficient Tool Turret
Building a Workbench
The focal point of nearly all shop activity, a workbench is probably the most useful—and most used—tool in any workshop.
Design and Size: Pictured and described are five designs. The inexpensive back board bench is well suited to crafts work. With its broad, unshakable surface and handy tool trough, the woodworking bench is better for heavier, more complex activities. A fold-down table saves space, and a portable bench can be carried to the work. A tall stand not only saves you from having to bend over, but it is also excellent for tasks that require precision.
A full-size bench is between 5 and 7 feet long and between 25 and 35 inches wide, but you can adapt it to the size of the shop and proportions of the owner. Traditionally, a bench is as high as a hip joint, but arm and torso lengths can alter this dimension. The ideal width allows a comfortable reach from front to back, so you can work over the entire top without losing your balance. Leave 3 inches of space beneath the lowest horizontal member so you don’t have to lean forward. To fit a bench comfortably in the shop, plan the shop’s layout or position pieces of scrap wood on the floor to simulate the bench.
Special Considerations: For stabilizing a lightweight bench, place weights such as bricks or cement blocks on the lower shelf. You can also fasten the tall stand to the floor with lag bolts and anchors. To protect the working surface, you may want to nail or clamp a sheet of ½-inch medium-density overlay plywood or ½-inch tempered hard- board to the benchtop. A vise is ideal for holding materials in place; for woodworking, line the inner faces of the vise jaws with wood to protect your material.
TOOLS:
- Tape measure
- Square
- Circular saw
- Electric drill with assorted bits
- Hammer
- Wood chisel
- Mallet
- Wrench
- Saber saw
- Bar clamps
- Compass
- Sanding block
- Rasp
- C-clamps
MATERIALS:
- Lumber (1”, 2”) 4 x 4 posts
- Common nails (assorted sizes)
- Wood screws (assorted sizes)
- Lag screws and washers (assorted sizes)
- Carriage bolts and washers (1/2” x 2 1/2”, 8”)
- Wing nuts
- Screw anchors
- Woodworking vise
- Plywood (½”, ¼”, ¾”)
- Wood glue
- Sandpaper (medium grade)
SAFETY TIPS: Wear goggles when nailing or operating power tools.
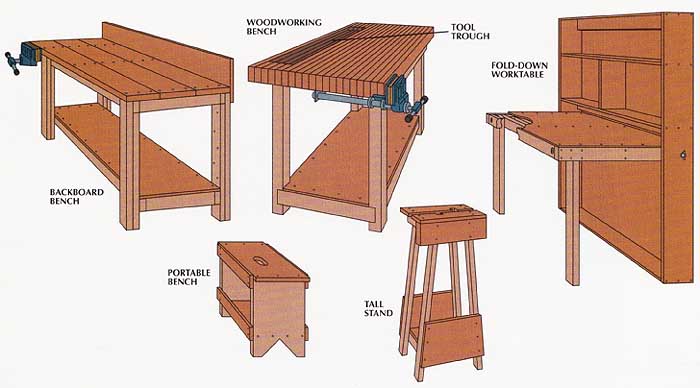
Woodworking Bench; Backboard Bench; Portable Bench; Tool Trough;
Fold-Down Worktable
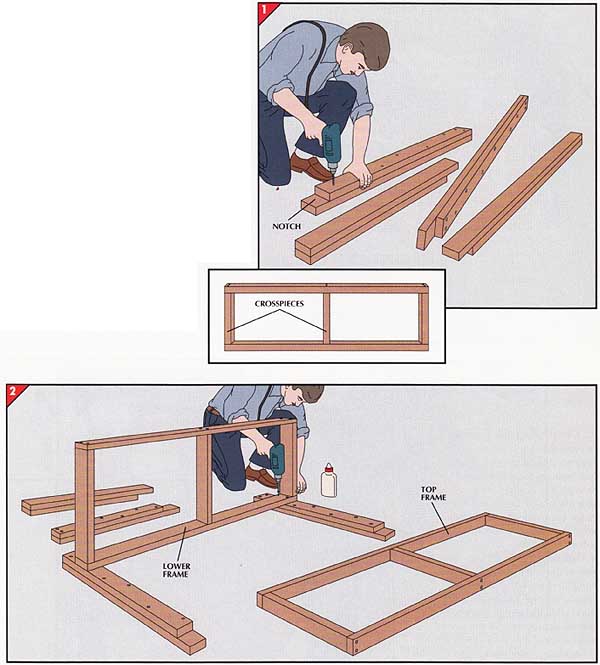
ASSEMBLING A BENCH WITH A BACKBOARD
• Prepare each leg by cutting two 2-by-4s -- one 5 inches shorter than the planned height of the workbench and the other 1½-inches shorter.
• Glue the sections together so the bottom ends are flush, creating a notch at the top.
• Drill pilot holes into the shorter pieces, staggering the holes in a zigzag pattern about 4 inches apart.
• Drive a 2½-inch No. 8 wood screw into each hole.
• To support the benchtop, assemble a frame of two 2-by-4s cut 8 inches shorter than the planned length of the top, and three 2-by-4 crosspieces cut 3 inches shorter than its width (inset). Drill pilot holes at the ends and centers of the long boards, then fasten the pieces with glue and 3- inch screws.
• Assemble a second frame for the bottom shelf in the same way as the top frame, but make each crosspiece 3 inches shorter than the crosspieces for the top.
2. Assembling the parts.
• Lay two of the legs on the floor with their notched faces up, and rest the lower frame against them.
• Position the lower frame 3 inches from the bottoms of the legs and flush with their outer edges. Spread glue on the contacting surfaces, then secure the legs to the frame with 2½-inch screws .
• Turn the assembly over, propping up the free ends of the legs, and join the other side of the frame to the remaining legs in the same way as the first.
• Fit the top frame into the notches at the top ends of the legs, making sure it is flush with the ends and outer edges of the legs. Fasten the top frame in place with glue and screws.
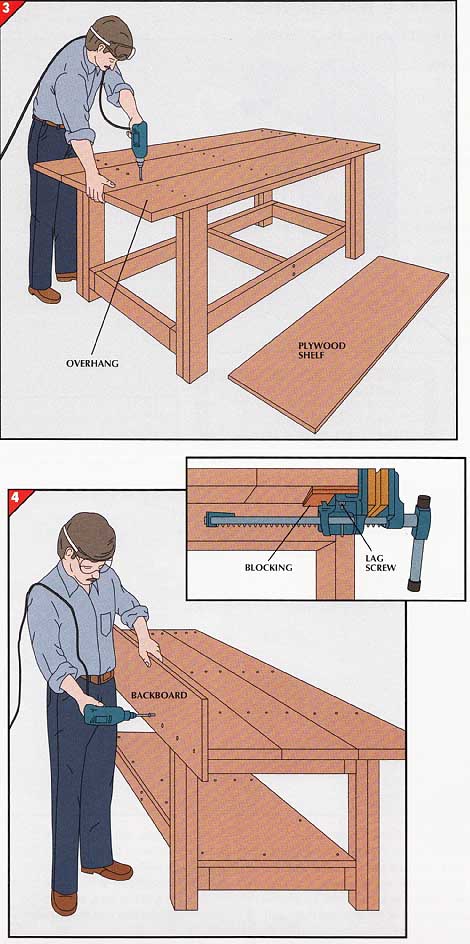
• Cut three 2-by-los long enough to create a 7-inch overhang for a vise at one end of the top and a 1 -inch over hang at the other. Trim one of the boards so the back edge of the top will be flush with the outside of the legs. To save space, you can also make the front edge flush with the legs.
• Place the 2-by-10s in position across the top frame. Drill countersunk pilot holes, then fasten the boards to the frame’s crosspieces with 2½-inch screws.
• For the lower shelf, cut a piece of ½-inch plywood to fit over the bottom frame and secure it with glue and 1½-inch common nails.
4. Completing the bench.
•With glue and 1½-inch screws, fasten a 2-by-4 to the back of the top frame between the back legs.
•With glue and 1½-inch screws, attach a 1 -by-12 backboard to the back of the bench, positioning its bottom edge flush with the bottom of the filler 2-by-4.
• Position a woodworking vise at the end of the bench with the 7-inch over hang, and mark the locations of the mounting holes. Drill holes at the marks and fasten the vise in place with lag screws appropriate for the size of the vise—typically – 3/8- by 2½-inch screws. If necessary, add blocking so the vise jaw is flush with or slightly below the top (inset).
• With medium-grade sandpaper, smooth the top and backboard, and slightly round the sharp corners.
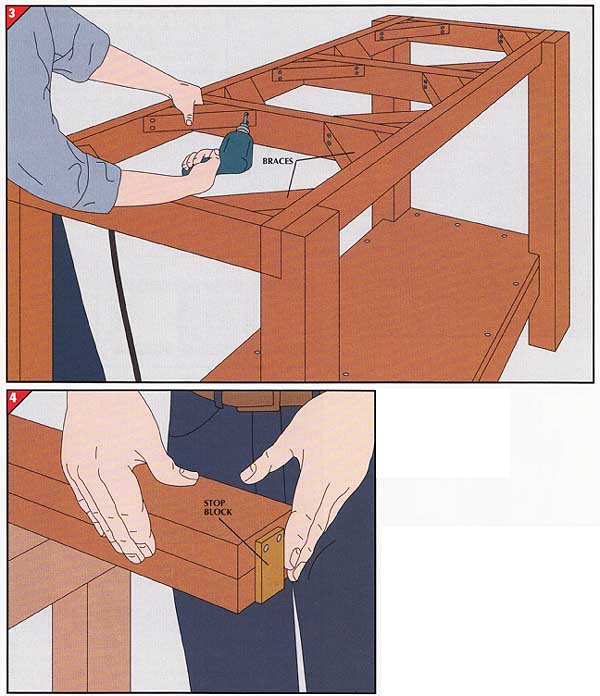
CONSTRUCTING A WOODWORKING BENCH
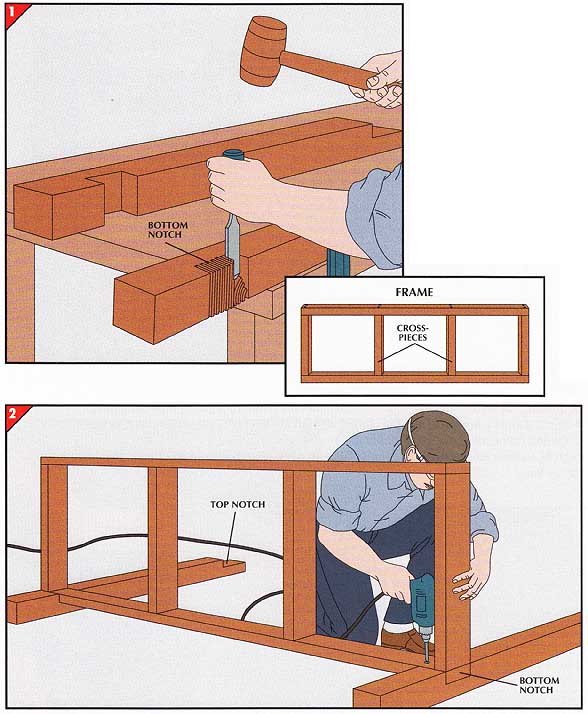
1. Preparing the legs and frames.
• To make the legs, cut four 4-by-4s 3½-inches shorter than the desired height of the benchtop.
• Outline two notches in each 4-by-4, making them 3½-inches long and 14 inches deep. Position one notch at the top end of each leg and the other notch 6 inches from the bottom end.
• Make a row of 1 ½-inch-deep cuts across each outline with a circular saw. Remove the waste with a mallet and chisel.
• From 2-by-4 lumber, cut pieces to form two identical frames with four evenly spaced cross-pieces (inset). Make the front and back frame pieces 1 foot shorter than the planned length of the benchtop; cut the crosspieces 7 inches shorter than the planned width of the top.
• Drill pilot holes, then assemble the frames with glue and 24-inch No. 8 wood screws.
2. Attaching the legs.
• Lay two legs on the floor and set one frame into the lower notches, aligning the ends of the frame with the outsides of the legs.
• Drill two 3/8-inch pilot holes through the frame and about 1/2 inch into the leg at notches, then drill 1/2-inch clearance holes through the frame above).
• With a wrench, tighten a 4- by 3-inch lag screw, with a washer, into each hole, securing the frame to the legs.
• Turn the frame over and attach the two remaining legs to the other side.
• Secure the top frame in the upper notches with lag screws, making sure it is flush with the outer faces of the top.
• Cut a piece of 1/2-inch plywood for the lower shelf, notching it at the corners to fit around the legs. Nail the shelf in place with 2-inch common nails.
• Cut 12 2-by-4 braces to fit into the corners of the top frame, mitering their ends at 45-degrees so their long edges are about 11½-inches long.
• Hold the braces with their tops flush with the top of the frame and drill pilot holes for 3-inch screws.
• Fasten the braces to the frame with glue and screws.
4. Cutting the top pieces.
• The top is made from 2-by-4s glued together face to face and set on edge. To calculate the number of 2-by-4s needed, divide the planned width of the bench by 1 and round the result up to the nearest whole number.
• Square one end of each 2-by-4, and trim one of them to the planned length of the benchtop.
• Nail a piece of scrap wood to one end of the trimmed 2-by-4 as a stop block , and use the assembly to mark the remaining 2-by-4s for cutting.
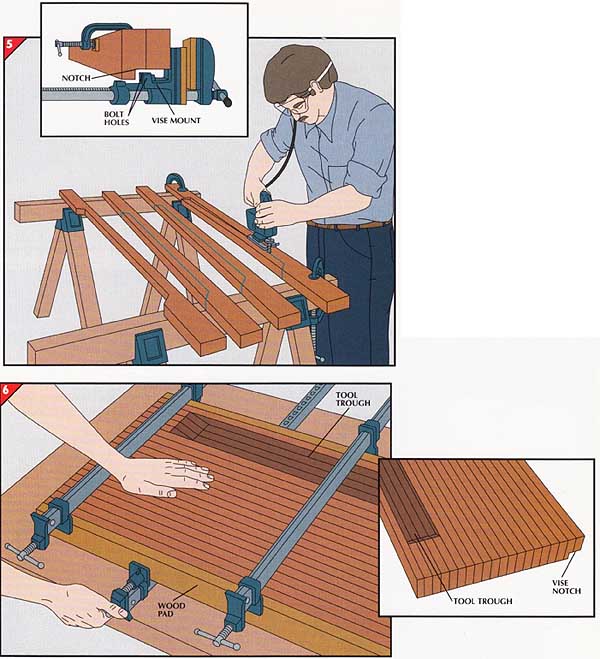
• To fashion a storage trough for tools in the benchtop, draw a line on the face of one 2-by-4, 2 inches from the top edge. Next, make marks on the top edge 8 inches from each end and connect them to the first line at 45-degree angles.
• Cut along the line with a saber saw, creating a long notch.
• Use this board as a template to mark and cut identical notches in three additional top pieces.
• To notch the front edge of the bench top to hold a vise, align two pieces and clamp them together, then measure the size of the vise mount and transfer its measurements to one end of the clamped 2-by-4s. Notch the 2-by-4s along the marked lines. Be sure the notch is cut deeply enough so that the vise will be flush with or slightly below the surface of the bench. Test-fit the vise and mark its bolt-hole locations on the clamped boards (inset).
6. Gluing up the top.
• Extend three bar clamps and lay them face up on a work surface.
• Starting with the two boards notched for the vise, spread a wavy bead of glue on the face of the first piece, butt the second board against it with the ends aligned, and lay them on the bar clamps. Position the clamps at each end and in the middle of the boards.
• Repeat with the remaining boards, ending with the four notched for the trough, so the top is configured as shown in the inset. Place long wood pads on each side, then snug up the clamps.
• Turn the assembly over and add two clamps, centered between the others.
For a wide bench, assemble the top as two halves, then glue the two slabs together.
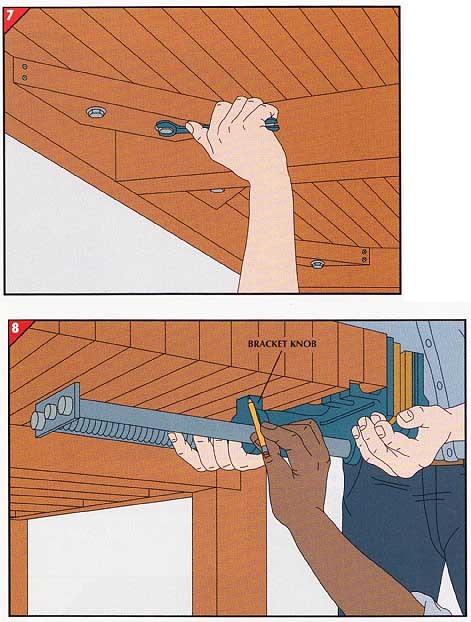
7. Bolting the top to the bracing.
• Drill two ½-inch clearance holes through each brace.
• Set the top on the frame so it overhangs the frame equally front and back, 11 inches at the vise end, and about 1 inch at the other end.
• Drill a 3/8-inch pilot hole through each clearance hole in each brace—except those under the tool trough—2 inches up into the top. Beneath the trough, drill to a depth of only 1 inch.
• With a wrench, drive a ½- by 2½-inch lag screw with a washer into each hole under the tool trough. Drive 3½-inch lag screws into the other holes.
• Once all the screws are in place, tighten them further to pull the top down securely against the frame.
8. Installing the vise.
• If the vise has a projecting bracket knob, have a helper hold the vise in place while you mark the knob’s position; then cut out a recess for the knob by drilling 1/2-inch holes within its outline, and cutting out the waste with a chisel.
• Mark the bolt-hole positions, then drill a 3/8-inch pilot hole into the top at each mark.
• Secure the vise with 2/8- by 2-inch lag screws.
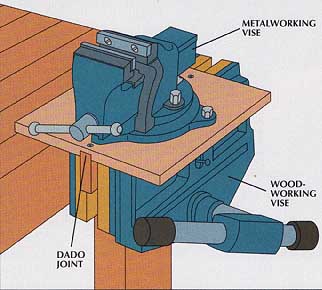
TIP from the PROs: Quick-switch vise
Many woodworking vises are not suitable for gripping metal. But rather than bolting a metal vise to your bench, attach it instead to a T shaped base made from two pieces of ¾-inch plywood joined together with a dado joint and screws. The assembly can be clamped in the woodworking vise whenever it is needed.
FASHIONING A FOLD-DOWN WORKTABLE
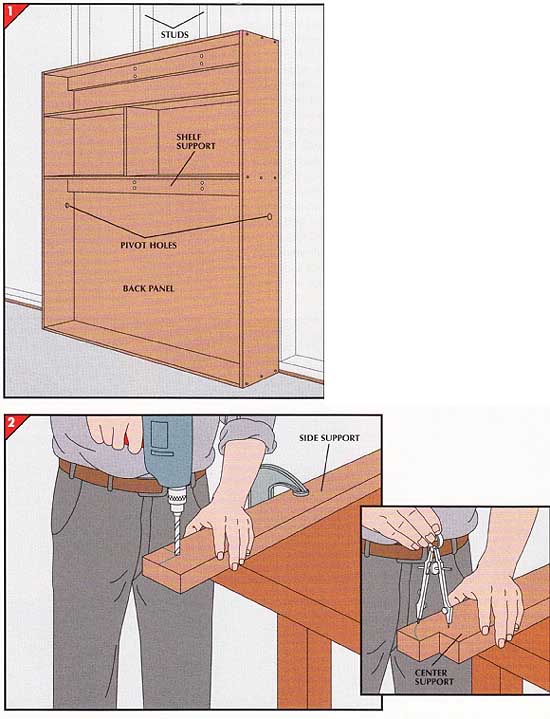
1. Constructing the wall frame.
• Cut four 1 -by-8s to form a 6-foot-high box with an interior width of 46½-inches. Butt the sides against the top and bottom, and fasten the assembly together with glue and 1½-inch No. 6 wood screws. Secure two 1-by-8 shelves to the upper half of the frame, with the lower shelf about 6 inches above the planned height of the work surface. Center a 1 -by-8 vertically between the shelves. Cut a back panel for the frame from k-inch plywood and secure it to the frame’s back edges with 1½-inch common nails.
• On the wall, mark the studs at the planned bench location, then place the frame against the wall so the sides align with studs, and transfer the stud marks to the front of the back panel. Position a 2-by-4 horizontally under the lower shelf, then drill two pilot holes through the board at each stud mark and drive -1/4- by 4-inch lag screws to anchor the frame to the studs. In a masonry wall, drive screws into screw anchors. Repeat with a 2-by-4 set under the top of the frame.
• Drill 1/2-inch pivot holes through the frame sides, 1 inch out from the wall and 2 inches below the planned height of the work surface.
2. Shaping the bench supports.
• For the side supports, cut two 2-by-4s long enough to span from the bottom of the frame to a point 1 inch above the pivot hole.
Mark a 1½-inch square at one corner of each 2-by-4, then drill a 1/2-inch hole through the inside corner of each square.
• For the center support, cut a third 2-by-4, 7 5/8-inches shorter than the others, and cut out a 1 1/2-inch notch at one end. Adjust a compass to a 2-inch radius, set the point 2 inches from the notched end, centered between the edges of the board, and scribe an arc at the corner (inset).
• Mark the same arc on the side supports at the marked corners, then cut the arcs on all three pieces with a saber saw and sand them smooth.
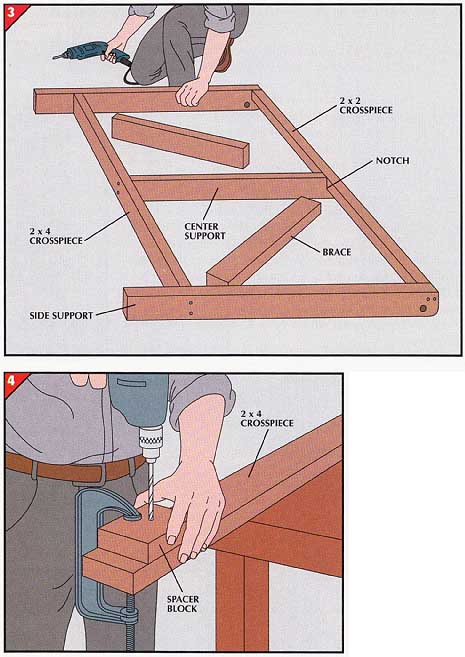
• Subtract 3¼-inches from the inside width of the wall frame. Cut one 2-by-2 and three 2-by-4 crosspieces to this length; set two of the 2-by-4s aside.
• Place the side supports on the floor on edge, rounded corners down. Locate the notched center support between the other two.
• Seat the 2-by-2 crosspiece in the notch of the center support with its ends flush against the side supports. Fasten it to the supports with glue and 3-inch No. 6 screws, then glue and screw a 2-by-4 crosspiece between the two side supports and against the bottom end of the center support.
• Fasten a 2-by-4 brace horizontally between the center support and each side support, centered between the two crosspieces.
4. Preparing the folding leg assembly.
• From 2-by-4 stock, cut two spacer blocks 3½-inches long, and drill a 1/2-inch hole through the center of each one. Clamp a spacer block at each end of one of the remaining 2-by-4 crosspieces, 1 inch from the ends, and drill through the board, guided by the spacer blocks. Repeat with the final crosspiece.
• Cut two legs from 2-by-4 stock, ½-inch shorter than the planned height of the work surface. With the spacer block flush with the end, drill a ½-inch hole through one end of each leg.
• Using the technique in Step 2, round the inside top corner of each leg so it will clear the top when it is folded up.
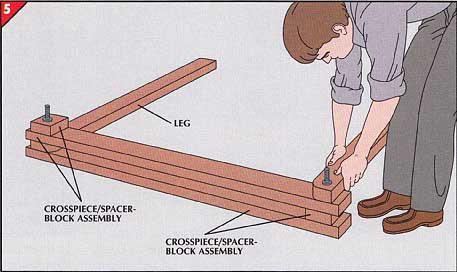
5. Assembling the legs.
• Glue and screw a spacer block to one end of each cross- piece, aligning the holes. Stack the crosspieces and the legs as shown at right, inserting a ½- by 8-inch carriage bolt through the holes and adding washers on each side of the legs.
• Temporarily tighten a nut over the assembly.
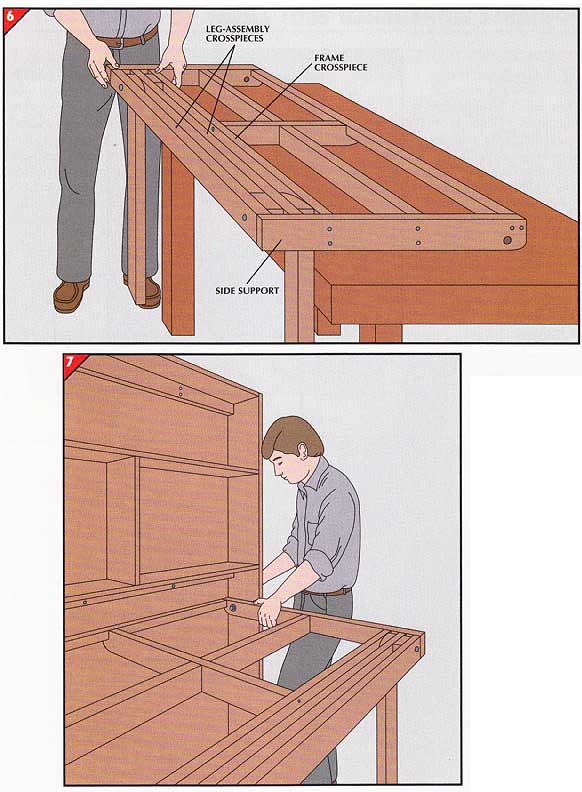
6. Attaching the legs to the frame.
• Position the leg assembly in front of the frame crosspiece, holding the top edges of both assemblies flush.
• Mark the points where the leg-assembly bolts touch the frame crosspiece. Drill a 1/2-inch hole at each mark, remove the nuts, and slide the bolts through the holes.
Hand-tighten the bolts to snug the leg assembly against the frame crosspiece.
• Drill pilot holes and screw the leg- assembly crosspieces to the side supports of the bench frame.
• Tighten the bolts so the legs will swing down with only slight resistance.
7. Installing the bench frame.
• Swing the legs down and align the pivot holes in the sides of the bench frame with their holes in the wall frame.
• Place washers between the two frames, and thread 4- by 2½-inch carriage bolts through the holes with the bolt-heads on the inside.
• Tighten each bolt with a washer and wing nut.
• Tighten the wing nuts firmly when the bench is in use, and loosen them slightly to pivot the entire bench assembly, with legs folded, back into the wall frame.
Complete the benchtop by covering the work surface with a piece of ½-inch plywood, secured with glue and counter sunk 1¼-inch No. 6 wood screws.
MAKING A PORTABLE WORKBENCH
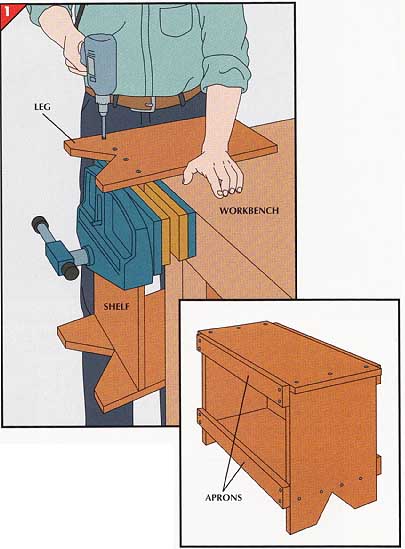
• Cut two 18-inch-high legs from 1-by-12 lumber and saw a triangular notch 4 inches high and 8 inches wide from the bottom of each piece.
• Cut a 25-inch-long 1 -by-12 shelf and clamp it end-up in a vise, flush with the top of the workbench.
• Position a leg against the shelf so the bottom of the shelf aligns with the top of the leg cutout. Drill three pilot holes through the leg into the shelf, secure the shelf with glue and 2-inch No. 6 wood screws, and attach the other leg in the same way.
• Center a 30-inch-long 1 -by-12 astride the legs as a top, then glue and screw it in place.
• Fasten two pairs of 1 -by-3 aprons to the sides of the legs (inset) so the upper edges of one pair are flush with the top and the lower edges of the other pair are flush with the bottom of the shelf.
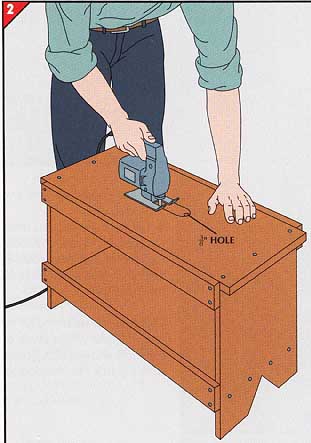
2. Completing the bench.
• Outline an oval handgrip on the top 4 inches long and 1½-inches wide.
• Drill a 3/8-inch hole within the oval for the blade of a saber saw or a keyhole saw and cut out the oval.
• Work off any rough spots with a rasp, then smooth the opening with medium grade sandpaper.
A TALL STAND FOR SMALL JOBS
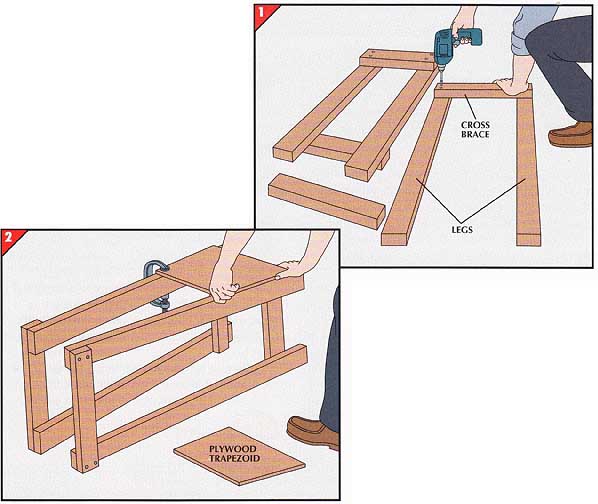
• From 2-by-4s, cut four waist-high legs and four 17-inch-long cross braces.
• With wood glue and 2k-inch No. 8 wood screws, fasten a brace across the top of one pair of legs, aligning the ends of the braces with the tops and outside edges of the legs.
• Flip the assembly over and fasten a second brace 4 inches above the bottom of the legs.
Fasten braces to the second pair of legs in the same manner.
2. Assembling the leg frames.
• Cut two trapezoidal panels from ¾-inch plywood so they measure 12 inches high, 15 inches along the top, and 17 inches along the bottom.
• To fasten a panel to the leg frames, first apply glue, then clamp the panel in place, flush with the outside edges of the legs. Screw the assembly together, then flip it over and attach a panel to the other side of the legs.
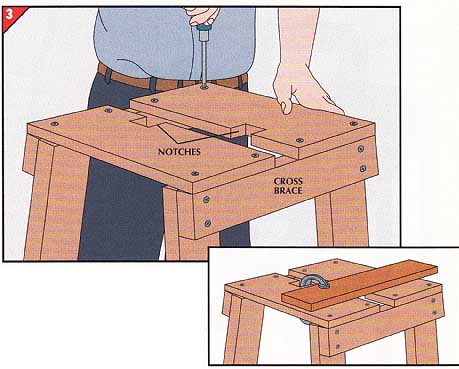
• For the benchtop, cut two pieces of 1-inch-thick hardwood to a width of 8 inches. Cut the pieces long enough to straddle the leg assembly flush with the outside of the cross braces; make them longer for an overhang.
• Clamp the pieces together in a vise and cut a 1 -inch-square notch out of the edges, 6 inches from one end, with a saw and a chisel.
• Lay the top pieces across the leg assembly and at right angles to the cross braces, positioning their notches at opposite ends and leaving a 1-inch gap between them, which will later allow you to fit clamps into the top (inset).
• Drill countersunk pilot holes through the top boards and anchor them with 2½-inch screws .
• Fasten a ½-inch plywood shelf across the lower cross braces with glue and 1½-inch common nails.
Next: Adding Accessories to Power Tools
Prev: Lighting Up a Shop
