When planning a heating scheme for a workshop, you’ll need to isolate the heat source from any combustibles—especially if the heater uses exposed electric coils or an open flame.
Forced-Air Systems: Extending an existing forced-air system to a shop is the safest option. It is often the least expensive solution as well, requiring only that you run duct work from the furnace to the shop. However, if the workshop is more than 25 feet from the furnace, or you cannot run the duct in a relatively straight line, most of the heat will dissipate before reaching the shop.
Electric Heat: An electric base board heater is a simple, if expensive, solution. These units fit against the wall, taking up little space. Some have a built-in thermostat; others are wired to a wall-mounted thermostat. The best arrangement is to install a 20-amp branch circuit from the service panel for a 240 volt-heater; a plug-in 120- volt model can overload the circuit serving it. To estimate the wattage you need, multiply the number of square feet in the shop by 10.
TOOLS:
- Electric drill
- Ball-peen hammer
- Cold chisel
- Tin snips
- Screwdriver
- Hammer
- Electronic stud sensor
- Wire stripper
- Cable ripper
MATERIALS:
- Starter collar
- Round duct (6”)
- Sheet-metal screws (1/2” No. 10)
- Furnace tape
- Perforated metal strapping
- Stove bolts, washers, and nuts
- Joist-hanger nails
- Register and boot
- Screw anchors
- Wood screws (3/4” No. 8)
- 2-wire grounded cable (No. 12)
- Conduit
- Cable staples
- Cable clamp
- Wire clamps
SAFETY TIPS: Protect your eyes with goggles when chiseling, drilling, or nailing, and wear work gloves when handling sheet metal.
Tapping Into a Forced-Air Furnace
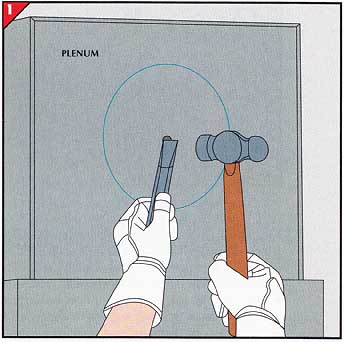
1. Cutting into the main duct.
• With a felt-tipped pen, outline a 6-inch sheet-metal starter collar on the main duct, or plenum, at the top of the furnace. Drill a hole within the outline.
• With a hammer and a cold chisel, enlarge the hole enough to accommodate tin snips .
• Cut the outline with the snips.
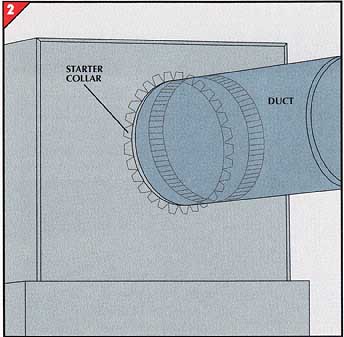
• Slide the starter collar, tabbed end first, into the opening so the bead encircling the collar sits against the plenum.
• Reach inside and fold the tabs against the plenum.
• Slide a section of round duct 6 inches long over the collar .
• Drill a 4-inch hole through each side of the joint, drive 4-inch No. 10 sheet-metal screws into the holes, and seal the joint with furnace tape.
• Screw on additional sections of duct. Every
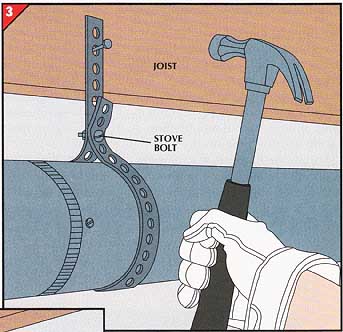
3 feet, wrap a piece of perforated metal strap ping around the duct and secure the strap to the duct with a stove bolt, washer, and nut.
• With a joist-hanger nail, fasten the strapping to a joist so there is at least 1 inch of clearance between the duct and the joist .
• Wrap furnace tape around the joint.
If the joists are not exposed, locate them with a stud sensor and fasten the strapping to the bottoms of the joists through the ceiling material.
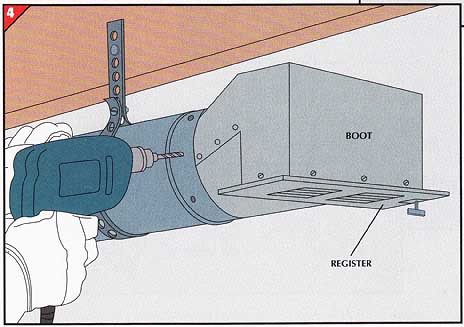
• Attach a register to the rectangular opening of a register boot by drilling matching screw holes through the flanges of the register and boot and fastening the two together with sheet metal screws.
• Slide the boot over the end of the last section of duct. Drill holes through both and screw them together.
• Wrap furnace tape around the joint.
Installing a 240-volt Baseboard Heater
• For a masonry wall, hold the heater against the wall and mark the positions of its mounting screws or clips; then drill holes at the marks and insert screw anchors. For a finished wall, remove the baseboard, then locate and mark the studs.
• Secure the heater to the masonry wall with the anchors, or to the studs with ¾-inch No. 8 wood screws.
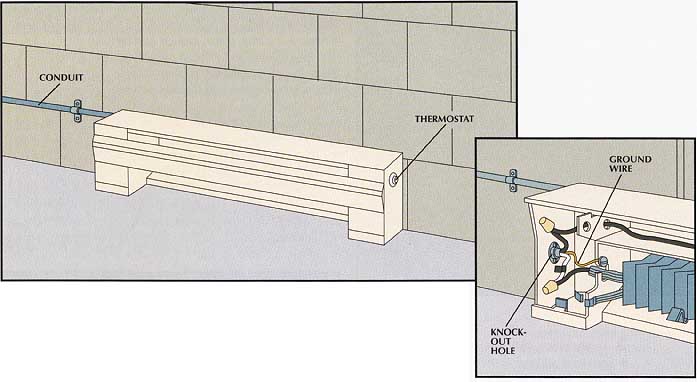
• Run a length of 12-gauge electrical cable with conduit between the service panel and the heater, but do not connect the wiring.
• Run the cable to the heater’s knockout hole and fasten it with a cable clamp, then strip about ¾-inch of insulation from the black and white wires.
• With wire caps, connect the black cable wire to a black heater wire; connect the white cable wire to the other black heater wire and wrap a piece of electrical tape around the white wire to recode it. Connect the bare cable ground wire to the grounding screw of the heater (inset).
• Have an electrician connect the cable to the service panel.
TRICKS of the TRADE:
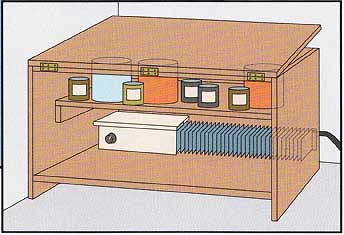
A Warm Box for Cold Climates
To protect items like paint and finishes from freezing in a workshop detached from your house, you don’t need to heat the entire shop around the clock. Instead, keep the items in a small cabinet and warm it with a low-surface-temperature “pump-house” heater. If the temperature in your shop will drop below 0 deg F, insulate the cabinet.
Next: Adding an Exhaust
Fan
Prev: Keeping a Basement
Workshop Dry
