Open windows and doors may provide enough air to dispel work shop fumes and airborne dust in good weather. For an all-weather solution, install a fan that vents directly outside through a wall opening or a hole in plywood set in a window.
Selecting a Fan: A regular kitchen fan that moves 425 cubic feet of air per minute is adequate for a work shop up to 1,700 cubic feet in size. Larger fans can be ordered. Divide your shop’s cubic footage by four— the number of minutes in which the fan is required to completely change the air—to determine the size you need in cubic feet per minute (CFM).
If you will be cutting through a stud wall to accommodate a fan, select one that fits between two studs. Some fans have mounting holes 16 inches apart for attaching directly to adjoining studs; others require a frame for the fan housing. A fan with an enclosed motor eliminates the danger of sparks that could ignite flammable or explosive fumes. A model with an automatic damper or shutters will keep out cold air.
If you plan to use a paint sprayer in the shop, you will need a more elaborate setup.
Dust Filters: Ambient air cleaners consist of a blower and a series of filters. They are ideal for removing dust from shop air; however, they cannot remove chemical fumes.
TOOLS:
- Electronic stud sensor
- Carpenter’s level Electric drill
- Compass saw
- Circular saw
- Hammer
- Caulking gun
- Wire stripper
- Cable ripper
MATERIALS
- Lumber (3/4” thick)
- Common nails (2½”)
- Wood screws (1¼” No. 8)
- Silicone caulk Armored electrical cable
- Cable clamp Wire caps
SAFETY TIPS: Goggles protect your eyes when you are nailing or operating a power tool.
CAUTION!
Before 1978, lead was used exclusively in paint, while asbestos was found in wallboard, joint compound, and insulation. Before cutting into walls or ceilings, mist the area with a solution of 1 teaspoon of low-sudsing detergent per quart of water, then cut out a small sample with a hand tool.
Use a home test kit to check for lead; take asbestos samples to a certified lab. If either substance is present, you may want to hire a professional for the job; if you do the work yourself, follow these procedures:
- Keep people and pets out of the work area.
- Wear protective clothing (available from a safety-equipment store) and a dual-cartridge respirator with high-efficiency particulate air (HEPA) filters. Remove the clothing before leaving the work area, wash it separately, and shower immediately.
- Indoors, seal off work-area openings, including windows, doors, vents, and air conditioners, with 6-mil polyethylene sheeting and duct tape. Cover non-removable items with sheeting and tape, and turn off forced-air systems. Mop the area twice when the job is done. Outdoors, never work in windy conditions, and cover nearby ground with plastic sheeting.
- Never sand materials or cut them with power tools—mist them with detergent and remove them with a hand tool.
- Place all debris in a 6-mil polyethylene bag and call your health department or environmental protection agency for disposal guidelines.

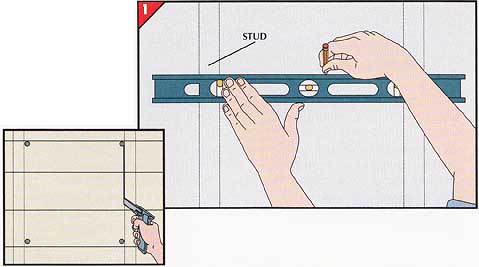
1. Cutting the inside opening.
• Locate the studs and mark their positions on the wall.
• Between two adjoining studs, outline the rough opening for the fan, using a level to keep the lines horizontal .
• Turn off electrical power to the work area in case you cut into wires.
• Drill a hole through the wall at each corner of the outline.
With a compass saw or saber saw, cut through the inside wall along the outline. Remove the wallboard and insulation.
• Working outside, cut a matching opening through the exterior wall, using the corner holes as reference points (inset).
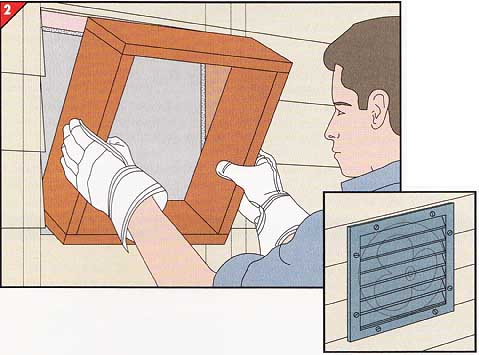
• Measure the distance from the exterior to the interior wall surfaces, and cut a 3/4-inch-thick board to your measurement.
• Cut the board into pieces to make a frame that fits exactly within the opening; assemble the frame with 24-inch common nails.
• Slip the frame into the opening so the out side edge is flush with the sheathing, then nail it to the studs.
• Outside, mark the screw holes in the fan mounting flange on the edges of the frame and drill a 1/8-inch pilot hole at each mark. Spread silicone caulk along the frame edges, set the fan in the frame, and secure it with 1¼-inch No. 8 wood screws (inset).
• Caulk any gaps between the fan and the siding.
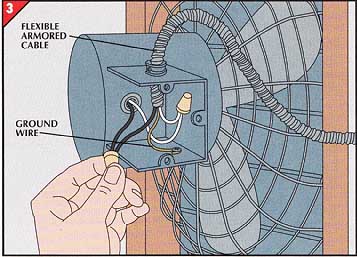
• Stretch out a length of flexible armored cable between the service panel and the fan, but do not connect the wiring.
• Slide the cable through a knockout opening in the fan junction box and anchor it with a cable clamp. With wire caps, connect the black cable wire to the black fan wire and the white cable wire to the white fan wire. Connect the bare cable wire to the fan grounding screw.
• Fasten the cable along the wall with armored cable straps.
• Have an electrician wire the cable to the service panel.
Also see our dedicated web site on ... Dust Control, Air Purification and Filtration: Information and Resources for Improving Indoor Air
Next: Building a Pass-Through
Prev: Bringing Heat to the
Shop

