Excess moisture is often a concern in a basement home workshop. Besides making a room uncomfortable, dampness can rust tools and warp wood.
Tracking the Moisture: To discover the source of the dampness, fasten a piece of foil 1 foot square to the inside of the basement wall, sealing all four edges with tape. After two days, check the foil, if moisture formed on the room side of the foil, the cause is condensation inside the room. If it appears on the side facing the wall, seepage from outside is the culprit, if both sides of the foil are wet, you have both problems.
Dealing with Condensation: Set up a dehumidifier; and in summer, use a window air conditioner to help keep the basement dry and cool. To control condensation drip ping from cold-water pipes, cover them with foam pipe insulation.
Handling Seepage: If there is standing water near the foundation after a heavy rain, you may be able to solve the problem by repairing gutters or installing new ones. Also, check the walls for cracks. Although small fissures do not endanger the structure of a house, they can let water in—it’s best to seal them. Horizontal cracks along a bulging wall or vertical cracks wider than inch and longer than 4 feet indicate a serious structural problem. If water is seeping through the joint between the basement floor and wall, the basement may lie below the water table. In either case, consult a building professional.
Sometimes, the only way to deal with a wet basement is to excavate along the outside of the foundation wall and add drain tile at the footing. The enormity of this job persuades most people to leave the work to a professional.

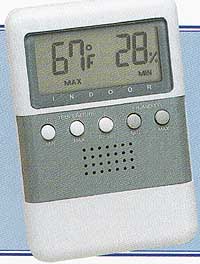
Humidity Tester (hygrometer): Available at a scientific-supply
or electronic hobby store, a portable hygrometer is a simple way to mea
sure relative humidity. Take a reading when the temperature in the basement
is at its coolest, usually in the morning. If the humidity is above 70 percent,
take steps to reduce it, as described above.
TOOLS:
- Tape measure
- Shovel
- Caulking gun
- Ball-peen hammer
- Cold chisel
- Stiff-fiber brush
- Pointing trowel
MATERIALS:
- Silicone caulk
- Splash block
- Latex concrete- patching compound
- Plastic sheeting
- Duct tape
SAFETY TIPS: Protect your eyes with goggles when chipping out masonry or mixing patching compound.
Attacking Moisture
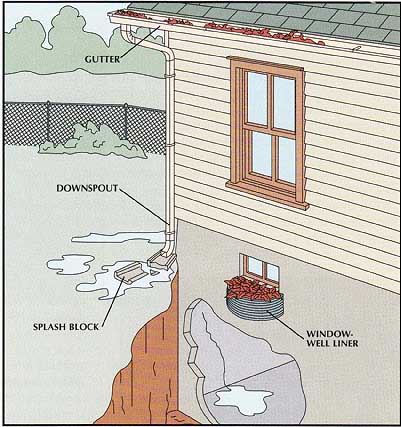
• If pools of water collect near the house foundation, inspect the gutters. Clean them of debris and check that they slope toward a downspout by inch for every 20 feet of length. Arrange downspouts to direct water at least 3 feet away from the walls:
Replace damaged splash blocks or add downspout extensions to direct water out into the yard.
• Bank soil away from the foundation and plant ground cover to hold the soil in place.
• Check basement window frames for leaks and seal any gaps with caulk; clear window wells of leaves that may block drainage and channel water into the basement.
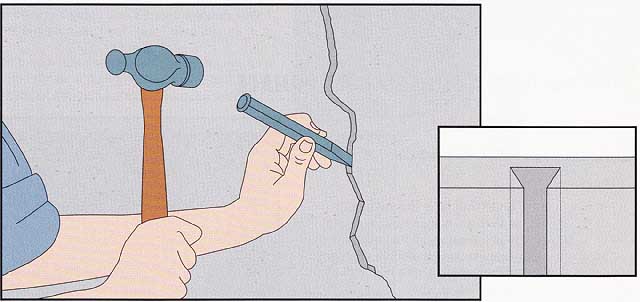
With a cold chisel and a ball-peen hammer, enlarge the crack to about inch wide and 4 inch deep (above), undercutting the opening (inset). If undercutting is impossible, make the sides straight rather than V-shaped.
• Clean out the crack with a stiff-fiber brush.
• Wet the crack or brush on a bonding agent, if necessary, then use a pointing trowel to fill the gap with latex concrete-patching compound.
• Starting at the top of the crack, pull the edge of the trowel down to remove excess compound.
• Smooth the patch with the back of the trowel.
• Tape plastic sheeting over the patch and let it cure.
More on ... Wet Basements and Waterproofing
Next: Bringing Heat
to the Shop
Prev: Building in Safety
Features

