AMAZON multi-meters discounts AMAZON oscilloscope discounts
12. Cable Fault Locating Methods
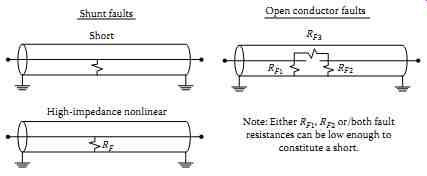
This section describes the existing methods and techniques used for fault location. Faults may vary widely, and similar faults may exhibit different symptoms depending upon the cable type, operating voltage, soil condition, and so on. Basically, faults can be considered to be shorts, opens, or nonlinear. A short is defined as a fault when the conductor is shorted to the ground, neutral, or another phase with a low impedance path. This type of fault is also referred to as a shunt fault. An open fault is defined as when the conductor is physically broken and no current flows at or beyond the point of break. The nonlinear type of fault exhibits the characteristics of an unfaulted conductor at low voltages but shows a short at operating or higher voltages. This nonlinear fault is also known as a high-resistance fault. These fault types are shown in FIG. 8.
Fault location methods can be divided into two general categories: terminal techniques and tracing techniques.
---
Short Shunt faults
High-impedance nonlinear Open conductor faults RF RF1 RF2 Note: Either RF1, RF2 or/both fault resistances can be low enough to constitute a short.
RF3
----
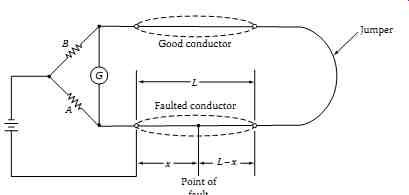
FIG. 9 Murry loop bridge method.
---
12.1 Terminal Techniques
These involve measuring some electrical characteristics of the faulted conductor from one of the cable terminals and comparing it with unfaulted conductor characteristics in terms of the distance of the fault. The effectiveness of this method is a function of the accuracy of installation records. The terminal techniques category can be further subdivided in terms of the actual methods employed, which are bridge, radar, and resonance methods.
Terminal methods do not pinpoint faults, however they localize faults.
Bridge methods
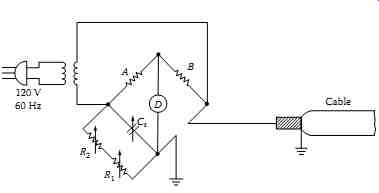
FIG. 10 Capacitance bridge measurement method.
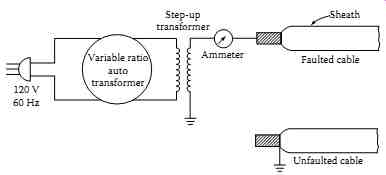
FIG. 11 Charging current method for fault location.
Faulted cable; Unfaulted cable; Sheath; Ammeter; Step-up transformer; Variable ratio auto transformer 120 V 60 Hz
----
Various types of bridge configurations may be used to locate faults. The most common are the Murry loop and the capacitance bridge. The Murry loop bridge uses a proportional measure so that it is not necessary to know the actual cable resistance. Its principle of operation involves a continuous loop of cable to form the two arms of the bridge. It is necessary to have an unfaulted conductor available to form such a loop. Also, it requires a low-resistance jumper to be installed at the far end of the cable. The Murry loop bridge connections are shown in FIG. 9. When the bridge is balanced, the distance to the fault can be found by the following expression:
The capacitance bridge technique simply measures the capacitance from one end of the faulted cable to ground and compares it in terms of the distance with the capacitance of the unfaulted conductor in the same cable. The connection diagram for a capacitance bridge is shown in FIG. 10.
In lieu of a bridge, the charging current of faulted cable and unfaulted cable can be compared, using several hundred volts or several thousand volts of 60 Hz supply voltage. The connection diagram is shown in FIG. 11. The distance L1 to the fault is given by the expression L1 = L2(I1/I2), where I1 is the current in the faulted conductor, I2 is the current in the unfaulted conductor, and L2 is the length of the unfaulted conductor.
The application of bridge methods can be used on all types of cables.
The Murry loop bridge is effective where the parallel fault resistance is low or the bridge voltage is high. It is ineffective on open faults. Open faults can be located with the capacitance bridge. The major drawbacks of the bridge method are the following:
1. Requires access to both ends of the cable
2. Connection must be of low resistance
3. All lead lengths must be accounted for
4. Cables must be of the same size
5. Requires considerable operator skill
6. Difficult to use on branched systems
Radar method
The radar (reflection or pulse-echo) method is based upon the measurement of the time that it takes the pulse to reach a fault and reflect back. The distance d of the fault for uniform cable can be obtained from the expression d = vt/2, where v is propagation velocity and t is the time it takes for the pulse to travel to the fault and back. There are two types of output pulse duration employed in radar methods.
The short duration pulse type is most commonly used in radar test sets for testing power cables. The pulse duration is short in comparison to propagation time to the fault. The width of the pulse is usually wide enough to be able to be observed on the oscilloscope. Practically, the pulse width must be greater than 1% of the transit time for the entire cable length under test. Most commercial equipment has provisions for changing the pulse width depending on cable length. The pulse magnitudes are very small, usually on the order of few volts. The short pulse does not lend itself well to the interpretation of data because of reflections from splices or the nonuniformity of cable size.
The long-pulse system employs long step pulses as compared to the transit time of signal from one end of the cable to the fault and back. Any discontinuities in cable are seen as changes in the voltage level of the step pulse. It is easier to interpret the data in a long-pulse system; that is, the faults can be differentiated from splices, and changes in cable size can be easily observed.
In radar systems the scope trace shows the transmitted and reflected signal.
The separation of the two signals is measured and multiplied by the scope calibration to give the transit time. The reflected wave can be expressed in terms of the transmitted wave and circuit constants as follows:
…is the transmitted wave R is the resistance at the end of the line Z is the impedance of the line If the line is open-circuited, then R = ? and the reflected wave is lr = lt
Therefore, the reflected wave is of the same magnitude and same polarity as the transmitted wave. If the line is short-circuited, R = 0 and the reflected wave is lr = -lt
Therefore, the reflected wave in this case is of equal magnitude to the transmitted wave but 180° out of phase. These two conditions are shown in FIG. 12.
The radar can be applied to all types of cable systems provided the propagation velocity is constant along the length of the cable. The radar system does not work very well with nonlinear faults. However, it can be used when the nonlinear fault impedance is burned to a low resistance value. To provide this flexibility, three major variations of radar systems are available: the arc radar system, the free oscillation system, and the differential radar system. The arc radar uses a HV pulse system so that the high-impedance (nonlinear) faults can be burned down until they appear as shorts and the radar pulse can be reflected from the arc short. The free oscillation system is also used for high impedance faults in which the breakdown of the arc causes a pulse to be transmitted down the cable. In this method the cable end at which measurements are made is terminated in a high impedance (i.e., open) so that the pulse formed at the arc is reflected from the open end to the short at the arc and back to the open end. This reflection back and forth continues until the energy is completely absorbed by the cable. The period of signal is four times the transit time of the pulse as it travels the distance of the fault. Therefore, the distance to the fault is one-fourth the product of the propagation velocity and transit time. Differential radar is applicable for fault location on branched systems.
It is based on the fact that a faulted cable phase is almost always paralleled by an identical unfaulted phase. The radar prints of two phases will be identical, except that part of the print associated with the fault itself. The differential radar signal is applied to both phases simultaneously and the return signals are subtracted. The radar pulse input shows at the point of the fault.
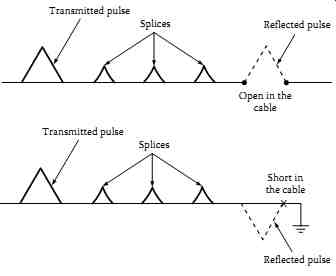
FIG. 12 Typical wave forms for open- and short-circuit conditions in cable.
Resonance method
The resonance technique is based on the principle of wave reflection. The resonance method for fault location measures the frequency at which the length of the cable between the terminal and the fault resonate. The resonant frequency is inversely proportional to the wavelength. The distance d of the fault can be determined by the following expression:
...where V is the propagation velocity fr is the resonant frequency N is the number of quarter- or half-wavelengths Normally, quarter-wave resonance is used for locating shorts, in which case N = 4, and half-wave resonance is used for locating opens, in which case N = 2. The resonance technique uses a frequency generator (or oscillator), which is connected to the end of the faulted cable. The frequency is varied until resonance is reached. At resonance, the voltage changes rap idly from voltage at non-resonance frequency. The voltage will increase for shorts and decrease for opens, respectively.
The minimum frequency required is determined by the cable length, and the maximum frequency is determined by the distance to the nearest point at which a fault may occur. For insulated cable the phase shift governs the speed of the transmitted and reflected wave to the fault and back. The phase shift is a function of the dielectric constant of the insulating material. Usually, the velocity of propagation for insulated cables varies between one-third and one-fourth of the velocity of propagation of bare conductors, which is 984 ft./µs. Therefore, the velocity for cable will be somewhere between 328 and 246 ft./µs. Therefore, for each insulating medium its dielectric constant must be known for fault location. The relationship between frequency and distance to the fault is given by the following expression:
...where N is the number of quarter- or half-wavelengths fr is the resonance frequency (MHz) K is the dielectric constant of cable d is the distance to the fault This method can be used on all types of cables and works will on branched systems. It does not work very well with nonlinear faults.
12.2 Tracer Techniques
Trace techniques are those that involve placing an electrical signal on the faulted feeder from one or both ends, which can be traced along the cable length and detected at the fault by a change in signal characteristics. The following methods are available under this classification:
1. Tracing current
2. Audio frequency (tone tracing)
3. Impulse (thumper) voltage
4. Earth gradient
Tracing current method
In this application both DC and AC methods are employed. This method can be used for fault location on a branched system as well as on a straight uniform cable system. The fault current is injected into the circuit formed by the faulted conductor and the ground, and a detector is then used to measure the cable current at selected manhole locations. This technique is applicable where fault resistance is low or the voltage of the test set is high enough to send sufficient current through the faulted conductor. This method is mostly applicable for duct line installations because it is sufficient to know the fault between manholes, since the entire section of cable between manholes must be replaced when faulted.
The major consideration for use of this method is to assure that substantial amount of return current is via the ground path rather than the neutral. If all the current flows through the neutral, current seen by the detector is canceled for three-conductor cables, and there is no output from detector. This is very important for insulated neutral cables, such as PILC, where it is necessary to assure neutral to ground contact between the point of the measurement and the fault.
The tracing DC method uses a modulated DC power supply ranging from 500 V to 20 kV and current ranging from 0.25 to 12.5 A. The detector can be either an electromagnetically coupled circuit using a pickup coil and a galvanometer to detect directional signal, or test prods may be used on the cable sheath, using a drop-of-potential circuit with a galvanometer for signal-direction detection.
The tracing AC method uses a 25 or 60 Hz modulated transmitter consisting of 100% induction regulation or a constant-current transformer. The detectors can consist of either a split core current transformer and an ammeter or a sheath drop detection circuit consisting of test prods and a millivolt meter. The test set range is from 15 to 450 kVA, and audio amplifiers are avail able with output meters, headsets, or speakers.
This method applies to direct buried, insulated cable for a short-to-ground fault. It is not very effective for other types of faults or cable configurations.
Audio frequency (tone tracing) can be used to locate phase-to-ground faults (or to neutral) in concentric neutral cables if the neutral can be isolated from the ground so that the fault return current flows through the ground. If the neutral cannot be isolated, substantial fault return current may flow through the neutral, canceling the magnetic fields and thus reducing the pickup sensitivity. This technique can be used equally well to locate and identify cables.
Because of its application to insulated cable, audio frequency is most commonly used for finding secondary faults. This method is very effective for faults that are near zero resistance. It is not as effective for resistance faults above a few ohms. This method is particularly applicable to low-voltage class systems.
Audio frequency (tone tracing) method:
In this method, audio frequency is injected in the fault circuit formed by the faulted cable and the ground. The flow of current through the conductor causes a magnetic field, which exists both in air and ground. The magnetic field can be sensed by using a simple magnetic loop antenna. Moreover, the magnetic field can be resolved into horizontal and vertical components for predicting antenna orientation. The loop antenna that responds to the horizontal component of the magnetic field has maximum excitation directly above the cable, whereas the loop antenna that responds to the vertical component of the magnetic field has minimum excitation. Also, the magnetic field varies in the vicinity of the fault. The magnetic field characteristics change beyond the fault because of no current flow, and therefore the horizontally polarized antenna output falls off rapidly. The change in characteristics of the vertical component of the magnetic field is not as pronounced when moving beyond the point of the fault location. The magnetic fields are a function of the current in the cable and therefore essentially constant along the cable route.
The receiver sensitivity is a function of antenna gain to obtain maximum output. The receiver employs high-gain amplifiers for the same purpose. The detectors are usually made of exploring coils.
Impulse (thumper) method:
This method consists of using a charge capacitor to transmit a high energy pulse between the faulted conductor and ground. The pulse creates an arc at the fault, which in turn heats the surrounding air, and the energy is released as an audible thump. The fault location can be found by listening to the acoustical thump or by tracing the magnetic field generated by the arc. A functional diagram of fault location using the impulse is shown in FIG. 13.
The impulse source is a capacitive discharge circuit consisting of power supply, capacitor bank, and HV switch. Typical capacitor discharge (thumper)
test sets are shown in FIG. 14. The impulse signal can be detected by means of a magnetic loop antenna, a microphone, an earth gradient detector, or a seismic transducer. The relationship between signal loudness and duration depends on the physical sensation. The tendency is for the loudness to increase with the duration; however, beyond a certain point the impact on the loudness is negligible. This method has been applied to both secondary and HV systems.
The major application of the impulse method is to faults where an arc is readily formed. This method can be made effective for faults down to zero resistance (dead shorts), depending upon the source of surge tracing methods because a dead short fault does not produce a thump. Signal detection can be divided into the following methods:
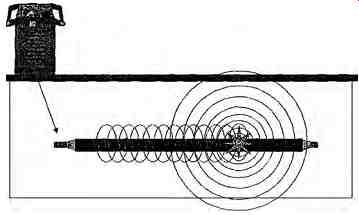 FIG. 13 Impulse (thumper) method for fault location.
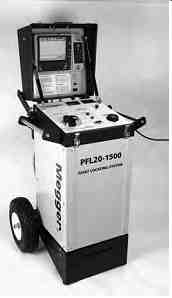
FIG. 14 Capacitor discharge (thumper) test sets, 20 kV with 60 mA burn capacity.
(Megger, Inc., Valley Forge, PA.)
Acoustic signal pickup: In this case the fault of high resistance is arcing over due to the periodic voltage pulses, which makes a very loud thumping sound. Detection can be very simply accomplished by patrolling the line and listening to the noise of the voltage discharge.
Audio amplifiers with suitable pickup of electronic type, headphones, or a stethoscope can be used.
Electromagnetic pickup: When a fault of zero resistance (i.e., fault impedance is low compared to surge impedance) is being located, then of course there will be no noise. Also, even faults of high resistance when surrounded by mud and water will not give off loud noise. Faults of line-to-line or conductor-to-sheath, where the outer sheath is not broken, will not give off any loud noise. For these cases, a detector that traces the impulse signal to the fault by electromagnetic coupling can be used. It consists of pickup coil and a detector.
The detector amplifies the signal, and detection can then be made by galvanometer. It is effective for duct lay and non-lead buried cable.
Impulse current pickup: In this method impulse current signals are derived from a linear coupler, which can be incorporated in the surge generator, or an external linear coupler can be used with any surge generator or HV DC test set. The linear coupler in both cases is in the earth return (cable sheath) circuit to the surge generator or HV DC test set. High-resistance, flashing, and intermittent flashing faults are located using the external pulses generated by the HV surge generator. The signals generate1d are stored digitally in the memory of the test set. The stored wave form can be extracted continuously from the digital memory and displayed on a low-speed oscilloscope. Measurements of fault position can be directly measured digitally in microseconds, thus calculating an accurate estimate of the distance of the fault location by the following formula:
..where T is in microseconds L is in feet …
Vp is the velocity of propagation of electromagnetic waves for the cable dielectric. It should be noted that the propagation factor varies with distance to the fault. Consequently this weakness in the method limits the accuracy.
Arc-reflection method
The arc-reflection method combines an impulse generator to a TDR through an arc reflection filter. This combination of equipment provides an integrated system to locate all cable faults. For high resistance (nonlinear) faults, arc reflection applies an oscillatory, HV impulse to the cable under test. The high impulse causes the high-resistance fault to break down, thus causing a low- resistance arc at the fault. The arc-reflection analyzer simultaneously applies high-frequency, low-voltage pulses to the cable to reflect from the low-resistance arc. The reflected pulses are displaced as intermittent negative reflections on the arc-analyzer screen. The arc reflection filter protects the analyzer against the HV of the impulse generator. The filter also limits the applied HV to just enough to create breakdown at the point of the fault. The arc-reflection method can detect open neutrals or phases, low-resistance faults (<200 Ohm) between phases or between a phase and the neutral, water saturation, and good versus bad splices. The trace on the analyzer screen will display a characteristic signature for each of the above conditions. To determine the location of the fault, the reflection analyzer will automatically display the distance to the fault in feet or meters based on the velocity propagation constant of the cable.
Earth gradient method
This method locates faults by injecting a fault current into the faulted circuit formed by the conductor and earth return. The current spreads into the ground, and potential is developed in the ground between fault and current injection point. The voltage drop between any two points on the ground surface can be measured. Usually, the direction of the voltage drop points toward the fault location. As the fault is approached by moving along the cable length, the voltmeter deflection decreases until the null point is achieved directly over the fault location. However, when the fault location is passed, the voltmeter deflection increases again. In this method precise location of the cable is necessary for pinpointing the fault location.
Where precise routing of cable is not known, a DC or pulsed fault current source may be used to locate the fault using the earth gradient technique.
In this case the meter direction will always be toward the fault location.
To minimize difficulties and make judicious use of time in locating the fault, a simple procedure is usually followed; the negative probe is always inserted first and the positive probe is moved to obtain maximum positive deflection of the voltmeter. By following this procedure the deflection will then always be in the general direction of the fault, and fault tracing can proceed in sequence until the fault is located. This method at best is time consuming, and at worst it will not work at all, especially when cable lay is not known.
The limitation of this method is the measurement sensitivity, because ground potential is a function of both cable depth and fault distance.
The fault current source can be an AC tone, a pulse, or DC voltage. With an AC tone, the voltmeter will show an amplitude of large magnitude on either side of the fault, whereas the amplitude will fall off as the fault location is passed. Also, care must be taken to minimize 60 Hz interference. The DC source is most commonly used, which provides sufficient current flow through nonlinear faults. The pulse source is also similar to the DC source, except that it offers higher fault currents. The earth gradient technique is used to locate conductor-to-ground faults. This method may not be applicable to concentric neutral cables because much of the current returns through the neutral rather than the ground, making measurements rather difficult.
Therefore, the earth gradient method is most applicable to insulated wire cables, which are usually found in secondary distribution systems.
A special application of the earth gradient method is the DC sheath potential difference method. In this method a DC from a 6 V battery is passed through a short length of a faulted lead sheath cable. A voltage drop appears between the faulted conductor and the lead sheath, which can be measured at one of the cable terminals. This connection is shown in FIG. 15. If the fault resistance is low enough or the internal resistance of the voltmeter is high enough, a voltage will be measured on the unfaulted side of the battery.
Therefore, to locate the fault the battery contacts can be moved in the fault direction until fault is located.
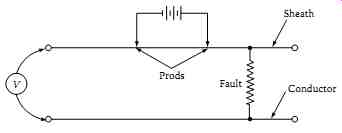
FIG. 15 DC sheath potential difference method.
12.3 Application Guide for Cable Fault Locating
Cable fault locating in the past has been more of an art than a science. The tools used were megohmmeter, shovels, and hacksaws. The common technique for locating faults was the halving technique, which can be described as follows: "Cut cable at halfway point after excavation of a hole, check resistance with a megohmmeter. If the value of resistance is acceptable, move to one-quarter the length of the line, then to one-eighth length, and so on.
Repeat the same procedure on the second half of the remaining length of the cable until the precise point of fault is found." The halving technique is time consuming and costly compared to the modern methods that are now available for fault location. Instruments are available today to, first, find the fault, second localize the fault, and third, pinpoint the fault. To achieve these objectives, the following practical application guide is offered for fault locating using the terminal and tracer methods on transmission and distribution circuits. A summary is given in TABLE 6.
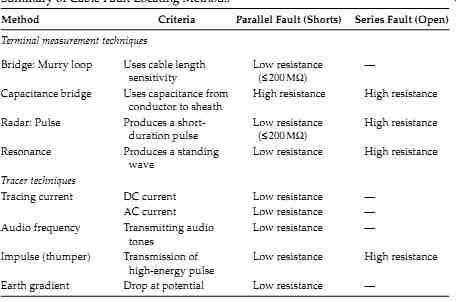
TABLE 6 Summary of Cable Fault Locating Methods: Method Criteria Parallel
Fault (Shorts) Series Fault (Open)
Locate faults in primary cable
The strategy for finding cable faults in primary cable consists of the following steps:
1. Test using an insulation resistance tester
2. Analyze
3. Localize
4. Locate
After a section of cable has been de-energized and isolated in preparation for cable fault locating, it is strongly recommended that a fixed strategic plan be followed for locating the fault. Although most faults are "shorts" between conductor and ground, conductor-to-conductor "shorts" and series opens also occur. Helpful information can be gathered by characterizing the fault with an insulation resistance tester.
Make a series of measurements with the insulation resistance tester using FIG. 16 as follows:
---

FIG. 16 Locate fault in primary cable.
End A End B Megger test from end "A" indicates a short-circuit.
Megger test from end "B" indicates an open-circuit.
---
1. From side "A," connect the insulation resistance tester between the faulted conductor and ground (sheath or concentric neutral and ground if the outside layer of cable is jacketed). Record the reading.
2. From side A connect the insulation resistance tester between each of the other phases (one at a time) and ground (if the cable is three-phase).
3. Repeat all insulation resistance tests from side "B" and record all readings.
Analyze the data
If the insulation resistance of the faulted conductor is less than 50 O or more than 1 MO, the fault will be relatively easy to locate. For values between 50 O and 1 MO, the fault will be more difficult to locate. Some reasons for the difficulty with these faults are the possible presence of oil or water in the faulted cavity and the presence of multiple faults. Multiple faults are frequently encountered on buried cable that has been abandoned for several years or more.
If the insulation resistance tester indicates insulation resistance values less than 10 O, it may not be possible to create a flashover at the fault site when subsequent capacitive discharge methods are used. This type of fault is often referred to as a bolted or metal-to-metal fault.
Whenever possible, perform insulation resistance tests from both ends of the cable. Test results will often allow the user to improve his or her under standing of the characteristics of the fault. For example, if a measurement of 10 Ohm is made from side A and 250 M-Ohm from side B, it could be reasoned that the cable is blown open (severed) and that the part connected to side A is shorting to ground but side B is not shorted. Thumping from side B would likely produce better results..
Localize the fault (pre-locate/approximate) Selection of a localizing technique is based on the character of the fault.
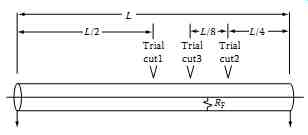
FIG. 17 Divide and conquer method.
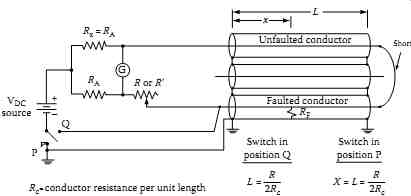
FIG. 18 Bridge method of cable fault locating.

FIG. 19 TDR method of fault locating.
Several techniques will be discussed as follows:
1. Divide and conquer-all faults
2. Bridge-single shorts < 200 MOhm
3. TDR-shorts < 200 Ohm and all opens
4. Arc reflection-all faults that will breakdown
5. Surge current reflection-all faults that will breakdown
6. Electromagnetic impulse detection-all shorts and some opens
1. Divide and conquer-all faults
1. This technique was described as the "halving technique" in Section 12.3. Refer to FIG. 17 and locate a position halfway down the cable path and dig down to the cable.
2. Cut the cable and perform insulation resistance tests each way.
Record readings and splice the cable.
3. Locate a position halfway down the cable path in the direction indicated by the insulation resistance test set to contain the fault.
4. Continue the above until the fault is isolated on a very short portion of the cable.
Advantages:
All you need is a hacksaw, a shovel, a splice kit, an insulation resistance tester, and a lot of time.
Disadvantages:
Expensive, destructive, time consuming, and inefficient.
2. Bridge-single short to ground <200 M Ohm
In order to make use of a bridge, often referred to as the resistance ratio method, the fault must be a fault to ground and only one fault is allowed on the section of cable under test. Also, a good second conductor, preferably the same size, must be available to provide the return path in parallel with the faulted conductor. When these conditions are met, the measurement can be made in only a few steps with most modern high resistance manually operated bridges. Although some automatic resistance bridges are available, they are limited to faults of a few megohms. When all conditions are met, a good manually operated bridge can provide accuracies in the order of 6 in. in a loop length of 500 ft (for example). The bridge method is shown in FIG. 18.
Advantages:
Localizes faults to ground with resistance up to 200 M-Ohm
Disadvantages: The accuracy of this method is affected by:
Presence of more than one fault
Variations in cable size along the loop
Variations in the temperature of the copper or aluminum conductor along the loop
Must have a spare good cable to create a loop circuit
3. TDR-shorts < 200 Ohm and all opens
TDRs send a high-frequency pulse down the surface of the conductor under test. When this pulse reaches a point where the characteristic impedance changes, some or all of the pulse's energy is reflected back to the TDR where it is displayed on an oscilloscope screen. The TDR measures the time required for the pulse to get to the impedance change plus the time it takes to return, takes the actual speed of the pulse into account and displays the resultant distance in feet (or meters) to the impedance change. It is necessary to tell the TDR how fast the propagated pulse travels through the insulation in use, so that the correct distance figure can be calculated and displayed automatically. A high-quality TDR will display almost all impedance changes on the cable under test. It will not display faults to ground which measure higher than 200 Ohm on power cable. For resistance values of 200 Ohm and higher other localizing techniques such as arc reflection can be used successfully. The TDR method of cable fault locating is shown in FIG. 19.
As explained earlier, it is a good idea to shoot the cable from both sides.
The extra effort often rewards the user with critical additional information.
Advantages:
Easy and fast fault finding
Safe low test voltage
Disadvantages:
Cannot find faults to ground with resistance greater than about 200 Ohm
4. Arc reflection-all flashing faults A fault that can be broken down, sometimes referred to as a flashing fault, is essentially a zero resistance fault for the duration of the flash (sometimes referred to as arc over). With this in mind, a filter was designed that allows the TDR to send pulses down a faulted conductor at the same time that an impulse generator sends a breakdown voltage down the same conductor.
The TDR's pulse is reflected from the momentary arc and is subsequently displayed momentarily on the TDR screen. In this way, the TDR is able to reflect pulses from all faults that can be broken down. The arc-reflection method is shown in FIG. 20.
Advantages:
All faults that can be broken down can be localized.
The number of capacitive discharges required for subsequent pin-pointing is minimized.
FIG. 20 Arc-reflection method of fault locating.
Output voltage to the cable under test during the use of arc reflection is automatically regulated by the system to an absolute minimum required to break the fault down.
Pinpointing time is greatly reduced because only the relatively short localized length of cable needs to be patrolled during the pinpointing operation.
Disadvantages:
Does not localize faults that do not break down
5. Surge pulse method
When discharging an impulse generator into a faulted cable, the voltage step travels along the cable. The pulse first passes the faulted region and reflects off of the end of the cable, back toward the fault. The inrush cur rent causes the fault to establish a low-resistance arc and generates a new wave front. This new wave front travels back toward the impulse genera tor. When this new wave front reaches the impulse generator, it sees the generator's capacitor as a short-circuit and reflects back toward the fault, which also appears as a short-circuit during breakdown. The wave front will continue to propagate backwards and forwards between the impulse generator and the fault, slowly diminishing in amplitude. The result of this traveling wave is current and voltage transients. An inductive pickup is used to display the transients on a storage oscilloscope. The surge pulse method is shown in FIG. 21.

FIG. 21 Surge pulse method of cable fault locating.
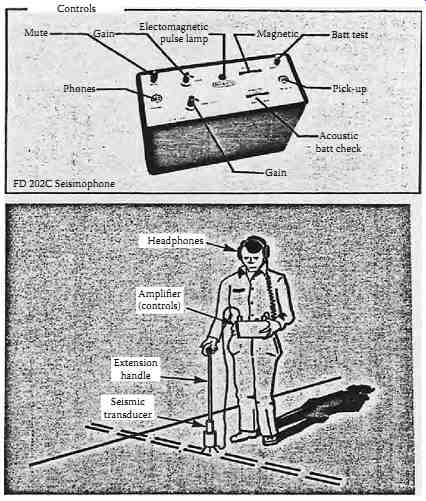
FIG. 22 Electromagnetic impulse detection technique using a polarized meter
and seismic transducer.

FIG. 23 Electromagnetic impulse detection technique.
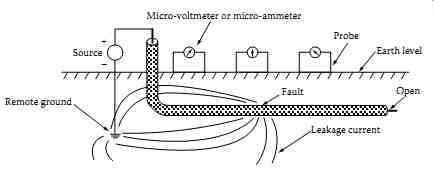
FIG. 24 Voltage gradient method.
Advantages:
Will localize faults in water or oil, and very long cable
Disadvantages:
Much more difficult to operate than arc reflection, and is less accurate
6. Electromagnetic impulse detection
The impulse current from an impulse generator follows the center conductor, goes through the fault to the lead sheath and ground bonds and subsequently returns to the thumper. The magnitude of the current going out on the center conductor differs from the current returning on the lead sheath by the cur rent leaving through the ground bonds just ahead of and just after the fault.
The net electromagnetic field produced is detected by the sheath coil and is displayed on a zero-center meter. Through careful application of the sheath coil and by productive interpretation of the polarized meter indication, the operator can identify the section of cable with the fault. The electromagnetic impulse detection technique is shown in FIG. 22 using a polarized meter and seismic transducer.
Locate or pinpoint faults in primary cable
Locating, often referred to as pinpointing, is necessary before digging up direct buried cable. After the fault has been localized, an impulse generator is connected to one end of the faulted cable. A second repairman proceeds to the localized area and listens for the telltale thump from the fault. When the thump is not loud enough to hear, it may be necessary to use an acoustic impulse detector to finally pinpoint the fault as shown in FIG. 23.
Locate faults in buried secondary cable
Voltage gradient test sets are effective in finding faults on direct-buried secondary cable. This method depends on the fault occurring between conductor and Mother Earth. When the cable is contained within conduit, a different method must be used. TDRs find faults when they occur between two conductors or between conductor and metal conduit. When a single conductor is contained within a plastic conduit, shorts cannot occur unless water gains access through a crack or other entry point. When a fault develops, leakage current flows from the conductor through the break in insulation, and then follows the water to the break in the conduit to earth. If voltage gradient is used, the location of the crack in the conduit could be found, but the location of the fault in the insulation would remain unknown. The voltage gradient method is shown in FIG. 24.
---
