Whatever the shape and size of a workshop—or how special its purpose—it should be arranged to conserve space and motion. Group tools according to function, with nearby storage for accessories. Make electricity available where it is needed, for both light and power.
Planning on Paper: Begin your layout with a floor plan of the existing space drawn to scale on standard graph paper. Note the locations of windows, doors, stairs, supporting columns, and other permanent architectural features. Include anything that intrudes on the shop space—a furnace, water heater, freezer, washer, or dryer. If the shop is in the garage, indicate the space occupied by the car.
Make paper cutouts, also drawn to scale, of the benches, cabinets, and power tools you intend to install, and move them around on the layout until you find a satisfactory arrangement. Try arranging tools in the sequence in which they will be used. In a woodworking shop, for example, cutting and shaping tools (a saw, a jointer, and a lathe) should lead to assembly (a drill press), then to finishing (a sander). Allow for sufficient work space and auxiliary work surfaces around each tool. Position the workbench and lathe near windows, if possible, to benefit from natural light, and place power tools near electrical outlets. You will need shadow-free light overhead for a table saw, sander, or jointer; but a drill press, band saw, or scroll saw can go into a corner with less light, since you can equip these tools with a lamp.
Finding More Room: There are several ways to make your available area work for you. To conserve space, you can buy a radial-arm saw, which fits against a wall, rather than a table saw, which requires 10 feet of space all around. Or, you can build a fold-down workbench that stores out of the way when it is not needed. Save room by mounting bulky tools on roll-away stands that can be pushed into a corner or under a table when not in use. You may decide to forgo stationary power tools altogether, opting for portable ones that can be fastened to a tabletop to do a comparable job. What you lose in performance will save both money and space.
PLOTTING A TRAFFIC PATTERN
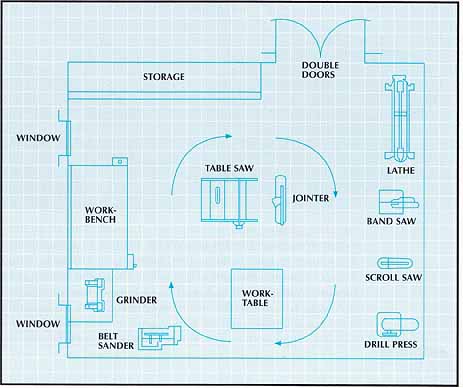
Laying out a step-saving circle.
In a spacious, well-equipped shop (right), tools and work surfaces are arranged in a circle that reflects the natural flow of a typical woodworking project. Storage is located near the table saw, jointer, and lathe, which are commonly used at the start of a job. A band saw and a scroll saw for shaping are lined up along the wall with a drill press.
Nearby stands a worktable for assembly. The shop’s main workbench is positioned between two windows, to make optimum use of natural light.
TWO LAYOUTS FOR SMALLER SHOPS
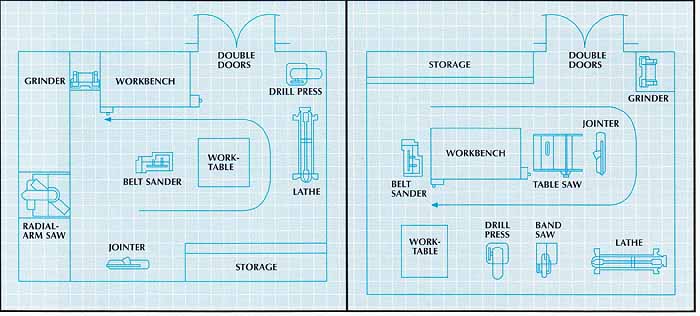
Fitting a shop in small spaces.
To make the best use of a smaller space, set up your shop so work flows in a U — from storage to cut ting and shaping to assembly and finally to finishing. One option is to buy a radial-arm saw (above, left), which can be positioned against a wall, freeing the center of the shop for finishing tasks. Another is to build the shop around a central island formed by the workbench, a table saw, and a jointer (above, right). This arrangement allows both sides of the workbench to be used. If your shop has double doors, they can be left open to provide space when you are working long boards on the saw or jointer.
== Squeezing Stationary Machines into Confined Spaces ==
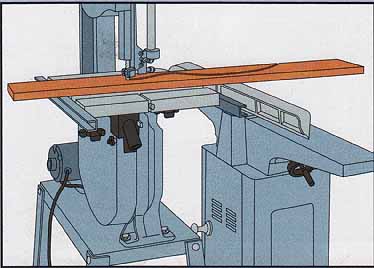
Even if your shop is cramped, you need not forgo large power tools.
Consider the design of the machines and their feed directions—you may be
able to place two machines quite close together if they are well matched.
With a band saw and a jointer, for ex ample, the jointer can be located next
to the out-feed end of the saw’s relatively high work table (right). The
two tools will not interfere with each other, and the jointer fence can even
serve as an auxiliary table for the saw.
==
THREE SHOPS FOR TIGHT QUARTERS
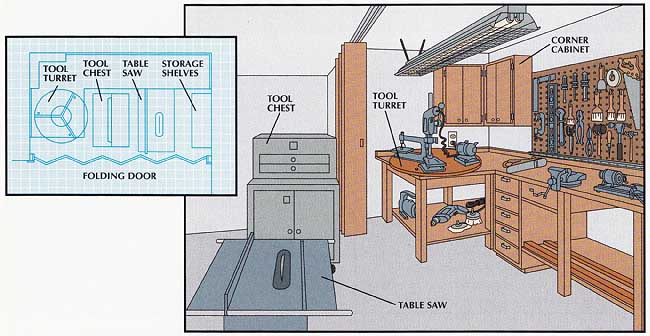
Setting up an expandable shop.
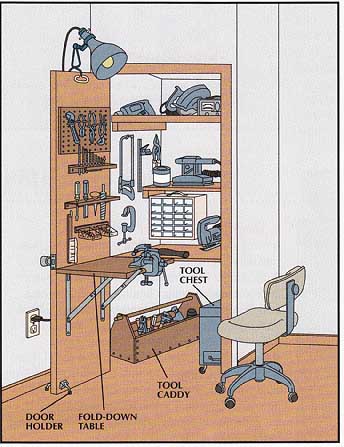
Fitted into an alcove behind folding doors when not in use (inset), a shop can share space with a recreation room, den, or garage. Large items such as the tool chest and the table saw are mounted on locking casters and can be rolled into position (above). The L-shaped work bench—two rectangular benches joined by a single top—is large enough to accommodate a vise, a small lathe, and a revolving tool turret. This one features a scroll saw, a drill stand, and a grinder.
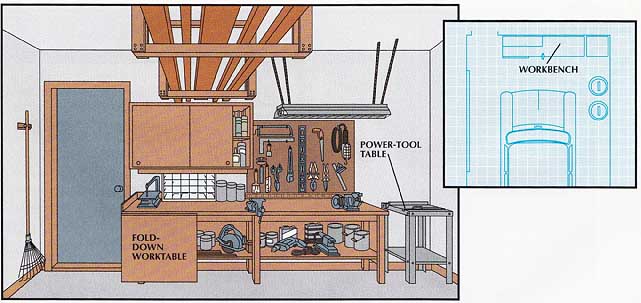
Set at the end of a garage (inset), the shop illustrated above is built around a workbench that covers most of the wall. The bench expands to an L-shaped surface when the hinged table on the left side is raised. Overhead racks suspended from the ceiling provide storage space for lumber. A commercial power-tool table can accommodate a circular saw or router—becoming a small table saw or router table.
== A Shop Dolly ==
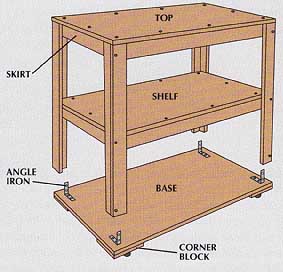
A wheeled dolly is a convenient way to move tools and projects around,
particularly in a compact shop. Cut the base and corner blocks from 3/4-inch
plywood. Screw the blocks to the plywood and fasten a caster to each block.
Cut the eight skirt pieces and the eight leg pieces from 1 -by-3 stock, the
shelf from 1/2-inch plywood, and the top from 3/4-inch plywood. Glue the
leg pieces together, fastening them with 1½-inch No. 6 screws, then screw
the skirts to the inside face of the legs. Fasten the shelf and the top to
the skirts, then secure the legs to the base with angle irons.
==
A closet shop is more than just a convenient place to store tools. Replace a hollow-core door with a solid one, then attach a small fold-down work surface made of 3/4-inch plywood to the inside of the door, supporting it with heavy-duty folding brackets. To extend the work surface, mount a shelf at the same height inside the closet on 2-by-4s nailed to the studs in the closet walls. A clamp-on work lamp provides light. A tool caddy on the floor holds hand tools, while power tools are stored in a wheeled chest. Equipped with locking casters, the chest can serve as a work surface. The holders at the bottom of the door keep the door from moving when the work surface is being used.
Next: Bringing Electricity
to the Shop
Prev: Power-Tool Safety
