Noisy workshops are much more than just an annoyance to others. Continued exposure to noise can damage your hearing and promote fatigue—a leading cause of accidents in the workshop.
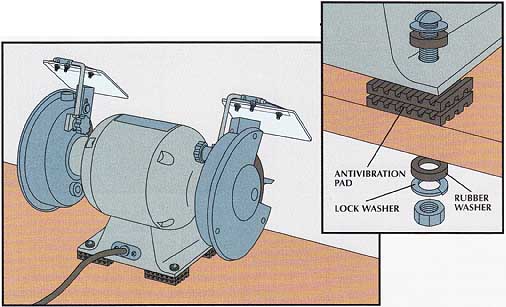
Protecting Your Hearing: Guard yourself from the harmful effects of noise by wearing hearing protection. Earmuffs are effective, but earplugs are less expensive and more comfortable, particularly when paired with goggles. To minimize vibrations produced by tools, place neoprene isolation mounts under machines or the legs of tool stands (below). Install acoustic ceiling tiles to soften reverberations.
Containing Noise: To reduce the passage of noise to adjoining living areas, prevent it from passing through solid materials, such as wallboard and wood, and through the air with sound-reduction strategies. These measures block both routes at once by creating as wide and dense a barrier as possible between rooms and by isolating barrier parts from each other so the sound cannot travel across them.
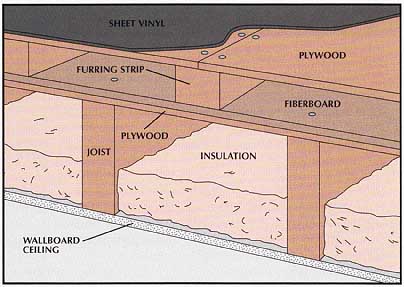
To prevent noises from traveling from an attic to the story below, in stall a double-thickness floor that separates the attic floor from the joists under it. Added fiberglass insulation will help buffer noise.
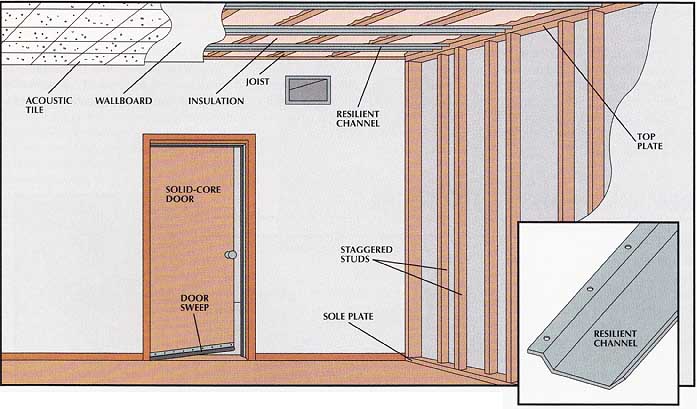
To keep sound in lower-floor shops from traveling sideways or upward, insulate walls and ceilings, then separate the wallboard from studs and joists with resilient channels or Z-furring strips. For an even more effective sound barrier between rooms, you can erect special walls built with staggered studs.
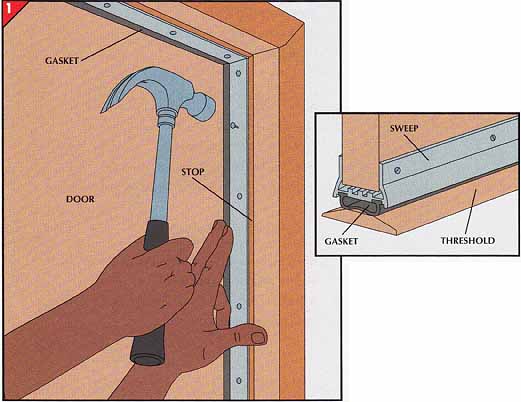
To block noise from passing room to room through the air, seal small openings between rooms with silicone caulk, weather stripping, or special duct liners.
TOOLS:
- Electric drill
- Screwdriver
- Hammer
- Circular saw
- Utility knife
MATERIALS:
- Anti-vibration pads
- Stove bolts
- Rubber washers
- Fiberglass insulation
- Plywood (1/2”)
- Fiberboard (1/2”)
- Roofing nails (1 1/2”)
- Wood glue
- 2 x 3s, 2 x 4s, 2 x 6s
- Resilient channels
- Z-furring
- Wallboard materials
- Drywall screws (1½”, 2’’)
- Acoustic tiles
- Weather stripping
- Door sweep
- Duct-lining kit
SAFETY TIPS: Wear goggles when driving nails or operating power tools. Don goggles, a dust mask, gloves, and a long-sleeved shirt to handle fiberglass insulation.
Reducing Noise at the Source
• With the tool in its usual position, mark its bolt holes, and drill a hole through the worktable at each mark.
• Stack a pair of anti-vibration pads without interlocking the grooves and drill a hole through them.
• Place the pads over the holes in the worktable, set the tool on the pads, and fasten it in place with stove bolts, adding rubber washers on each side (inset).
A Built-Up Barrier Underfoot
• If possible, install batts of 3-inch fiberglass insulation between the joists below the floor.
• Over a ½-inch plywood subfloor, place ½-inch resilient fiberboard, fastened to the joists with 1½--inch roofing nails.
• Using only wood glue, fasten 2-by-3 furring strips to the fiberboard centered between the joists.
• Nail a layer of ½-inch plywood over the furring strips and top the plywood with a floor covering such as sheet vinyl.
Sound-Deadening Walls and Ceilings
Several soundproofing techniques can be built into a shop (above). Fiberglass insulation is stapled between ceiling joists. Running perpendicular to the joists, resilient met al channels (inset) separate the joists from the ceiling wallboard. The narrow flanges of the channels are screwed to the joists, and the wall board is fastened to the wide section with 1½-inch drywall screws. Walls can be soundproofed like the ceilings or a new wall can be built with 2-by-6 top and sole plates, and 2-by-4 studs positioned in a W pattern to the plates, placed so the centers of the studs are 2 feet apart. A solid-core door blocks sound, and unless the heating system requires airflow underneath the door, a door sweep and weather stripping seal any gaps around the door.
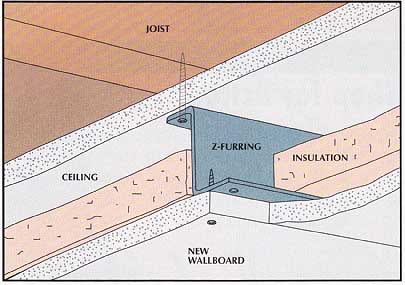
Soundproofing a finished ceiling.
• With 2-inch drywall screws, fasten the narrow flanges of 2-inch-deep Z-furring through the ceiling to the joists above.
• Attach a layer of wallboard to the wide flanges of the strips, inserting 1-inch-thick sheets of fiber glass insulation as you go.
• Glue acoustic tiles to the new ceiling to damp en reverberations in the shop.
Plugging Holes that Transmit Sound
• Cut lengths of weather stripping to fit around the perimeter of the door.
• Hold each piece flat against the stop so the gasket is partly compressed against the door. Secure the strip to the stop with the nails provided .
• To seal the gap under the door, install a sweep on the bottom of the door so the gasket is slightly compressed when the door is closed against the threshold (inset). You may need to trim the door to get the right fit.
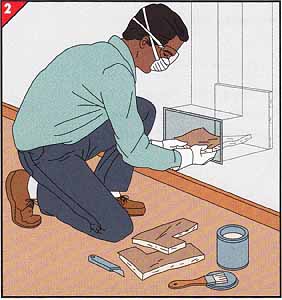
2. Installing duct liners.
• Unscrew the grille over the duct opening, then reach in and measure as far up the duct as you can.
• Cut acoustic duct liner to fit the measured areas and coat exposed surfaces with the adhesive sold by the liner manufacturer. Apply adhesive to the unbacked side of each piece of liner and press it into position inside the duct.
• Let the adhesive dry, check that the pieces are secure, then replace the grille.
Also explore our Ultimate Guide to Sound Absorption.
Next: Equipping the Shop with Portable Tools
Prev: Building a Pass-Through
