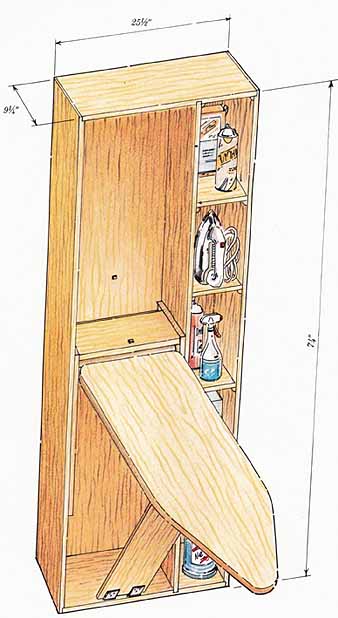
Insert this fold-away ironing-board unit into a tall cabinet in the laundry room or bed room. A cabinet made out of ¾” plywood would be suitable. Readily available materials are used to create this handy and compact project that fits inside.

The outer dimensions of the cabinet shown are 25½ inches by 74 inches
by 9¼-inches, large enough to stow the ironing board with space left for
a stack of narrow shelves. Here’s how to outfit the cabinet for ironing.
Making the board
Start by cutting the ironing board from a sheet of 3 plywood or from a length of 1 by 16 board (although not common, this size is available). Making the ironing board out of 2-by material is even better, but you will have to edge-glue narrower pieces together.
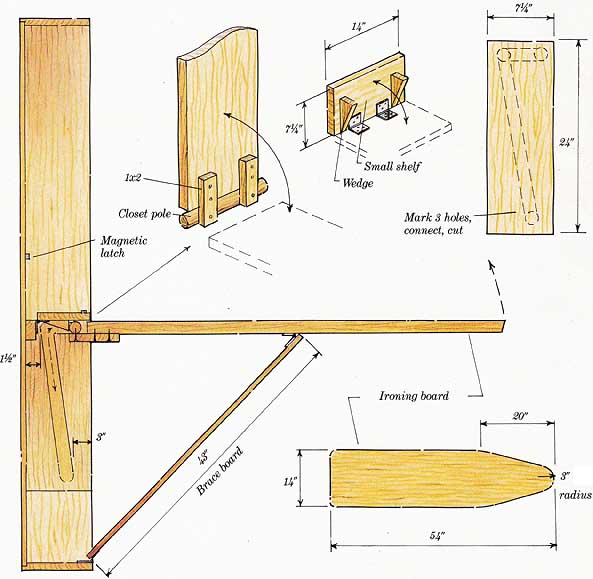
Cut a 15 7/8” length of closet pole, and attach it to the back of the ironing board with two 6-inch sections of 1 by 2, using 1 1/2-inch by No.8 round-head wood screws.
Attaching the board
Cut two 24-inch lengths of 1 by 8 and, using the end of the closet pole, draw 3 circles on each piece. Connect the circles to form the elongated figure-7 shape shown in the inset illustration. Cut around the marked shape with a saber saw, taking care that the resulting slot is wide enough to allow the closet pole to slide with out binding.
Screw slotted panels to inside of cabinet. The top of the figure 7 establishes the top of the ironing board; standard height ranges from 32 inches to 35 inches. Use your current ironing board, or a friend’s, to deter mine the height that suits you best.
Cut a length of 1 by 8 to 43 inches. Bevel 1 end about 15 degrees. Attach it to the bottom of the cabinet, in the center with 2 hinges. Using the 1 by 8, cut a small shelf 14 inches wide.
Attach a 1 by 2 cleat across the back of the cabinet so that the top edge is at the same height as the top of the figure 7. Fasten shelf to cleat using 2 small hinges. Holding shelf in the up position, lift ironing-board assembly into position: The back should be supported in the figure-7 slots and the front rests on the floor. Lower shelf onto closet pole, and mark the position for the 2 small wedges on the bottom of shelf. Cut wedges from 1- by material, and attach them securely to bottom of shelf, just to the outside of the 1 by 2 connectors. These wedges keep closet pole in the forward position when ironing board is in use.
Place a carpenter’s level on the ironing board, and holding it level, mark the correct location of brace board on the bottom. Then, using another hinge, attach brace to bottom of the ironing board.
Finally, attach a magnetic latch to the folding shelf and cabinet back. This will hold shelf in the up position.
Prev.: Home
Theater, TV or Stereo Cabinet
Next: Building
Cases: Modular
Cubes
Full guide: How to Plan & Build Bookcases, Cabinets & Shelves
Product
Catalog

