AMAZON multi-meters discounts AMAZON oscilloscope discounts
Although there are hundreds of types of electronic components and thousands of subtypes (transistors with different characteristics, For example), a small set of parts constitutes the core of most electronic products. Let's look at the most common components and how to recognize and test them. In this section, we'll cover out-of circuit tests, the kind you perform after removing the part from the board. We'll get to in-circuit testing in Section 11, when we explore signal tracing and diagnosis.
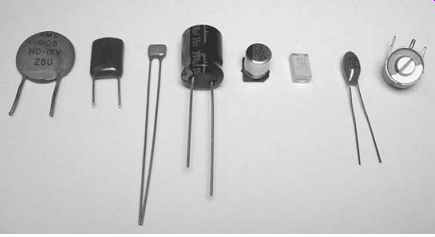
FIG. 1 Ceramic disc, plastic, electrolytic, surface-mount electrolytic,
tantalum, and trimmer capacitors
Capacitors
Capacitors consist of two plates separated by an insulator. A charge builds up on the plates when voltage is applied, which can then be discharged back into the circuit.
Capacitors come in many types, including ceramic, electrolytic, tantalum, polystyrene (plastic) and trimmer (variable). See FIG. 1.
Symbols:

Markings
Most capacitors are marked in straightforward manner, with numbers followed by µf (microfarads, or millionths of a farad) or pf (picofarads, or trillionths of a farad). Leading zeros to the left of the decimal point are not shown, so we won't use them here either. Some European gear has caps marked in nf (nanofarads, or billionths of a farad). Thus, a cap marked 1 nf = .001 µf. Some capacitors are marked with three numbers, with no indication of µf, nf or pf. With these, the last number is a multiplier, indicating how many zeros you need to tack on, starting from picofarads. For instance, a cap marked 101 is 100 pf, because there is one zero after the two numbers indicating the value. A marking of 102, then, is 1000 pf, or .001 µf. And 103 is 10,000 pf or .01 µf, and so on. Here's a handy list:
XX0 = less than 100 pf. The two Xs are the value in pf. Sometimes there's no zero on the end. A tiny cap marked 27 is 27 pf. One marked 270 is also 27 pf.
XX1 = value X 10 pf
• XX2 = .00XX µf
• XX3 = .0XX µf
• XX4 = .XX µf
• XX5 = X.X µf
• XX6 = XX µf
Any value greater than these will be marked directly in µf, as in "2000 µf." On ceramic disc capacitors, you may also see a marking like N750. This specifies the temperature coefficient, or how much the capacitance drifts with temperature and in which direction. Keep an eye out for NP0, which means no drift in either direction.
NP0 caps are used in time constants and tuned circuits so they won't change frequency as the unit warms up. Should you ever need to replace an NP0 cap, be sure to use the same type.
Polarized capacitors are marked for their polarity. With can-style electrolytics, the marking is a long arrow or black line, and it indicates the negative lead. Some very old electrolytics may show a + sign instead, indicating the positive lead, but they haven't been made that way for many years. Look for them in antique radios and such.
Tantalum electrolytics, which look like little dipped candy drops with wires, denote the positive lead with a + sign, or sometimes a red or silver dot.
Surface-mount electrolytics of the can type are marked with a black line or semicircle, usually on the top, indicating the negative lead. Flat plastic caps have one end painted silver or white, and this denotes the positive terminal; don't confuse it with the negative-indicating line on can-style caps. Some small surface-mount caps of well under 1 µf have no markings at all, making it impossible to determine their values without a capacitance meter. They are usually tan and are neither polarized nor electrolytic.
If you find a can-type capacitor with no polarity marking, look for NP, which indicates a non-polarized electrolytic cap. These are uncommon, but you sometimes run across them in audio gear. You must replace NP caps with the same type.
Uses
Different styles of capacitors cover various ranges and are used for different purposes.
Here are the common ones:
Ceramic • These cover the very small values, from a few pf up to around .1 µf, and are used in resonant radio circuits and bypass applications.
Plastic • These start at around .001 µf (1000 pf) and may go as high as .47 µf or so. They are used for bypass and coupling, and are sometimes found in time constants because of their excellent stability over a wide range of temperatures.
Electrolytic • These start at around .47 µf and cover the highest ranges, on up to tens of thousands of µf. They are used for coupling and filtering.
Tantalum • These range from .1 µf to around 47 µf and are a special type of electrolytic capacitor with lower impedance at high frequencies. They are used in filtering and bypass applications when high frequencies are present.
Trimmer • These range from the low pfs to around 200 pf and are used as frequency adjustments for tuned (resonant) circuits and oscillators.
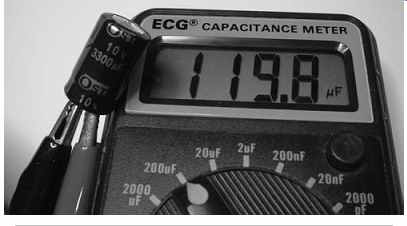
FIG. 2 Bulging electrolytic capacitor with greatly reduced capacitance
What Destroys Them
Different styles of capacitors fail for different reasons, depending on how they're used and to what conditions they're subjected. Generally, application of a voltage above the cap's ratings can punch holes in the dielectric (insulating) layer, heat can dry or crack them, and some wear out with age.
Ceramic and Plastic---These very rarely fail. In all my years of tech work, I've found two bad ceramics and one bad plastic cap! It just doesn't happen. If these caps appear unharmed, they are almost certainly okay.
Electrolytic---These are the most failure-prone components of all. Part of their charge-storing layer is liquid, and it can dry out, short out, swell and even burst the capacitor's seals and leak out. Heat, voltage and age all contribute to their demise. The constant charging and discharging as they smooth ripple currents in normal operation gradually wears the caps out. Today's predominance of switching power supplies, with their fast pulse action, has accelerated capacitor failure. And application of even a little reverse-polarity current will wear out 'lytics in a hurry. A leaky rectifier will permit some AC to hit the filter caps connected to it, resulting in ruined caps. If you replace them without changing the rectifier, the new parts will fail very quickly.
Failure modes include shorts, opens, loss of capacitance from age or drying out, electrical leakage (essentially a partial short), and increased internal resistance, or equivalent series resistance (ESR). If you see a bulge in the top of the cap, or anywhere on it, for that matter, it’s bad and must be replaced. Don't even bother to check it; just put in a new one. Look at the bowed top of the capacitor in FIG. 2.
Keep in mind that a cap can also exhibit high ESR or decreased capacitance with no physical signs.
Many surface-mount electrolytics made in the 1990s leaked, thanks to a defective electrolyte formula. If the solder pads look yellow or you see any goo around the cap, the part has leaked and must be replaced. Sometimes the yellow pads are the only clue.
Tantalum---These use a solid electrolyte in the dielectric layer that is quite thin.
Consequently, they are prone to shorts from even momentary voltage spikes exceeding their voltage ratings and punching holes in the layer. And they are even less tolerant of reverse current than are standard electrolytics.
Trimmer---Trimcaps use a plastic or ceramic insulating layer that is very reliable. They rely on a mechanical connection, though, between the rotating element and the base, making them prone to failure from corrosion over a period of many years. Sometimes rotating the adjustment through its range a few times can clear it up, but doing so causes loss of the initial setting, requiring readjustment afterward. Never spray the plastic variety with cleaner spray, as it may damage the dielectric layer and destroy the component.
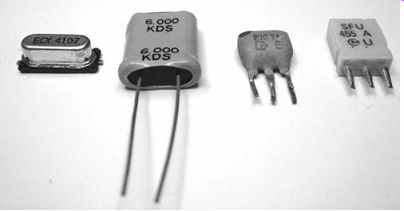
FIG. 3 Quartz crystals and ceramic resonators
Out-of-Circuit Testing
To test a capacitor after removal from the circuit, use your cap meter. If you don't have one, you can use your DMM's ohms scale to check for shorts. Small-value caps will appear open whether they are or not; they charge up too quickly for you to see the voltage rising.
For electrolytics, do a quick test with an analog VOM, watching for the initial needle swing and slow release back toward infinity. Make sure the cap is discharged before you try to test it. With a polarized cap, connect the test leads + to + and - to -. Most polarized caps will survive a reversed test, but tantalums may not; even momentary reversed voltage can short them out.
Crystals and Resonators
Quartz crystals and ceramic resonators are made from slices of quartz or slabs of ceramic material, with electrodes plated on the sides. They exploit the piezoelectric effect, in which some materials move when subjected to a voltage and also generate a voltage when mechanically flexed. Crystals are always found encased in metal, while ceramic resonators are usually in yellow or orange plastic. Crystals have two leads, and ceramics may have two or three. See FIG. 3.
Symbols
Crystals and resonators use the same symbol unless the resonator features internal capacitors and has three leads.
Markings
Crystals and resonators are marked with their frequencies. For crystals, assume the number means MHz. On resonators, assume hundreds of kHz, though some may be in MHz as well. Crystals can sport other numbers indicating the type of cut used, which is quite a complicated topic. It's not a concern in most service work, though.
Either the crystal oscillates or it doesn't.
Uses
Quartz crystals are used as frequency-determining elements in oscillators, and sometimes as tuned filters in radio applications. Ceramic resonators are used the same way, but in applications requiring less stability and accuracy, and usually at lower frequencies. You are more likely to find a quartz crystal in the clock oscillator running a digital device like a laptop, DVD player or MP3 player, with a ceramic resonator lurking in a remote control or some radio circuit stages.
What Kills Them
Crystals and resonators are mechanical. They actually move on a microscopic level, vibrating at their resonant frequency. They are also made of crystalline material, so they're somewhat brittle. Heat and vibration can crack them, as can a drop to the floor. Quartz crystals, especially, can develop tiny internal fractures and just quit on their own, with no apparent cause.
Some flaws don't stop them outright; they become finicky and unpredictable.
Touching their terminals may cause them to stop or start oscillating. Also, crystals drift in frequency as they age, sometimes drifting past the point at which the circuit will operate properly.
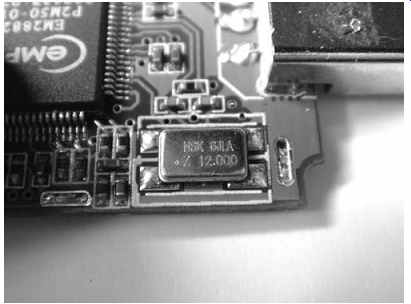
FIG. 4: 12-MHz crystal clock oscillator
Out-of-Circuit Testing
Without a crystal checker, which is simply an oscillator with an indicator light, there's no way to tell whether a crystal works without scoping its signal in an operating circuit. Even a crystal checker may lie to you, indicating a good crystal that still won't start in the circuit for which it's intended.
Crystal Clock Oscillators
Crystal clock oscillators are complete clocking circuits in a small metal box with four or six pins. FIG. 4 shows a really small one. (Notice a much larger unit in Figure 10-8, in Section 10.) On four-pin parts, two pins are for power and ground, a third for output, and the fourth, called output enable, to activate or inhibit the output.
Six-pin versions sport two complementary outputs (one is high while the other is low), output enable, power, ground and one unconnected pin.
Symbols:
Markings
The frequency will be marked on the case. You may also see a manufacturer's part number.
Uses
More and more, crystal clock oscillators are replacing separate crystals, especially in products using multiple frequencies for various tasks. Because the oscillator is in the can, no extra circuitry is required, so cost and required space are reduced.
What Destroys Them
These oscillators contain quartz crystals, so they're subject to the same mechanical issues inherent in crystals. Because the cans also include a complete circuit, they're vulnerable to heat and overvoltage failures as well. For the most part, though, crystal can oscillators are very reliable.
Out-of-Circuit Testing
Applying power and ground to the appropriate pins should produce an output waveform at the frequency shown on the can. The amplitude should be fairly close to the applied DC voltage. Unless no power is getting to the oscillator, it's just as easy to test one in-circuit as out. If there's power, the waveform should be there. The output enable pin must not be low, or no output will appear. It's fine for it to be left unconnected, and in many circuits it is, since the oscillator needs to run all the time anyway.
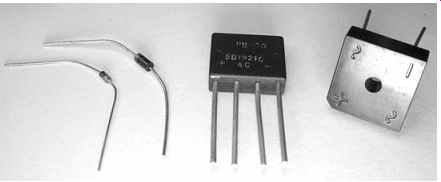
FIG. 5 Diode, rectifier, and bridge rectifiers
Diodes
Diodes are one-way valves. Current can flow from their cathodes (-) to their anodes (+) but not the other way. They are made from silicon slabs "doped" with materials that cause the one-way current flow, with two dissimilar slabs touching at a junction point. Large diodes used in power supplies are called rectifiers, but they do the same thing. Two of them in one package, sharing one common terminal (for a total of three leads), are called a double diode, or double rectifier. Four of them arranged in a diamond-like configuration are called a bridge rectifier, whether they are separate parts or integrated into one package. See FIG. 5.
Markings
Single diodes and rectifiers have a band at one end indicating the cathode. They are marked by part number, which does not indicate their operating parameters like maximum forward and reverse operating voltages and maximum current. To get those, you must look up the part number in a guide or online.
Bridge rectifiers may be marked for peak forward voltage and current, but they often have part number markings or none at all. Sometimes you'll see "~" at the AC inputs and "+" and "-" at the DC outputs.
You may see a marking like 200 PIV, for peak inverse voltage. This is the maximum voltage the diode can withstand in the reverse (nonconducting) direction before breaking down and allowing the voltage to pass. Exceeding the PIV rating usually destroys the diode.
Uses
Diodes and rectifiers are common parts in pretty much every electronic product.
Small-signal diodes rectify signals for detection of the information they carry, as in a radio, and direct control voltages that turn various parts of the circuitry on and off.
They may also be used as biasing elements, providing a specific current to the inputs of transistors and other amplifying elements, keeping them slightly turned on so that they can conduct over the required portion of the input signal's waveform. Light emitting diodes, or LEDs, are used as indicators on control panels, and bright white LEDs backlight newer LCD screens in many products, from laptops, netbooks, and tablet computers to large TVs.
Rectifiers convert incoming AC power to DC. They convert the pulses in a switching power supply's transformer back to DC as well. Bridge rectifiers are commonly used to change AC line current to DC by directing opposite sides of the AC waveform to the appropriate + and - output terminals.
What Destroys Them
Diodes and rectifiers can fail from voltage exceeding their limits, but the most common cause is too much current and the heat it produces. Sometimes they just fail with age, too. Failure modes include opens, shorts and leakage.
Out-of-Circuit Testing
Most DMMs include a diode test function that shows the voltage drop across the part, indicating whether it’s passing current. Be sure to test the diode in both directions. It should show a drop of around 0.6 volts in one direction and appear open in the other.
An open reading will show the applied test voltage, the same as when the meter's leads are unconnected to anything. Even a small voltage drop in the reverse direction suggests a leaky diode that should be replaced.
With an analog VOM, you can use the resistance ranges to get a good idea of a diode or rectifier's condition, but small leakage currents are hard to detect. With either type of meter, you're most likely to see a total failure, either open or shorted, if the part is bad. Leaky diodes are rare, but not so rare that you shouldn't keep the possibility in mind.
Fuses
Fuses protect circuitry and prevent fire hazards by stopping the current when it exceeds the fuses' ratings. Though simple in concept, fuses have a surprising number of parameters, including current required to blow, maximum safe voltage, maximum safe current to block and speed of operation.
The primary parameter is the current required to melt the fuse's internal wire and blow it. If you're not sure of anything else, be sure to get that right when replacing a fuse.
The speed at which the fuse acts is also important in some devices. Time-delay or slow-blow fuses are used for applications like motors, which may require momentary high start-up current. Ultra-fast-acting fuses are used with especially sensitive circuitry that must be protected from even transient overcurrent conditions. Most consumer electronic gear uses standard fuses, which are considered fast-acting but not ultra-fast.
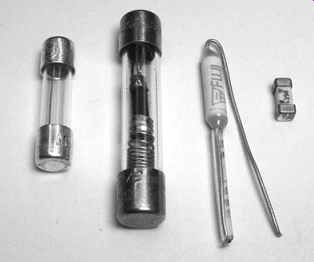
Fuses come in many shapes and sizes, from the ubiquitous glass cylinders with metal end caps to tiny, rectangular, surface-mount parts hardly recognizable as what they are. You'll find fuses in holders and also soldered directly to circuit boards. Be on the lookout for glass fuses with internal construction including a spring and a little coil; those are the slow-blow variety. See FIG. 6.
Symbol:
Markings
At least four marking systems are used on fuses. The primary marking is the melting current, shown by a number followed by an A. You may also see 3AG or AGC, both of which indicate standard-speed glass fuses. You must look up other markings to get the speed rating. Many online catalogs offer this information.
Uses
Anything that plugs into the wall will have a fuse on the hot side of the AC line, usually right as it enters the device, before it even gets to the power switch. Battery-operated gadgets often have fuses too, between the battery's positive terminal and the rest of the unit. Some products have multiple internal fuses protecting various parts of the circuitry. I've seen as many as eight of them in one camcorder! Some audio amplifiers and receivers use fuses in line with the speakers to protect the amp, should a speaker's voice coil overheat and short out. Such a fuse can also protect the speaker if the amp develops a shorted output transistor and sends the power supply's entire current capacity straight to the speaker.
What Kills Them
Most fuse failures are caused by doing their job. A short in the circuitry pulls too much current through the fuse, so it blows. Now and then, you may run across a fuse that has fatigued with age and use, finally failing. If it's a glass fuse, take a look at the inside. When the two wires are almost touching and there's no discoloration on the glass, the fuse blew gently, and there's a possibility that the circuitry isn't shorted.
That happens sometimes with speaker fuses when the amplifier is played at high volume for extended periods. The fuse's wire gets just warm enough to fracture, but there's no malfunction in the circuitry. If you see a wide gap between the wires and spattering on the inside of the glass, the fuse blew hard, indicating a lot of current and certain circuit failure.
Very rarely, fuses can develop resistance, continuing to pass current but interfering with the full flow. I've seen it a couple of times, and my first such case drove me bonkers trying to figure out why the power supply voltage was low and erratic. Figuring a fuse was either good or bad, I never considered it as a possible culprit until I'd wasted hours looking at everything else. Incredulous, I pulled it and discovered that it had become a 10-ohm resistor! I haven't trusted the little buggers since.
Out-of-Circuit Testing
Check fuses with your DMM's ohms scale. It should read 0 ohms. If you see an ohm or 2, try touching the meter's leads together; you may get the same reading, thanks to the resistance of the leads themselves. If not, and the resistance is definitely in the fuse, replace it. A blown fuse will read completely open, of course.
Inductors and Transformers
Inductors, or coils, generate a magnetic field when current passes through them.
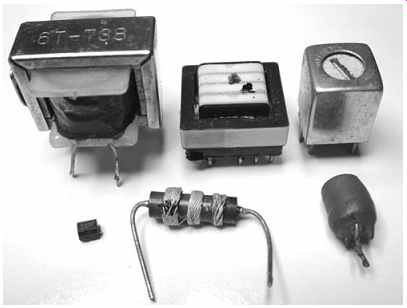
FIG. 7 Inductors and transformers.
When the current through the inductor stops or changes direction, the field collapses and creates a current in the wire, opposing the changes. The effect is to store some of the energy and put it back into the circuit.
Coils may be wound on nonferrous cores having no effect on the magnetic field, or they may be wound on iron cores that play a significant role in the inductor's behavior.
Two inductors wound on the same iron core can be used to convert one voltage and current to another by creating a magnetic field in one coil and using it to generate a current in the other coil, which may have a different number of turns of wire, thus creating a different voltage. This arrangement is called a transformer. See FIG. 7.
Markings
Many coils are not marked. Some small ones are encapsulated in plastic or ceramic and marked in µh (microhenries, or millionths of a henry) or mh (millihenries, or thousands of a henry).
Uses
Inductors and transformers are used to convert voltages; to couple signals from one stage to another, especially in radio equipment; and to filter, or smooth, voltage variations. They are also essential parts of many resonant circuits, working together with capacitors to establish time constants.
Their inherent opposition to rapid voltage change makes coils useful for isolating radio-frequency signals within circuit stages while allowing DC to pass. When used in this manner, coils are called chokes because they choke off the signal. Look for them where DC power feeds from the power supply into RF stages.
What Destroys Them
In low-power circuits, coils are highly reliable. Failure is pretty much always due to abuse by other components. It's very rare for small-signal inductors to fail, since little current passes through them. In circuits where significant supply current is available, a shorted semiconductor can pull enough through the inductor feeding it to blow the coil. If you find an open inductor, assume something shorted and killed it.
The windings in power transformers sometimes open when too much current overheats them and melts the wire. Often, the primary (AC line) side will burn out even though the excessive current draw is on the other side of the transformer, somewhere in the circuitry. They may also short to the iron core. The insulation of the windings in high-voltage transformers can break down and arc over to other windings, create a short between windings, or arcing and shorts to the core.
Out-of-Circuit Testing
Use your DMM to test for continuity from one end of a coil or section of a transformer to its other end. You can also use the ohms scale to check for shorts from windings to the core and between unconnected windings.
It's very hard to tell whether windings are shorted to each other in the same coil.
Using the ohms scale, the difference can be so slight that it's undetectable. If you have an inductance meter and know the correct inductance, that will give you some idea.
With unmarked coils and just about all transformers, though, you won't know what the inductance should be without access to an identical part for comparison. In some circuits, such as LCD backlighting inverters, there can be two identical transformers, so you may be in luck.
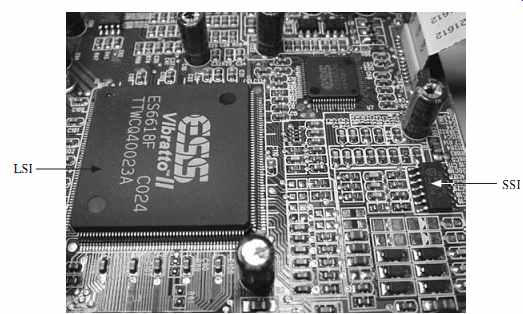
FIG. 8 Small-scale and large-scale ICs in a DVD player.
Integrated Circuits
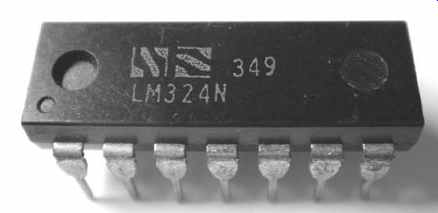
ICs, or chips, come in thousands of flavors. In today's advanced products, ICs do most of the work, with transistors and other components supporting their operation. Digital chips are at the hearts of computers, DVD players, digital cameras, MP3 players, you name it. In many devices, they work side-by-side with analog ICs handling radio, audio and video signals. See FIG. 8.
ICs integrate anywhere from dozens to millions of transistors on a small square of silicon, with microscopic structures printed using photographic techniques. A failure of even a single transistor will render the chip defective. It's pretty amazing that they ever work at all! Obviously, there's no way to test the individual structures; all you can do is verify whether the chip is properly performing its intended function.
There are some off-the-shelf chips used in many products, but custom ICs specific to a model or product category are quickly coming to dominate our gadgets' innards.
Each chip can include more product-specific functions, so it takes fewer of them to make a device. The fewer parts and interconnections, the more reliable an item is likely to be. And that gadget can be smaller and cheaper to build.
Large-scale-integrated chips, called LSIs, can have up to a few hundred pins spaced so closely that you can't even put a probe on one without shorting it to its neighbor.
Without exceedingly expensive, specialized equipment, it's very difficult to unsolder or resolder these parts. There is a trick for touching up suspected bad joints on some of them, but it takes practice and doesn't always work. We'll look at it in Section 12.
Luckily, ICs are very reliable. Most of them handle small signals, so they don't dissipate a lot of power and get hot enough to fail. There are some exceptions to that, however-notably CPUs and video graphics chips in computers. Some graphics cards have fans over the chips, as do CPUs. You know the thing gets mighty warm when it needs its own fan! These parts get so hot because they have millions of transistors switching from millions to a few billion times per second. Those microscopic heat generators add up to a serious temperature rise.
Other hot-running chips include audio power output modules in stereo receivers, some types of voltage regulators, motor controllers, convergence chips in big-screen CRT TVs and anything else that pumps real power. These parts are usually mounted on heatsinks, and they fail as often as power transistors.
Symbols:
Chips are denoted on schematics by the number of pins and their general shape. Some simple chips, like logic gates and op amps, may include a schematic of their general internal functions, but not the actual layout of transistors on the chip.
Markings
The parts are marked with part numbers that can mean many things. Small-scale, industry-standard chips are produced in families sharing some part number commonality. For instance, older CMOS logic gate chips are called "4000 series" and have part numbers like 4011B and 4518. They all begin with 4.
Large-scale integrated circuits often have proprietary part numbers, and they certainly will if they're custom parts made for the specific type of product.
The pins on an IC are numbered going counterclockwise around the chip in a ring.
Pin 1 will have a dimple or spot next to it on the chip's plastic casing, and it will be in a corner.
Uses
ICs are used for just about everything: audio amps, data processors, logic gates, oscillators, signal processing, and any other function you can think of.
What Kills Them
ICs are highly reliable, but heat is a major danger, especially when it's internally generated. Voltage spikes can destroy some chip families, but more modern varieties are fairly voltage-tolerant. Still, a static charge may present a voltage too high for any chip to withstand. A short in another area of the circuit that pulls too much current from a chip's output can blow it. If the power supply feeding the chip fails but signals are still fed to it, the chip can latch, causing a permanent internal short. Finally, some ICs, especially LSIs, have internal features so small that atomic forces may gradually eat through the microscopic wires and connections, creating holes that wreck the chip. Essentially, the part dies of old age. This problem has been researched by chip makers for many years, and today's ICs hold up rather well. Now and then, a chip still dies without apparent provocation.
Out-of-Circuit Testing
There's no way to put a meter on a chip to see if it's good. In fact, doing so may damage the chip if the meter's test voltage happens to be high enough and touches the wrong pins. Simple logic gates can be plugged into a test board and hooked up to test their functions, but the exercise is more trouble than it's worth. For the most part, chips must be tested in-circuit by observing their actions with your oscilloscope.
Op Amps
The op amp, or operational amplifier, is a common type of chip. It's an analog, general-purpose amplifier configurable to do many different jobs, such as buffering, oscillating and signal filtering, by connecting resistors and capacitors to its inputs and outputs. The number of op amp circuit variations is staggering! One chip may contain several op amps. Dual and quad op amps are used in many products. See FIG. 9.
Symbol:
Vs+
+
- Vout Vs-
Markings
The chips are marked with part numbers, and there are some, like LM358, you'll see often.
Uses
You'll find op amps in audio circuits, radio circuits, motor controllers and power supplies.
Any place requiring an amplifier is a prime candidate for an op amp. Most op amps are for small-signal applications, but some power op amps are capable of driving significant loads. Expect those to be heatsinked.
What Kills Them
Heat and overcurrent are the primary culprits.
Out-of-Circuit Testing
As with logic gates, op amps have to be in some kind of circuit for you to test them.
