AMAZON multi-meters discounts AMAZON oscilloscope discounts
To repair anything, you will need some basic test gear and a suitable place to use it. Because electrons and their energy flows are invisible, test equipment has been around almost as long as human awareness of electricity itself. The right test instruments and hand tools enable you to get inside a product without damaging it, find the trouble, change the bad parts and reassemble the case correctly and safely.
Essential Tools for Electronic Labs
Electronics work can involve a seemingly unending array of instruments, but you don't need them all. Some of them are insanely expensive and only rarely useful. Others cost a lot less and find application in almost every circumstance. Some items are absolutely essential, so let's start by looking at those things you can't live without, and how and where to set them up for the most effective, efficient service environment.
A Good Place to Work
Like surgery, tech work is exacting; there's little room for error. One slip of the test probe can cause a momentary short that does damage worse than the problem you were trying to solve. One of the most important elements of effective, conscientious repairing is an appropriate workspace set up to make the task as easy and comfortable as possible, minimizing the likelihood of catastrophic error.
First, consider your location. If you have young children, it's imperative that the workbench is set up in a room that can be locked. Opened electronic products and the equipment used to service them are not child-safe, and the last thing you or your kids need is an accident that could injure them. Dens and basements can be suitable locations, but garages are probably best avoided if the kids are still at that "poke in a finger and see what happens" age. Pets, too, can wreak all kinds of havoc on disassembled machinery. Cats love to climb on and play with things, particularly if those things are warm. The effects can range from lost screws and broken parts to dead cats! Let's face it, cats are not big readers, and a "Danger! High Voltage!" sticker looks about the same to them as "Cat Toy Inside." Keep kitty away from your repair work, even when you're in the room. You just never know when the little angel sitting there so placidly will make a sudden leap at your project and turn it into op-art.
Many of us have our workshops in the basement. This location is a mixed bag.
It keeps the somewhat messy business of repair out of your living space, but it has some drawbacks. If you live in a cooler clime, it can get mighty chilly down there in the wintertime! Worse, basements tend to be damp, which is bad for your test gear.
In damp environments, oscilloscopes and meters have a way of not working if you haven't used them for awhile, because moisture gets into connectors and redirects normal current paths in unpredictable ways. Still, the basement may be your best bet.
Just be sure to fire up your gear now and then to dry it out, and run a dehumidifier if humidity climbs above 70 percent or so. Use an electric heater in the winter; kerosene heaters designed for indoor operation still emit quite a bit of carbon dioxide that will build up in the unventilated spaces of most basements. And should such a heater malfunction and put out a little carbon monoxide, you'll probably be dead before becoming aware of anything wrong.
The workbench itself should be as large as you can manage, with plenty of space for your test equipment, soldering iron, power supplies and other ancillary gear along the edges; you'll need to keep the center clear for the item to be repaired. Wonderful, prefab test benches can be mail-ordered, but they're fairly expensive and are most often found in professional shops. If you have the means, go for it. Get one with shelves and lots of power strips. If, like most of us, you'd rather not spend hundreds of dollars on a bench, there are plenty of alternatives. You can make your own in the time-honored way, from an old solid door (hollow doors aren't strong enough) and some homemade wooden legs and braces. If you're not the woodworking type, a big desk can sometimes suffice.
Sturdy desks and tables suitable as workbenches can often be had for very little from thrift stores or for free from online trading boards, because of one factor in your favor: they don't have to be pretty. In fact, avoid spotless, fancy furniture, because you'll feel bad when you nick, scrape, singe and accidentally drill holes in it. An Ikea style desk works great, as long as it's well-braced and sturdy. A white Formica surface is nice too, because notice dropped screws and such much more easily than with a darker, textured covering (see Fgr. 1). Don't even consider covering the bench with carpeting; you'll lose so many parts in it that you could eventually shake it out and build a fusion reactor from what you find! Also, carpeting can build up static electric charges lethal to circuitry.
Carpeting on the ground around the bench has its pros and cons. It's easy to lose small parts in it, but it also helps prevent them from bouncing away into oblivion when they fall. If you do choose to have a carpeted floor, pick a light color and as shallow and tight a pile as possible. This is no place for a thick carpet with loose fibers.
You'll need modern, three-wire (grounded) electrical service at your bench. This is critical for safety! A grounding adapter plugged into a 1920s two-wire outlet won’t do, even if you screw the adapter's ground lug to the wall plate. Most of those plates are not properly grounded, and a bad ground can get you killed in certain circumstances.
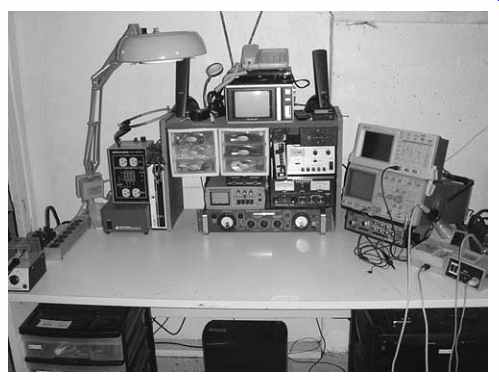
Fgr. 1 The well-appointed workbench: a little smaller than ideal,
but it does the job.
The current (amperage) requirement is not high for most service work. Your scope and other instruments won't eat a lot of power, and most benches can be run quite safely using a single, modern 15-amp plug fanned out by a couple of hardware store-variety power strips. Also, this arrangement has the advantage that all ground points are at exactly the same voltage level, which helps prevent ground loops (unwanted current between ground points). Again, be sure the strips are three-wire, grounded types.
Lighting is another very important factor that shouldn't be ignored. While it might seem obvious that the entire room should be brightly lit, that is not the most productive approach, as it can actually make it harder to see small details that need to be scrutinized and, therefore, brighter than their surroundings. Average lighting in the room is adequate. What you need most is spot lighting, and the best solution is a fluorescent light on a swing arm, as shown in Fgr. 1. If it has a magnifier, all the better, but you'll be wearing one anyway, so it's not necessary.
Forget about using an incandescent bulb; the heat it produces will cook your hands, your face and the gadget you're trying to fix. An inexpensive way to obtain the necessary lighting is to get a swing-arm desk lamp and replace its incandescent bulb with an "eco bulb," one of those now-ubiquitous spiral light bulb replacements. Be aware, though, that many eco bulbs have a rather yellowish tint and also put out a fair amount of ultraviolet light, so using one close to your eyes may not be comfortable.
Plus, they operate at a high frequency and can emit significant short-range radio frequency energy capable of interfering with some kinds of measurements or even the circuit under test. The old circular, bluish-white fluorescent lamp is still your best bet.
Digital Multimeter (DMM)
A multimeter is a device that can test several electrical parameters. The most common and important quantities you'll need to measure are voltage (volts), resistance (ohms) and current (amps or, more typically, milliamps, which are thousandths of an amp). The analog incarnation of this test device, recognizable by its big meter needle and multiple-stop selector knob, used to be called a VOM (volt-ohm-milliammeter). Now that the meters are digital, they're usually called DMMs (Digital Multi Meters), but they do the same thing, except that the readout is numerical instead of something interpreted from the position of a meter needle.
DMMs began as very expensive, high-end laboratory instruments, but they're cheap now and pretty much all you can buy. The market positions have reversed, and VOMs have become the exotic technology, with a good one selling for considerably more than a digital. Hardware stores and RadioShack (a.k.a. The Shack) offer DMMs for around $20 to $50, and they're on sale on occasion for as little as $5. Some, however, can still be in the range of $200 or more. The expensive ones may have the ability to test various other parameters like capacitance and inductance, but mostly what they offer are much higher precision and accuracy.
Precision and accuracy are two different things. Precision is the fineness to which a measurement is specified, and accuracy is how truthful the measurement is. For instance, if I say, "It's between 60 and 80 degrees outside," and the actual temperature is 72 degrees, my statement is not very precise, but it's quite accurate. If, however, I say, "It's 78.69 degrees outside," and it's really 82 degrees, my statement is very precise but not at all accurate.
So, for a DMM to specify that it measures voltages to three digits to the right of the decimal point, it has to have a basic accuracy of somewhere around a thousandth of a volt. Otherwise, those pretty digits won't mean much! Who on Earth would build an instrument that displayed meaningless numbers? Makers of low-cost DMMs do it all the time. The digits make one manufacturer's unit look more desirable than another's, but the basic accuracy doesn't support them. Does it matter? Not really, as long as you are aware of the limitations of the instrument's basic accuracy, so you know what to ignore toward the right side of the display. In any event, all DMMs, even the cheapies, are both more precise and more accurate than any VOM ever was.
Just how much precision do we need? For general service work, not a lot. When things break, they don't do so in subtle ways. For example, if you're checking the output of a 5-volt power supply, and your DMM reads 5.126 volts, that's not cause for concern. If it reads 3.5 volts or 7 volts, then perhaps you've found a problem! Bottom line: you don't need a $200 DMM. The $20 to $50 instruments will do fine.
Oscilloscope
Many hobbyists feel intimidated by the oscilloscope, but it’s the best buddy any tech can have. Repeat after me: "My scope is my friend." Come on, say it like you mean it! Once you get the hang of using one, you will love it, I assure you.
The basic function of an oscilloscope is to generate a graph of voltage versus time. As a spot sweeps from left to right across the screen at a constant rate, it also moves up and down in relation to the incoming signal voltage, drawing a waveform, or representation of the signal that shows you how the voltage is changing. The maximum rate of change of the voltage amplifiers driving the vertical motion determines the bandwidth, or how fast a signal the scope can display. Most scopes in our range of interest have bandwidths of around 100 MHz (100 million cycles per second). They also have two vertical input channels, meaning they can display two waveforms at the same time. In Section 6, we'll explore how to use a scope-it really isn't hard-but first you have to get one. There are several types.
Analog Oscilloscopes
This is the classic scope with a green CRT (cathode ray tube, a.k.a. picture tube). It displays signals as they arrive and has no memory functions to store waveforms. It doesn't sample them, it doesn't dice or slice them; it just shows them to you, plain and simple. A classic analog scope is shown in Fgr. 2.
Analog scopes have been available since around the 1940s, and they really got good in the 1970s. Some are still being made today, though digital scopes have been at the forefront of the marketplace for a decade or more. Newer is better, right? Not always. The oscilloscope is a good example of an older analog technology being superior in some ways to its replacement. For most general service work, an analog scope is the simplest to use, and its display is the easiest to interpret. Further, it shows details of the signal that digital scopes may miss.
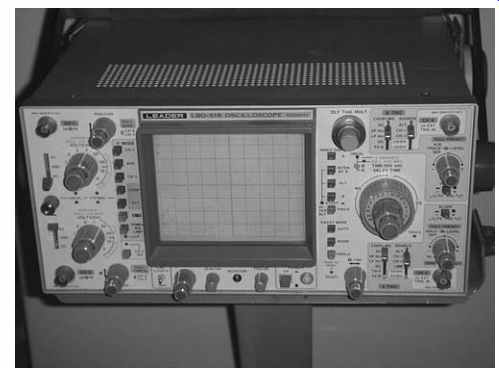
Fgr. 2 Leader LBO-518 100-MHz analog oscilloscope.
The lowest-end analog scopes have just one channel of input, and they lack features like delayed sweep, a very handy function that lets you zoom in on any part of a waveform you want and expand it for detailed viewing. Avoid them. There are tons of great analog scopes with all the nice features on the used market at ridiculously cheap prices, so there's no need to skimp on the goodies. Make sure any analog scope you buy has two channels (some have even more, but two are standard) and delayed sweep. Look for two input connectors marked "A" and "B" or sometimes "Channel 1" and "Channel 2," indicating two vertical input channels. If you see a metal knob that can be turned multiple times and slowly advances a number imprinted on it, or you see "A and B" on the big knob marked "Sec/Div" or "Horiz Sweep," or buttons marked "B after A," "B ends A," or "B delayed," then the unit has delayed sweep. Another tipoff is a knob marked "Trace Sep." If you're still not sure, look up the model on the Internet, and you can probably find its specs or even download a free PDF of the manual.
Digital Oscilloscopes
Digital scopes are new enough that they all have delayed sweep and two channels, except for a few handheld models. Though some early examples used CRTs, modern digital scopes can be recognized by their shallow cases and LCD (liquid crystal display) screens (see Fgr. 3). With a digital instrument, you can grab a waveform and examine it in detail long after it has ceased. Thus, digital scopes are ideal for working on devices with fleeting signals you need to be able to snag that may zip by only once.
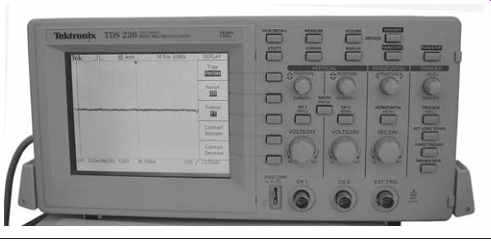
Fgr. 3 Tektronix TDS-220 100 MHz digital oscilloscope
Such is almost never the case in the kind of service work you'll be doing. The vast majority of the time, you will be looking at repetitive signals that don't have to be stored, and the limitations of a digital scope may get in your way.
One significant limitation arises from the basic nature of digital sampling, or digitizing, in which a voltage is sampled, or measured, millions of times per second, and the measured value of each sample is then plotted as a point on the screen. Alas, real-life signals don't freeze between samples, so digital scopes miss some signal details, which can result in a phenomenon called aliasing, in which a signal may be seriously misrepresented. (This is the same effect that causes wagon wheels in old Westerns to appear to rotate backward-the movie camera is missing some of the wheels' motion between frames.) If the sampling rate is considerably faster than the rate of change of the signal being sampled, aliasing won't occur. The sampling rate goes down, though, as you slow the sweep rate (speed of horizontal motion on the screen) down to compress the graph and squeeze more of the signal on the screen. As a result, when using a digital scope, you must always keep in mind that what you're seeing might be a lie, and you find yourself turning the sweep rate up and then back down, looking for changes in the waveform suggestive of aliasing. It takes some experience to be certain what's on the screen is a true representation of the signal. Even so, sometimes aliasing is unavoidable at lower sweep rates, limiting how much of the signal you can view at once-a conundrum that never occurs with analog scopes.
Another big limitation arises from the screen itself, and it also limits how much notice at one time. Unlike the continuously moving beam of the analog scope, the digital scope's display is made up of dots, so it has a fixed resolution, and nothing can be shown between those dots. (That's why the sampling rate goes down at lower sweep rates; there's no point in taking samples between dots, since there's no place to plot them anyway.) When examining complex waveforms like analog video signals, the result is a blurry mess unless you turn the sweep rate way up and look at only a small part of the signal. While an analog scope can show a useful, clear representation of an entire field of video, a digital instrument simply can't; all you see is an unrecognizable blob.
Probably the most profound difference between an analog and a digital scope is that an analog instrument actually writes the screen at the sweep speed you select, while a digital unit does not. A digital collects the data at that speed, but it updates the screen much slower because LCDs don't respond very fast. For many signals, that's fine, and it can even help you see some signal features that might be blurred by repetitive overwrites on an analog screen.
Sometimes, however, those overwrites are exactly what you want. When viewing the radio-frequency waveforms coming from video and laser heads, for instance, you need to evaluate the envelope, or overall shape of the waveform over many cycles, not its individual waves. The overwriting and true-to-life writing speeds inherent in an analog scope make envelopes stand out clearly. Some envelopes can't be viewed at all with a digital, because it misses too much between screen updates. You'll see individual cycles of the waveform, but not their outer contour, unless you slow down the sweep rate so low that all you get is a featureless blur.
On the plus side, digital scopes are naturals at measuring waveforms, not just displaying them. They can provide a numerical readout of peak voltage, frequency, time difference, phase angle, you name it. While all of those measurements can be done with an analog scope, the computer in that case is your brain; you have to do the math, based on what you're seeing on the screen. With a digital scope, you position cursors on the displayed waveform and the scope does the work for you. Having quick and easy measurement of signal characteristics can greatly speed up troubleshooting.
When choosing a digital scope, look for the sample rate and compare it to the vertical bandwidth. The sample rate should always be higher than the bandwidth so the scope can perform real-time sampling. The Tektronix TDS-220, for example ( Fgr. 3), samples at 1 gigasample (billion samples) per second, with a bandwidth of 100 MHz. Thus, one cycle of the fastest waveform it can display will be broken into ten samples, which is pretty good. At a minimum, the sample rate should be four times the bandwidth.
It’s possible to sample repetitive waveforms at a rate slower than the bandwidth using a technique called equivalent-time sampling, in which each successive waveform is sampled at different points until the full representation is assembled. Equivalent time sampling was developed when analog-to-digital converters were too pokey for real-time sampling of fast waveforms. It’s an inferior technique, because developing an accurate representation requires the incoming signal to remain unchanged from cycle to cycle for as many cycles as it takes to assemble one. Plus, what you see is never a true picture of any one particular cycle. And, heck, it's just plain slow. Avoid any scope depending on it to reach its bandwidth specs. Real-time sampling is the only way to fly.
Analog with Cursor Measurement
This is the best of both worlds: an analog scope capable of performing many of the measurements available in a digital instrument. This style of scope doesn't digitize signals, thus avoiding all of the limitations associated with that process. Like a digital, though, it uses movable cursors to mark spots on the displayed waveform and calculate measurements. This is my favorite type of scope.
Analog with Storage
Before the advent of digital scopes, some analog units were made with special CRTs that could freeze the displayed waveform, enabling a crude form of signal storage.
These scopes were expensive and always considered somewhat exotic. Digital storage has completely supplanted them.
PC-Based ‘scope
The PC-based scope uses your general-purpose computer as a display and control system for a digitizing scope. It seems like a great idea, because you get a nice, big, high-resolution screen, and you can use your computer's keyboard and mouse to control the features. Plus, PC scopes are cheaper, since you're not paying for knobs and an LCD. In practice, PC scopes are the worst option for service work. They're awkward to use and usually offer the lowest performance in terms of sampling rate. I recommend you avoid them.
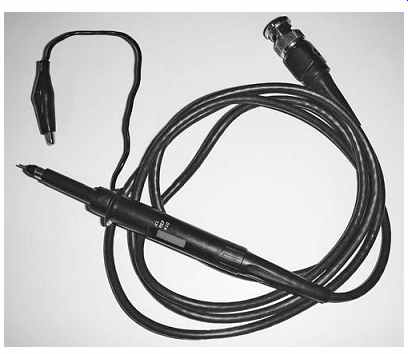
Fgr. 4 Oscilloscope probe, 10X/1X switchable
Pocket 'scopes; Smartphone and Tablet-based 'scopes
Buying an Oscilloscope
New scopes are fairly expensive. Expect to pay around $1000 for a 100-MHz instrument.
But why spend a lot when there are so many nice scopes on the used (eBay) market for next to nothing? It's quite possible to get a good used scope for about $100.
There are plenty of scope manufacturers, but the gold standard in the oscilloscope world is Tektronix. Tek has dominated the scope market since the 1970s, and for good reason. Many of its model 465 and 475 scopes from that era are still going strong, more than 30 years later! If you find one of those models in good working order for less than $100, it's worthy of consideration. Much newer models are also available, including the 2200 and 2400 series, and they're pretty cheap too. Other good scopes are made by Hitachi, Hewlett-Packard, B&K Precision and Leader. Fluke, famous for its DMMs, makes a series of handheld digital scopes, too, as does Tek. They're a tad pricey, though, and a bit harder to use, thanks to their extensive use of menus, since they have little room for knobs.
Where do you find a used oscilloscope? Good old eBay is loaded with them, and they show up now and then on craigslist.org. Try going to your area's hamfest, a periodic swap meet put on by ham radio operators and electronics aficionados, and you'll see plenty of scopes. Just be sure you can check that the instrument works properly before you plunk down your cash. Read Section 6 first so you'll know how to test the scope. Look for a nice, sharp trace and no lines burned into the display tube, if the scope uses one.
Along with the scope, you'll need a pair of probes. Scope probes are more than just pieces of wire; they have voltage dividers in them and are specialized devices designed to permit accurate signal measurement. Most divide the incoming voltage by 10 (you'll see why later) and are called 10X probes. Some have switches to remove the division, and are known as switchable 10X/1X probes (see Fgr. 4). Like scopes themselves, probes are rated by bandwidth, and the high-end ones can cost a lot.
Luckily, 100-MHz probes can be found on eBay brand new for around $15 each. New probes will include slip-on covers with handy hooks on the ends. If you buy used probes, try to get the hooks too.
Soldering Iron (Soldering Staion)
Soldering irons come in various shapes and sizes, and you'll probably wind up with more than one. The smallest, with heating elements in the 15-watt range, are great for getting into very tight spots and working on tiny surface-mount parts, at least on boards assembled with low-temperature solder. Those irons don't generate enough heat to solder a power transistor, though. The largest irons, usually pistol-shaped guns with elements of 100 watts or more, put out lots of heat and have sizable tips to transfer it to the part you're soldering. Those big guns can be real life-savers, but you sure don't want to try soldering minuscule parts with them. Even if you could fit the tip where you needed it, the excessive heat would destroy the part and probably the circuit board as well.
The best choice for general soldering work on printed circuit boards is an iron with a medium-sized tip and a heating element in the range of 40 to 70 watts. Melting leaded solder requires a tip temperature of about 375-400 °F. The newer, lead-free variety needs a much hotter tip, in the area of 675-700 °F. Some inexpensive irons in the 20-watt range are about the same size, but steer clear of those. Supplying inadequate heat can cause lots of harm; you may easily pull up copper traces and severely damage the printed circuit board if things aren't hot enough, especially when removing components. Plus, not using enough heat can result in "cold" solder joints that don't transfer electrical energy properly, causing your repair to fail.
Many inexpensive irons of medium size plug directly into the wall. This is not the best way to go, as it may expose the circuitry you're soldering to small leakage currents from the AC line, and having the cord go off to a power strip can be awkward as you move the iron around. Finally, should you accidentally lay the iron on the cord and melt through the insulation, you'll cause a short directly across the AC line, which is likely to be spectacular and unpleasant, and possibly dangerous. Don't laugh, it happens! A far better solution is an iron that plugs into a base unit with a step-down transformer. This kind of setup runs the heating element at low voltage and isolates the tip from the AC line. The base unit gives you a nice stand to hold the iron and a sponge for wiping the tip, too. Some bases have variable heat controls, and some even have digital temperature readouts. Before the age of lead-free solder, I never found such things to be useful, because the heat pretty much always needed to be turned all the way up on smaller irons anyway. These days, a variable-heat soldering station that can hit the temperatures required for lead-free soldering is well worthy of consideration.
Numerous companies make soldering irons, but two make the nicest, most durable irons, the ones found in service shops: Weller and Haiko. These irons can cost from $50 to more than $100, but they are worth every penny and will last for many years.
Your soldering iron is usually the first thing you turn on and the last you turn off, so it will run for thousands of hours and needs to be well-made. Don't be tempted by those $20 base-unit irons flooding the hobbyist market. They just don't hold up, and you'll be needing a new one before you know it.
As with scopes, good used irons often show up at great prices at hamfests.
Wherever you get your iron, plan on buying a spare tip or two. Tips wear out and become pitted and tarnished to the point that they no longer transfer heat well, so they must be replaced every few years. The heating elements can go bad too, but it's rare; I've seen them last for decades on the good irons.
The big guns are cheap, typically under $20, so buy one. There will be situations in which you will be very glad you did.
Plastic-Melting Iron
Sooner or later, you'll want to melt some plastic to repair a crack or a broken post. It's unhealthy to breathe in molten plastic fumes, but we all melt the stuff now and then, being as careful as we can with ventilation. If you're going to melt plastic, don't do it with the same iron you use for soldering! The plastic will contaminate and pit the tip, making it very hard to coat it with solder, or tin it, for subsequent soldering work.
Instead, pick up a cheap iron in the 20- to 30-watt range and dedicate it for plastic use.
For this one, you don't need a base unit or any other fancy accoutrements. You should be able to get a basic iron and a stand to keep it from burning its surroundings for around $10.
Solder
Traditional solder is an alloy of tin and lead with a rosin core that facilitates the molecular bond required for a proper solder joint. In the past, the alloy was 60 percent tin, 40 percent lead. More recently, it has shifted to 65 percent tin, 35 percent lead.
This newer type of solder is better suited to the lower temperatures associated with tiny surface-mount parts, and it's getting hard to find the old 60/40 stuff anymore.
The old proportions were better for the higher-heat environment of power transistors and voltage regulators. If you can find some 60/40, it's worth getting. If not, you can live with the newer variety. Lead is a toxic metal, and lead-free solder has become available and is widely used in the manufacture of new electronics, to comply with the legal requirements of some countries and states. The European "Restriction of Hazardous Substances" or RoHS standard is gradually being adopted around the world.
All products displaying the RoHS mark are made with lead-free solder. You can buy the stuff for your repair work, but I recommend against doing so, because it's hard to make good joints with it. It doesn't flow well, and cold joints often result. Plus, the higher heat required to melt it invites damage to the components you're installing.
Lead vaporizes at a much higher temperature than that used for soldering. The smoke coming off solder is from the rosin and does not contain lead you could inhale.
Handling solder, however, does rub some lead onto your hands. So never snack or touch food while soldering, and always wash your hands thoroughly after your repair session ends.
There is a variety of solder, found in hardware stores and intended for plumbing applications, with an acid core instead of rosin. Never use acid-core solder for electronics work! The acid will corrode and destroy your device. By the same token, the rosin flux paste used with acid-core solder is not needed for normal electronics solder, because rosin is already in its core.
Solder comes in various diameters. A good choice for normal work is around 0.03 inches. Very small-diameter solder, in the 0.01-inch range, can be useful now and then when working with tiny parts, but not often. For most jobs, it's so undersized that you have to feed it into the work very fast to get enough on the joint, making it impractical to use. My own roll of the skinny stuff has been sitting there for a decade, and most of it’s still on the roll.
Solder is like ketchup: you'll use a lot of it. Buy a 1-pound roll, because it's a much better bargain per foot than those little pocket packs of a few ounces. A pound of solder should last you a good few years.
Desoldering Tools
Removing solder to test or replace parts is as vital to repair as is soldering new ones to the board. Desoldering ranges from easy to tricky, and it's a prime opportunity for doing damage to components and the copper traces to which they're attached. Fancy desoldering stations with vacuum pumps can cost considerably more than even top end soldering irons. For most service work, though, you don't need anything exotic.
There are some low-cost desoldering options that usually do the trick.
Solder Wick
One of the best desoldering tools is desoldering braid, commonly called solder wick.
It's made of very fine copper wire strands woven into a flat braid. Usually, it’s coated with rosin to help solder flow into it. ( You may run across some cheap wick with no rosin. Don't buy it; it doesn't work.) Wick can be purchased in short lengths on small spools from RadioShack and various mail-order companies. Electronics supply houses offer it in much longer lengths on bigger spools. As with solder, the bigger spools are the far better deal. Always be sure to keep some wick around; it's some of the most useful stuff in your workshop.
Desoldering Bulbs
Another approach to solder removal is to suck it up with a rubber solder bulb, or solder sucker. Bulbs come in two forms: stand-alone and integrated with a soldering iron (see Fgr. 5). Both have their uses, but with the integrated type, you're limited by the heating power of the built-in iron, which is usually not especially strong. Stand alone bulbs are cheap, so get one even if you also get an integrated type.
Fgr. 5 Bulb-type desoldering iron.
Spring-Loaded Solder Suckers
One of the handiest solder removal tools, the spring-loaded solder sucker is another inexpensive option. These bad boys have a fast, almost violent action, and are a bit harder to control than bulbs. They suck up a lot of solder in one motion, though. Get one.
Vacuum Pump Desoldering Irons
These are like integrated bulb desoldering units, except that the suction is provided by a vacuum pump instead of a bulb. The pros use these, and they're fast and powerful, but they're expensive. If you can snag a good used one at a hamfest, go for it. Just be sure the heating and vacuum systems work properly. The vacuum portions are prone to problems and worn parts, because molten solder flows through them.
Chip Quik
This is a special low-temperature solder alloy and flux kit used for desoldering surface-mount parts. When melted into the existing solder, the alloy keeps it molten at low temperatures, allowing you to get lots of pins hot enough simultaneously to remove even high-density chips with dozens of leads.