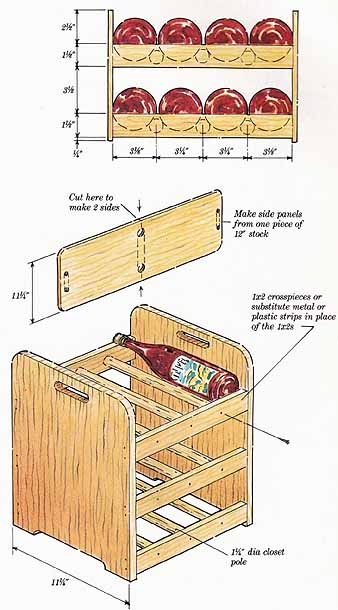
Wine rack: 1x2 crosspieces or substitute metal or plastic strips in place
of the 1x2s; Make side panels from one piece of 12” stock
This easy-to-build wine rack can be used as a freestanding unit, or it can be built into an existing cabinet.
Increase or decrease height and width to fit your needs or the space available for the rack. To do so, lengthen front and back crosspieces in 3¼-inch increments, and the height of the side panels in 3½-inch increments.
Building the rack
Make side panels from a length of 1 by 12 or 2 by 12 stock, the cross- pieces from 1 by 2 stock, and bottle supports from 1 1/4-inch-diameter closet pole.
Drill side panels with starter holes for cut-out handles and leg recesses. Cut panels, crosspieces, and round bottle supports to length. Sand and finish all pieces.
Carefully mark and drill pilot holes in crosspieces and bottle supports. Using 2-inch by No.8 round-head brass wood screws, join these parts to form ladderlike subassemblies. Mark and drill side panels, then screw assembled ladder shelves to them using two 1½-inch by No.6 round-head brass wood screws. Your wine rack is ready to use: a votre sante.
Variations
The materials and assembly techniques for this basic wine rack may be modified in several ways.
- Substitute flat-head screws for round-head screws, but remember to countersink them or to counterbore screw holes and cover heads with wooden plugs.
- Eliminate screws altogether and substitute glued dowels.
- Use metal or plastic horizontal crosspieces. Screw them to front edges of side panels.
Prev.: Slide- or
TV-, Computer-Monitor Projector Cabinet
Next: Sewing Center
Full guide: How to Plan & Build Bookcases, Cabinets & Shelves
Product
Catalog
