Now that you have been walking for six hours, you’d like to find a campsite. If you have already selected a trip from a Wilderness Press trail guide, you probably have tonight’s destination in mind. Or you may have planned your trip yourself, using the principles discussed earlier. The features most people consider in choosing a campsite are listed below, not necessarily in order of importance:
- view
- water supply wood supply ground cover
- dead trees and limbs that might fall potential rock fall
- bedsites
- weather probabilities
- nighttime temperature at your bedsite probable wind direction and intensity
- exposure to morning and afternoon sun ecological considerations
- kind of soil and rock around the fireplace site swimming
- fishing
- recreational and educational opportunities nearby pest problems
- degree of remoteness
- man-made conditions versus natural ones
- general feel of the area
No campsite in the world is right on all these features, but quite a few are right on more than half, and where you choose to camp depends on which features are more important to you. These considerations, moreover, will vary with the time of year. If you like to catch fish but haven’t done well yet this year, you’ll be especially eager to camp near the shores of some water where you believe the trout are biting. If it’s early or late in the season and the night might get too cold for you, you will want to camp up on a bench a few yards from the lowlands, where the mini mum temperature may be 10 degrees higher. If you have seen too many people on the trail, again you will want to camp where you’ll find solitude and perhaps a better view as well.
On the other hand, an already-developed campsite may have a fireplace, level bedsites and places to sit. In addition, the last person may not have used all the wood he brought in. So if you are especially tired, a much-used campsite will seem quite attractive. And you don’t have to dismantle it the next morning in order that no one will know you were there. More and more, highly used campsites are permanent fixtures in the wilderness. But if you are going to build a fireplace that blackens some rock, and level a place for a bed where no one, as far as you can see, ever slept before, it is your responsibility to remove all evidence that you did camp there, so that the next hiker will find the place as much a part of real wilderness as you did.
When given a choice between a well-used site and a spot that has been used only once or twice, choose the well-used one. Evidence of your passing will be negligible compared to the more vulnerable slightly used site, which could recover if left untouched.
Of course you will not have constructed a house, shack or lean-to of limbs and boughs because you know they belong in the history books with the pioneers.
Water
Being near a stream shortens the water-carrying chore, of course, and it also gives you the nicest of all wilderness sounds to go to sleep by and wake up to. Being near a lake only shortens the walk for water. If you like to fish or swim, the third virtue of camping near water is obvious. Unfortunately, almost everybody wants to camp beside water, so campsites there are by far the most used. As a result, camping is prohibited within at least 100 feet of many lakes and streams. Ah, well, the music of a large stream is quite loud enough even several hundred feet away. Be sides, by conscientiously choosing your campsite, you’ll be doing your part in preserving these lovely and fragile areas.
Exposure to Wind
In the mountains, wind is both good and bad. When the weather is hot or the mosquitoes are swarming, you want at least a breeze. When it is cold or stormy, a wind is piercing. Places where the wind often blows heavily in the same direction are indicated by lopsided trees—more foliage on the downwind side. Much more common than strong prevailing wind is daily change of wind direction: the wind blows up the canyon during the day and down the canyon at night. If you want to minimize the wind in your camp at night, pick a place in the nighttime lee of a grove of trees or behind large boulders. Orient your fireplace with the day-night wind shift in mind.
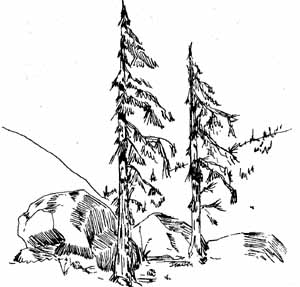
Fig 9-1 wind blows left to right
Exposure to Sun
Since nights are cool or cold in most backpacking country, you will enjoy beyond words a warm morning sun shining on your just-up, sleepy body. A campsite at the east or southeast edge of a stand of trees will be bathed by welcome morning sun but shaded from the hot afternoon sun. If the night will be cold, don’t camp outside the trees, but just at the edge, for the trees hold in some of the day-gathered heat all night long.
Cold
Since cold air sinks, hollows are colder than the slopes above them. If you study plants to learn which ones like warmth the most, you can find the warmest spots in an area by finding those plants.
Runoff Channels
A rainstorm of any size will feed many freshets, and you don’t want to be camping in their runoff channels. In addition, low spots can fill with water, creating small lakes. If there are some channels and low spots in the campsite you choose, at least don’t locate your kitchen, your campfire or your bedsite in one of them.
Dead Limbs
The dead tree limbs you see on the ground were broken off by wind or by the weight of snow. Don’t camp right under a tree that has any dead limbs which you think might come down in a high wind.
Making Camp
Now that you have selected your campsite, you are eager to reconnoiter, rest, fish, take pictures, or talk. Do none of these yet. Do what must be done.
First, remove your sleeping bag from its stuff sack, shake it to restore its loft, and spread it out. Then choose a spot for your kitchen area. A large, flat rock with places nearby to sit, or a similar log, seems to be ideal. I like to keep the view potential in mind when choosing my kitchen area. If you’re planning to build afire, unless the campsite is an established one, you must choose a kitchen area where your fireplace will have the minimum impact. Gathering wood and making the fireplace, or rearranging the existing one as needed, is part of preparing the kitchen area, which is the next step. See “Building a Campfire” for details.
Next, lay out the dinner food and cooking utensils near the fireplace. Keep as much food (and nonfood) as possible in your pack, and keep each thing always in the same place in the pack. Dedicated “filing” will not only keep things where you can locate them immediately; it will keep them clean and unbroken, and safe from little animals. Animals, of course, need food, including salt—which they may try to get by chewing your boots or your fishing-rod handle. Furthermore, some rats and some birds like to take away shiny things, and yet other animal predilections, still unexplained, lead to what humans call “theft.”
Now, locate your bedsite. If you are really tired, which is likely on your first trip, you will think that you could sleep on a bed of nails. It’s true you could go to sleep on such a bed, but after a few hours you would regret not having made yourself a better bed.

Fig 9-2 just right for morning
So choose a level spot. If the best spot is not level enough, build up the low end; don t excavate the high end, for that would leave your torso sleeping on bare, damp earth, and would create scars in the earth which you would have to repair before leaving. If it’s impossible to make a level bed, put your head uphill. Pick up all, little rocks, twigs, etc., which might press up through your foam pad or puncture your air mattress. You don’t have to pick up every pebble, but if in doubt pick it up. In any event, don’t have a hump under your body. In fact, a slight trough where you lie is even better than a flat surface.
Now, pitch your tent or other shelter where you have chosen your bedsite. You will have practiced pitching your tent at home, so it should go up easily. On warm nights, when I want to sleep under the stars, I use the body of my tent, unpitched, as a ground cloth so I don’t have to carry one to keep my sleeping bag and pad clean. Don’t string cord where people are bound to walk— or, if you have to, at least tie something white to it, so everyone will see it, even after dark.
If your tent site is too rocky to allow using stakes to pitch your tent, you can still use your tent. Attach cord to the tent’s stake loops and tie them off to large rocks. Use rocks light enough to carry, but heavy enough to hold the tent in a wind without losing tautness. This method allows you to pitch your tent anywhere, even on solid rock, provided there are enough loose rocks avail able. Remember to replace these rocks where you found them when you break camp.
To pitch a tube tent, see Section 2. How you pitch a tarp depends on how many people will be under it; what trees are around, if any; how hard the wind is blowing, and from what direction— among other things. Basically, you will have to think about it, and then improvise.
Now, one chore remains before cooking and eating—preparing your food storage system. Do it now so that after dinner you can easily hang up your food, cooking utensils and fragrant personal items like lip balm and toothpaste. This is most important in bear country, but you should also be wary of smaller mammals looking for treats in your pack and gnawing holes in your gear on their way in. These small mammals may also nibble at your pack and sweaty clothes looking for salt from where you perspired.
Because of bear problems in some backcountry areas, managing agencies have installed tall poles, cables and bear-proof containers not only to protect backcountry users’ food but also to protect the bears. Once a bear learns to associate humans with an easy meal, it may become a nuisance, requiring its relocation to another area. This is disruptive to the nuisance bear and neigh boring bears. In the worst case, the bear is destroyed. It is the wilderness users’ responsibility to protect themselves and the bears with correct food storage techniques.
Most people hang their food from a tree limb, but a really smart bear can get almost any hanging food. Hence, if possible, use either of two surer methods. The first is to put your food on a high ledge. Bears can’t climb steep cliffs. If there are no high ledges around, or if you are a poor rock climber, look for a deep crack in a large boulder. The crack should be less than 9 inches wide and at least 4 feet deep. Use a stick to push your food sack beyond a bear’s reach, and in the morning lift the food out with the same stick. Just be sure you don’t make your food irretrievable by you.
Lacking ledges and cracks, use the counterbalance method of hanging food. Find a sturdy tree limb at least 20 feet up. (In some national parks, the authorities have installed cables, which you can use instead of tree limbs.) Put your food in two sacks. Then follow the procedure outlined in the captions of the diagrams below.
If you have done it right, both bags will be at least 9 feet off the ground. In the morning you can push up one sack until you can reach the other.
If a bear does get your food, don’t try to take it back! He will guard it as his own.
These bear-bagging methods are also effective against raccoons. A recent invention is the bear-resistant container which back packers can carry in their pack. Weighing under three pounds, it can store about 3-5 days worth of food. At night, place the container far enough from your sleeping site so the bear won’t be startled by waking campers. The bear needs time—about 10 to 20 minutes—to discover it is not a food source. These containers can be rented in some of the more bear-prone areas, and are required in a few of the most notorious bear areas. If you plan much hiking in bear country, these bear-resistant containers are avail able for purchase (see Section I).
If you happen to be camping in grizzly country, bear-bagging is essential not only to ensure your food supply but for personal safety as well. Items to put into your bearbags include all your food; cooking utensils; chapstick, lotion, toothpaste, and other non-food but “sweet” smelling items; and any clothing that had food spilled or wiped onto it. Don’t underestimate the bear’s ability to sniff out the most obscure items that it may think are food.
All bears are potentially dangerous. It is important to follow these precautions so that a bear, with its excellent sense of smell, won’t be tempted to investigate your “sweet” smelling campsite. In its search for food, it may discover you in your sleeping bag. Careful camping techniques can prevent your own injury as well as the unnecessary destruction of a bear that’s become trouble some.
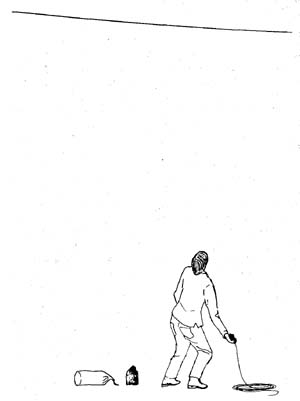
Fig 9-3 Tie one end of the parachute cord to a rock and throw it over
a limb or cable. If a limb, rope should be 8 feet from trunk.
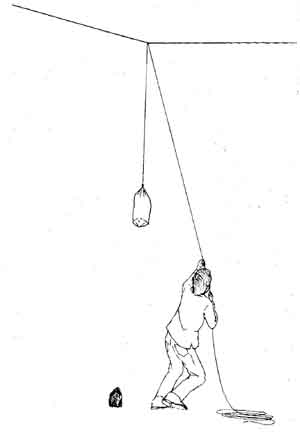
Fig 9-4 Untie the rock and tie on the heavier food sack. Then hoist
the sack as high as you can.
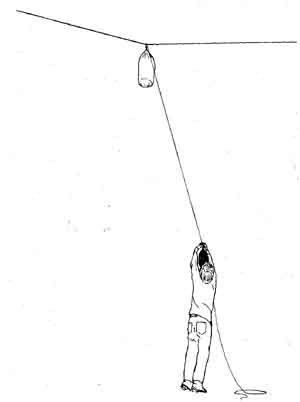
Fig 9-5 Tie the lighter food sack onto the cord, as high up as you can
reach. Two persons make this step much easier. Stuff all remaining cord
into the food sack.
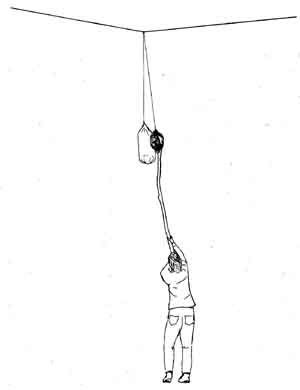
Fig 9-6 With a stick, push the lighter sack up until it is as high as
the heavier one.
Building a Campfire
If you build a campfire, you should not leave a trace of it. If there’s an established fire ring where you camp, use it. If you want to build a fire ring, any of the following methods will en sure minimal impact.
Flat Rock Method: Carefully gather enough clean mineral soil to cover, several inches thick, an area slightly larger than the fire will occupy. Spread the soil on a flat rock—if there’s one large enough—or on exposed bedrock and build your small fire. Don’t ring your fire with rocks, as they would be permanently blackened, and if you really need rocks to support your grate or pots, use only a few and replace them where you found them when breaking camp. Burn all the wood completely. When the fire is out, crush the ashes, mix them with clean mineral soil, and scatter this mixture. Then remove the soil base and rinse the rock.
There should now be little trace of your fire.
Pit Method: From an area about 12 by 24 inches, remove the sod or topsoil in chunks down to where there’s only mineral soil, no organisms. Neatly arrange the chunks so they’ll be easy to put back when you break camp. Remove all burnable materials near the pit and cover the sides of it with underlying bare soil to pre vent drying of the surrounding vegetation. Moisten the vegetation if it shows signs of drying. Build your fire in this pit and be sure to burn all wood completely. When breaking camp, follow the same procedure with the ashes as above. Replace the soil and sod you removed from the pit, to re-create the surface as it was before you cut into it. Landscape the area with leaves, twigs, or whatever originally covered the ground.
Surface Method: If there is plenty of bare mineral soil avail able without excavation, you won’t need to disturb the topsoil by digging a firepit. As with the flat-rock method, simply spread several inches of carefully gathered mineral soil over the area where you’ll build your fire, and make your fire as usual. Burn all wood completely, crush remaining coals, mix them with clean mineral soil, and scatter. The campfire area should look undisturbed when you’ve removed the soil base and landscaped the area.
In areas with established fire rings, try to make as little impact as possible. Build a small fire, and completely burn all wood. Don’t enlarge the fire ring. Leave the area looking more natural than when you found it. If there is more than one fire ring in the area unnecessarily, take all but one apart, scattering the ashes, rocks and “furniture” that’s been moved around the fire ring. The wilderness experience of later visitors depends on visitors taking responsibility for maintaining or restoring the area’s pristine quality. Being a conscientious fire builder is part of that responsibility.
How you gather wood depends on whether there is plenty of dry wood. If there is, gather from the ground enough wood of various diameters, and break it all into fireplace lengths, before starting the fire. Gather only down wood—fallen wood. Even if purists protest, use some paper as kindling. (For use in the fire next morning, keep your paper covered against the nighttime dew.) On the paper put some pine needles, if any are around. On the needles put twigs, up to 1/8 inch in diameter. You want the whole to be as loosely packed as possible. Now light it. When it is burning, add larger and larger pieces until you have the fire you want. Don’t smother the little flame by adding wood too soon. But do blow on the base of it with a steady air stream to supply oxygen, and do shelter it from gusts of wind.
If the wood where you’re camping is damp from recent rain or snow, look under fallen logs and in the shelter of boulders for enough kindling to get the fire going. As a last resort, and only in emergencies, break off dead wood from the lower trunk of a live tree. (The reason I say “last resort” is that breaking limbs off a tree, even dead limbs, is bad conservation practice.) With your knife, cut slanting notches into sticks that are not wet clear through to allow the flame to reach dry wood. Again using paper, pile the kindling loosely and proceed as you would with all-dry wood. If you have brought a candle, its flame will help get the fire going. Once you have a healthy fire, you can dry out more wood by piling it near the fire.
If rain threatens at night, cover the wood supply with a plastic sheet, held down by rocks.
Sleeping Warm
In a good sleeping bag, you will be warm on a cold night even if you err in locating your bedsite. You can also get away with going to bed in damp clothing, such as the underwear and socks you sweated in on the trail, but if you have clean ones, put them on.
In only a fair sleeping bag, you will have to be more careful. First, keep the bag dry. Second, keep it well fluffed up when it’s not in your pack. As soon as you make camp, shake out your bag.
Having fluffed your bag, you can do some other things to en sure warm sleep. First, don’t go to bed hungry or thirsty. You need fuel to stay warm. If your sleeping bag has no hood to pull over your head, wear some kind of knit cap or even a balaclava. For cold feet, start with dry socks. If that doesn’t warm them up, put a plastic sack inside each sock. If your whole body is still cold, put on more clothes. You can also use your water bottle filled with hot water to warm you. If all that fails, get up and look for a warmer spot for your bed. Your (and my) natural inclination is to stay in bed and hope to get back to sleep, but it’s better to get up. The warmer spot may be one in denser trees, one a little higher up the nearby slope, or one farther from that snow bank. If you have a tent you didn’t put up yet, that warmer spot will be inside it. And, as I mentioned in Section 2, sleeping together is usually warmer than sleeping alone.
The Toilet
One of the biggest problems created by the increase in back packing is sanitation. Except in far reaches of the back country, one cannot be too careful.
If there is a constructed toilet where you camp, as there now are at many wilderness campsites, use it. If not, copy the cat. Go at least 100 yards from water, trails and camp, somewhere off the beaten path, and dig a hole at least 6 inches deep. To dig, use your heel, a stick, a rock—or a plastic trowel, which I carry for this purpose. After using toilet paper, burn it completely in the same hole. If you’re in a fire danger area, pack it out. This practice avoids the “flags” of toilet paper one sees all too often in the wilderness, and also helps keep down flies. Finally, cover the results. Urinate in a similar place.
Breaking Camp
As soon as you are up in the morning, spread your sleeping bag out to air. Inevitably, some of your body moisture is in the bag’s filling, and moist air would make bad insulation the next time you used the bag. (If you have to pack before sunup, dry your sleeping bag at the lunch stop, or at the end of the day’s hike if that will be early enough for it to dry.) If your tent is at all wet, spread it out to dry. Actually, drying your tent before you pack it is not necessary if you will re-use it the next night, though it will be heavier. But if the tent is wet and will remain packed for several days, it could be ruined by the mildew that will form.
Consolidate all your garbage. Don’t leave anything, even kitchen scraps.
If you built a fireplace, dismantle it as described in “Building a Campfire.” You might even choose to dismantle a fireplace you didn’t build.
Now, remove, obliterate and eliminate all other signs that you have been there, insofar as that is possible. Be creative in restoring the site. Scattering a few pine needles here and there, and brushing out your tracks will give the next visitor that same sense of solitude and wildness that you enjoyed. If you have treated the campsite respectfully, there will be little for you to do. If you have not, no amount of effort can restore the site to its former condition.
The last thing to do is to look all around carefully for anything you may have forgotten. There’s usually something. Five minutes is not too long to spend looking.
PREV: Walking
NEXT: Safety and Well-being
All Backpacking articles
© CRSociety.net