You’ve planned where the case is going to go, you’ve decided on basic proportions and have selected the material; now it s time to choose the special features.
These features will make the case look distinctive and function conveniently. Shelves can be fixed or adjustable. Doors can be flush, paneled, bi-fold, or sliding. The following articles present ideas and many alternatives to individualize the case and make it suitable for your storage needs.
Flip back and forth between this section and the one that follows to select the options, the case, and the look you want to create.
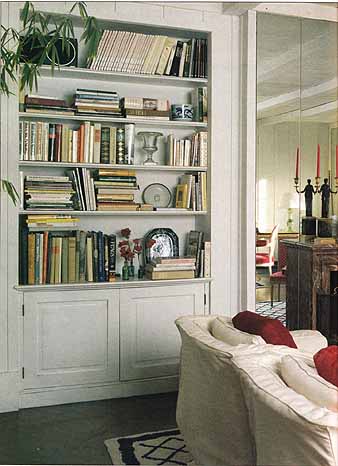

When bookcases are built to exact dimensions they become an integral
part of a wall. Here, face frames match the height of the mirrored fireplace
wall.
Shelves
Shelves are the one element found in all bookcases and in most cabinets. Although simple in concept, they de serve some forethought and planning.
When planning a case intended for storage, measure the items you want to accommodate. It may not bother you that the record albums (12½ inches square) will stick out beyond the edge of an 11½-inch shelf, but you should know this will happen before you build.
Strength
The weight that the shelf will carry is a critical factor in the design. A set of encyclopedias puts a far greater strain on a shelf than a dozen paper backs. An overloaded shelf is not likely to break, but it will sag and destroy the aesthetics of the case, giving it an appearance of instability.
Increasing the strength
You can increase the load-bearing capacity of a shelf in any one of a number of ways.
+ Use solid wood; it’s more rigid than plywood. Particleboard can snap under too much weight.
+ Install fixed shelves rather than adjustable ones. If shelves are tied into the structure of a case, they will be stronger.
+ Reinforce the points where the fixed shelf meets the sides and back of the case with wood cleats or metal brackets.
+ Trim the edge of the shelf with a continuous strip of lumber.
+ Make the shelf thicker. The thicker the lumber, the stronger the shelf.
+ Make the shelf shorter. The greater the span, the weaker the shelf. Even a strong shelf tends to sag under the weight of a full load of books or records if it is more than about 30 inches long.
+ Sandwich 1 by 2 or 2 by 4s between two pieces of plywood or particleboard.
Quick shelf assembly
The one element that all quick shelving units have in common is shelf and side panels of the same width. Whether you use 1 by 10, 1 by 12, or 12-inch-wide strips of plywood, you need only cut the pieces to the proper length to create the unit.
Shelf boards
The illustrations shown represent variations on a simple theme. The 2- by shelf is naturally stronger than the 1-by shelf, all else being equal. But the strength of a 1-by shelf can be increased somewhat by gluing and nailing 1 by 2 boards to the front and back edges. Of course, if the back of the shelf will be supported by a ledger board or cleat, or by clips or brackets, then there is no need to attach a reinforcing board across the back edge. To gain even more strength, and without the added weight of 2-by boards, build a composite shelf with top and bottom layers of tempered hardboard or light weight plywood glued and nailed to a framework of milled or plain 1 by 2 or 2 by 2 stock.
Appearance
Improve the appearance of the shelves by routing a decorative edge on the front of each shelf board. If you don’t have a router, or if you want to cover the edge of plywood or particleboard shelving, simply affix wood tape veneer to the edges of the shelf board, or glue on strips of wood veneer. For a shaped edge, glue and nail on a strip of molding. A number of appropriate moldings are available, including ogee-shaped ones as well as the simple half-round type.

Shelf options: Strong, lightweight shelves with milled structural
edges.
Fixed shelves
In order for a case to have structural integrity, plan on including at least two fixed shelves—one at the bottom and one placed approximately half way up. If flexibility of shelf positions is not a major consideration, the case will be stronger if there are more than two fixed shelves.
Cleats
Whether adding shelves to a niche, a built-in cabinet, or a movable case, the simplest, most economical approach is to attach plain cleats to the inner sides of the storage area, and set the shelf boards directly on them. Unless you attach the shelving to the cleats, they are not really fixed shelves, but you can’t change the location of the shelves without changing the location of the cleats (or adding new ones).
Don’t reject the idea of cleats merely because you don’t like the way they look. Realize that a cleat can be placed relatively inconspicuously under the back edge of a shelf where the support will greatly reduce the chances of a shelf sagging in the middle. You can also rout a pattern into the visible edges of the cleats to improve the appearance.
Dadoes
A freestanding bookcase will be much stronger if the shelves are dadoed into the sides of the case. This joint will also make the shelves a bit stronger.
Make the dado as wide as the shelf is thick, and as deep as one half of the thickness of the shelf (but never cut it more than halfway through the side panel). Because the shelf boards will fit tightly into the dadoes, set in the shelves as you assemble the outer portion of the case. Be sure to have a rubber mallet on hand to use during assembly. Apply glue in the dado, and drive finishing nails through from the outside to secure the shelves.
The front edges of shelves set into dadoes are not particularly attractive. These joints can be covered by attaching strips of lattice or molding along the edges of the side panels.
Stopped dadoes
An alternative version of the dado joint is called a stopped dado. This eliminates the need for trim strips. This joint is appropriate for a simple bookcase design or for a clean, Scandinavian-style design where trim is kept to a minimum. The stopped dado and other joints are described here.

Cleats; Dadoes: Dadoed fixed shelf; Nail trim strip to front of side
panel to cover dado joints; Stopped dadoes: Stopped-dado fixed shelf.
Adjustable shelves
Many methods have been devised over the years for supporting shelves in a way that allows for adjustment.
Notched standards
A traditional method is to use cleats as notched standards. Although not difficult to construct, this support sys tem does require precision cutting that will take time.
The system consists of four notched standards mounted in the four corners of the case. The ends of the cleats (two for each shelf) are cut on an angle to match the notches, and support the shelf at any height.
Using 1 by 2 stock, construct 4 standards and 2 cleats for each shelf. Make the notches by cutting 30/60 degree triangles as shown. If your equipment will handle it, cut 2 or more standards at the same time. Cut cleats with corresponding angles (see illustration) to the desired length (the depth between the front and back standard). Notch the corner of each shelf to allow clearance for the notched standards.
In a bookcase with multiple bays, add cleats and standards at intermediary points to support continuous shelves. Cover fronts of standards with a face frame or trim strips.
Pegs
A more straightforward way to sup port adjustable shelves is to drill into (but not through) the inner sides of the case, insert dowel pegs into the holes, and lay shelves on the pegs.
Use 1/4-inch-diameter, or larger, dowels and space holes every 2 inches or so. Lay out the boards carefully before drilling; misaligned holes will result in crooked shelves. Use a drill guide and a collar stop on the drill bit to ensure that you don’t drill through the side panels.
Clips
A contemporary version of the hole- and-dowel system substitutes L shaped metal clips held in the holes by attached pins.
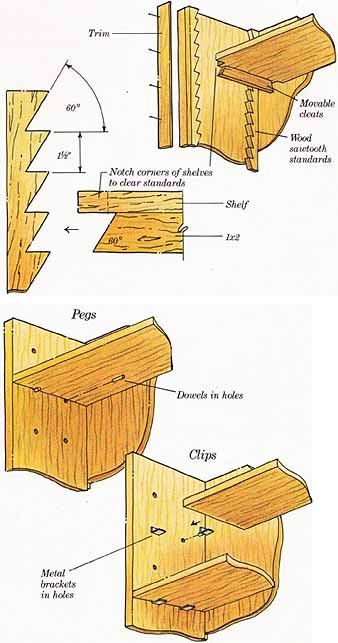
Notched standards; Pegs; Clips: Metal brackets in holes
Metal standards
Track systems for supporting shelves are the most common way of mounting adjustable shelves. By fastening standards directly to a wall and clip ping on support brackets, it is possible to turn nearly any wall into a library or storage area. These standards, available in a variety of finishes including silver, gold, bronze, black, and white, allow you to position shelves in a variety of heights and are quick and easy to install.
Use the vertically slotted standards and brackets for shelves with a long span or for shelves that will carry a good deal of weight. Purchase brackets that correspond to the width of the shelf boards. Keep in mind that because the vertically slotted standards attach to the back panel of your case, you must use material for the back panel that is strong enough to sup port the shelf system. This system works well where a cabinet is built into a wall niche and the standards can be anchored into studs in the rear wall.
In situations where the shelf span is shorter or the load lighter, use the horizontally slotted standards and clips. Install a pair of standards vertically on the inside face of each side wall to support the ends of the shelves. Intermediate standards can be installed in the backs of cases that have one or more vertical dividers in the face frame. Since these intermediary standards are set at right angles to the end standards, the shelf boards must be made narrower or notched to accommodate them.
The appearance of either track sys tem is improved when the standards are recessed into grooves cut or routed into the panels to which they are attached. This is particularly true of the horizontally slotted standards. The brackets used in the vertically slotted system have deeper tangs, which require deeper standards and, consequently, deeper grooves. Before starting construction, make sure the case material is thick enough to accept a deep groove.

Metal standards and brackets: Track and bracket, Vertical slots, For
a more finished appearance, tracks can be recessed into grooves; Clips: Track
and clip, Horizontal slots,
Connectors
Manufactured in L, T, and X shapes, shelf connectors are designed to clip together 1-by boards. Each connector is predrilled with several small holes through which nails or screws are driven into shelf boards.
Clips are available in either plastic or metal in a limited number of colors and finishes. They can, of course, be easily spray-painted any color. When buying connectors, remember to get enough to fasten both front and back faces of the unit.
Using shelf connectors, you can build a freestanding shelf unit or one sized to fit into a cabinet. The look, though rather informal, is suitable for a laundry room or workshop. Or, the connectors can be emphasized by spray-painting them with bright- colored enamel, in one or more colors to make a high-tech statement. Because a cabinet built with clips can be disassembled without too much trouble, this system is particularly appropriate for informal furniture in a dormitory or apartment.
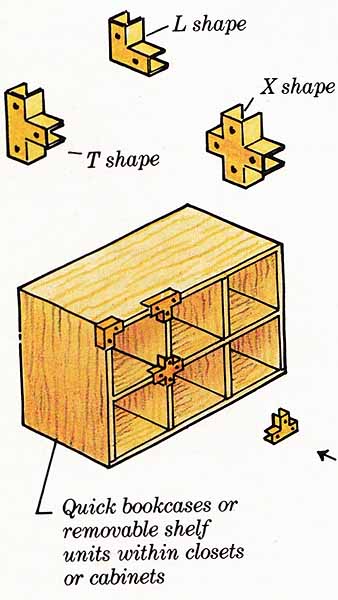
Quick bookcases or removable shelf units within closets or cabinets:
L shape, X shape, T shape;
Wood-block connectors
Create your own shelf connectors out of wood. This simple shelf system will please the youngsters in the family. It is inexpensive and easy to make, can be painted a bright color, and invites youngsters’ participation—at least during the final assembly.
Make 10-inch-square units using vertical-grain fir 2 by 2s for the blocks and 1 tempered hard- board for the panels. The size of the case depends on the number of units built. After painting, glue blocks and panels together, scraping away paint as necessary to get a good bond.
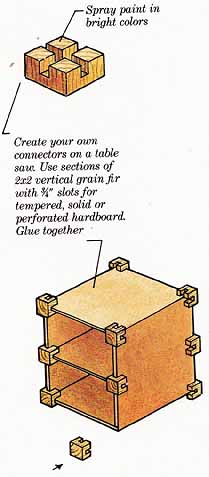
Spray paint in bright colors; Create your own con on a table saw.
Use sections of 2x2 vertical grain fir with ¾” slots for tempered, solid
or perforated hardboard. Glue together.
Metal brackets
The following metal brackets can be found in most hardware stores.
Metal angles
Formed out of flat steel, these brackets are available in L and T shapes.
Use them with 2-by boards to build sturdy shelves that will hold heavy items. Select ¾-inch-wide or larger brackets for 2-by shelving. Secure them to studs, then to shelves, using flat-head wood screws.
Shelf brackets
Shelves can be mounted quickly using metal shelf brackets. These are widely available, usually in gray, in several sizes corresponding to the standard dimensions of shelf boards.
For best results, screw brackets into the wall at points where studs are located. The result is shelving suit able for light, bulky items; too much weight will cause shelves to tip down.
Closet shelf brackets
This variation on the plain shelf bracket is designed to support a closet shelf and a pole on which to hang clothes. Because clothes on hangers make a particularly heavy load, this type of bracket is filled with a welded support bar.
These brackets can also be used in a garage for shelves that hold heavy objects. Screw brackets into the wall at stud locations. As an added feature, two appropriately placed brackets can store a bicycle.
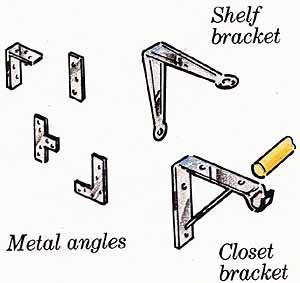
Metal angles; Shelf bracket; Closet bracket
FLOATING SHELVES
For dramatic visual appeal and to make shelves that appear to be cantilevered straight out from the wall, you can support them on pegs. The pegs are screwed into studs in the wall.
However, there are a few things to consider before you decide that this is the project for you.
+ Don’t use this system if you plan to load shelves with heavy items. The primary appeal is visual, not utilitarian. Use this hanging method for shelves that will hold framed pictures, flower arrangements, objets d’art, mementos, and maybe a few small-to medium-sized books.
+ Since the pegs attach to the studs that frame the wall, you need to locate the studs and determine that their placement is suitable for the peg locations. Studs are usually, but not always, spaced at 16-inch intervals, so do some checking. Hardware stores sell stud finders, but if the walls are smooth plasterboard, the locations of nails or screws can usually be found by shining a flashlight beam parallel to the wall surface.
+ When drilling pilot holes into the wall studs, it is very important to avoid drilling into any electrical wires within the wall. Driving a nail into a wire usually results in a short circuit and tripped breaker, but could cause a fire. Drilling into a wire can electro cute you. Be absolutely sure that you have located any electrical wires in the wall, and never drill too close to them. As an extra precaution, turn off the appropriate circuit.
Building the shelves
To build shelves on pegs, first plot out the location(s) on the wall. Next, assemble the materials. Using 1 by 8 stock, cut shelf boards approximately 8 inches longer than the distance between the 2 end pegs.
Making the pegs
Calculate the number of pegs needed (each shelf needs 1- in each stud) and buy enough 1¼”diameter closet pole to yield the correct number of 7¼”-long pegs. Buy the same number of 5/16” by 8-inch-long lag screws as you have pegs, with end caps of your choosing (see illustration). You can make your own end caps—in a diamond shape for instance—by cutting them from scrap shelf board or plywood.
Drill 5/16-inch diameter holes 3 inches into the wall at the stud locations. Use a level to make sure the holes line up with each other. Also use a drill guide to ensure that the holes are all exactly 3 inches deep and perpendicular to the wall.
Insert a lag screw into each hole so that it protrudes 5 inches (not counting the head). Cut off head of each screw with a hacksaw. Alternatively, you can cut off the heads first and use a small pipe wrench to attach screws to the wall.
Using a drill press with the table turned sideways, clamp each peg to the table and drill a 5/16-inch hole 5½-inches into the end of the peg. If you don’t have a drill press, make a bench top jig to hold the pegs, and holes by sliding an electric drill along the bench top. In either case, take care to make the holes straight and centered in the pegs. Glue an end cap onto the non-drilled end of each peg.
When glue is dry, sand and paint pegs and shelf boards. Slide pegs onto lag screws and set shelf boards in place.
If a peg fails to fit snugly, wrap some tape on the shaft of the lag screw. Or, drip a little glue into the drilled hole, let it dry overnight, then slide peg over the lag screw.
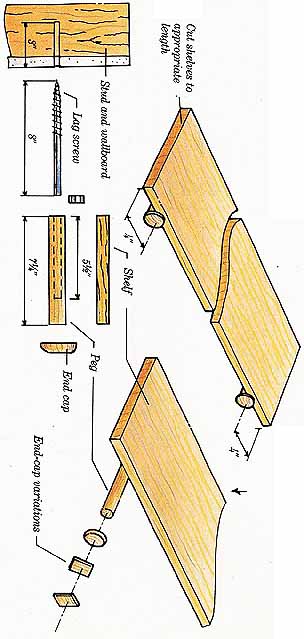
Cut shelves to appropriate length; End-cap variations
Prev.: Plotting Moves
Next: Doors
Full guide: How
to Plan & Build
Bookcases, Cabinets & Shelves
Product
Catalog
